Friday, April 27, 2007

Blow-off Valve mastery and Dynamat artistry
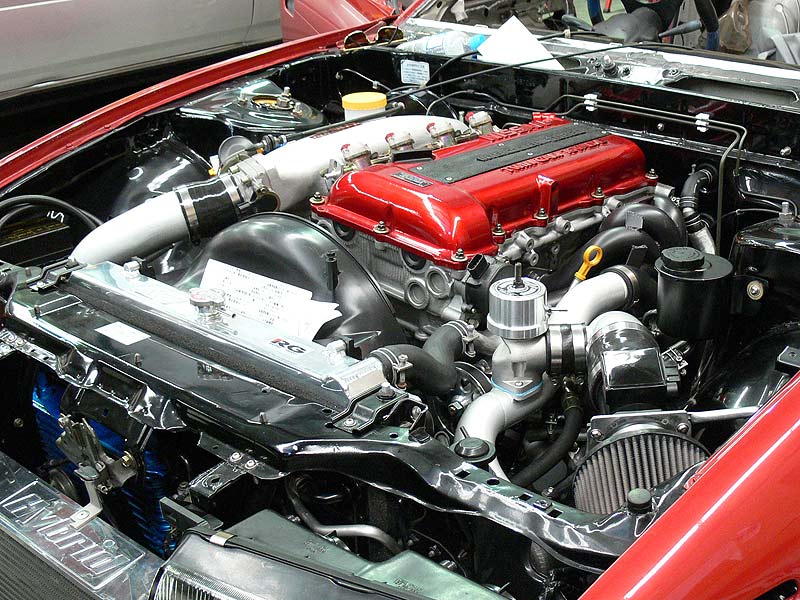
GReddy Type-R BOV installed on SR20DET

First up, sorry about the delay in the posting. I've been on holiday for a week and just haven't had a chance to post up. But now we are now finally able to reveal the BOV setup. This took quite some time to work out mainly because of the size of the GReddy Type-R blow-off valve that I'm using and because I wanted it setup in a recirculating configuration. The pipework was worked up over a couple of days between other things, and then finally painted with the VHT Brake Caliper Silver and Clear overcoat. Jury is still out on whether they would look better in black, but for now they look pretty nice. For the intercooler setup, all the hoses were changed from the blue silicon that came in the Hybrid kit for black Samco silicon hoses. Don't think we've seen another setup like this before but it's neat and tidy.

- Air filer side with Z32 AFM and BOV
- Overhead of GReddy Type-R and pipework
- Intake Plenum intake pipework
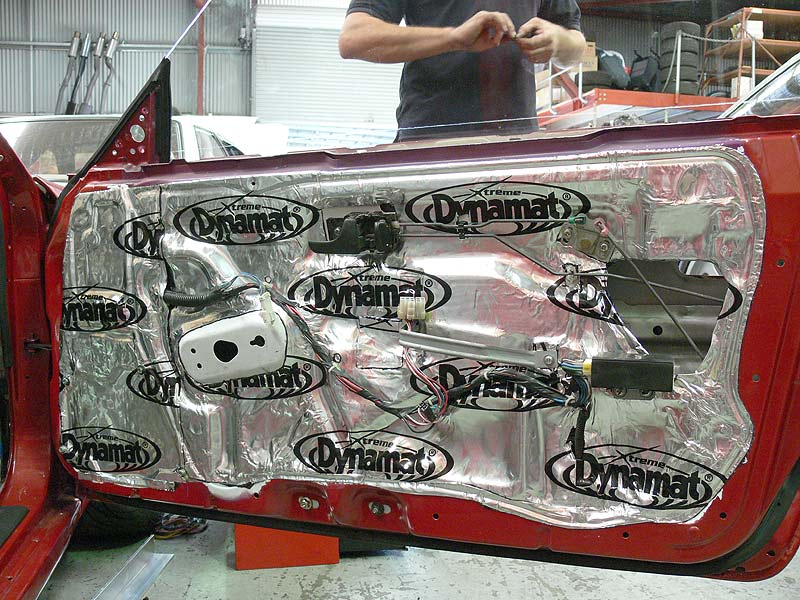
Dynamat applied to drivers door

The next few weeks I'll be focusing on getting the interior ready for stereo and trim, this means covering as much as possible with Dynamat. Some of you might be thinking about all the extra weight it will add, but then I'll just have to turn the boost up. The main reasons for the Dynamat is sound quality from the stereo, and making the interior livable. Just from putting it on the doors and roof, the difference to the way the roof sounds when you tap and the doors feel in closing is amazing. No more flimsy S13. Feeling much more like a Skyline now.

Dynamat Application Pics:
- Drivers Door
- Passenger Door
- Bootlid
- Roof

The firewall, floor, rear wheel arches and boot floor are still to be done, hopefully the amount I have left should be able to cover it.

Just a little extra bit done was the radiator cap. To match the RG Radiator, I've put on an RG Power Radiator Cap.

- RG Power Radiator Cap
- RG Radiator with Cap

A special thanks to Boney and Josh at C-Red for doing a little after hours work. Boney for helping with welding up the pipe work for the BOV setup/intercooler, and Josh for finding and removing an ECU loom for Sillbeer, thanks fellas (Dally put me up to this).

Cabin Autosalon is fast approaching now, so the aim is to have it all run in and completed by then. If it's not 100% complete, it'll be going in anyway.

Cheers
Brendan
Sunday, April 08, 2007

Brake Master Cylinder upgrade

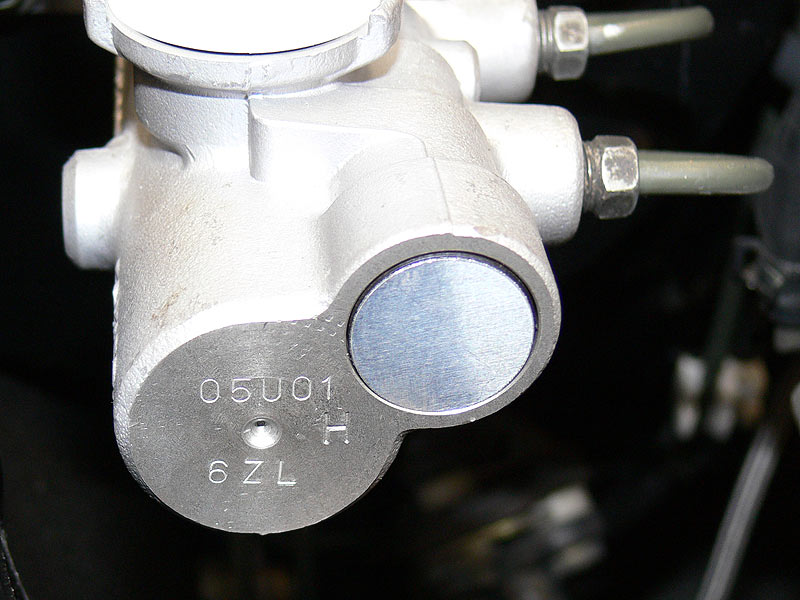
R32 GT-R N1 (V-spec version) BM50 Brake Master Cylinder

OK so a lot of you would already be aware that I'm running the front and rear Brembo calipers (with DBA4000 slotted rotors) from an R33 GT-R on Sillbeer (couple of pics here). Unfortunately the model of Silvia I've used as a base rolled out of the Nissan factory without ABS. Now this wouldn't seem like such a problem, but then I need to be able to fill these massive calipers (in comparison to the stock) ones with decent pressure and the stock Silvia brake master cylinder (BMC) just would not be up to the task with a resulting deep pedal. The other problem being that non-ABS cars need three ports on the BMC, 1 for the rear circuit and two for the front circuit. In the Nissan line up there's little choice in the larger sized BMC's available.

So the hunt was on for a larger BMC. Now there's quite a number of articles from the USA that says that their Z32 300ZX NA version did come up with a 1" (BM50) and 1 1/16" (BM55) BMC, and has been used successfully on their S13 240SX cars with larger caliper kits...so that was the first direction I took. After looking at a number of the photos of this setup, it finally clicked that this just wouldn't work...they drive on the left hand side of the car...so the ports on the BMC are on the wrong side. This was backed up by the fact that Nissan Australia couldn't find anything in their parts database for an Australia equivalent. Back to the drawing board.

After a couple of weeks, another light blinked on at the end of the tunnel. I recalled that the R32 GT-R N1 came from the factory without ABS fitted. Now the N1 came in two basic versions. The first was based on the standard GT-R, and the second as I understand it was based on the V-spec and V-spec II versions, which used the same Brembo calipers as the R33 GT-R (which I'm using). Next was to find some pics of it...and after a bit of search on the Yahoo Japan auctions, I found some and this confirmed the existance of a 1" BM50 brake master cylinder with 3 ports on it. Yay. Now it was just a matter of finding the Nissan part number. Part of the clue came from these photos with some of the part number stamped onto the end of the BMC body. The other bits came from the Nissan Fast software.

- Screen capture of GT-R Brake Master Cylinders

Relavent Translations:
(5) #46010-05U01 | *RB26DETT.GT-R.17 | Tokico 1" N1 Specification
(6) #46010-05U21 | *RB26DETT.GT-R.17 | Nabco 1" N1 Specification

After confirming that there were two numbers matching my requirements, a call to Northside Nissan in Perth confirmed their availability - which was affirmative ex-Japan. Pricing was reasonable at around $530 retail and about $450 trade. When we ordered, it wasn't sure which item of the above two would come in, but in the end we go the Tokico unit (46010-05U01). Here's the pics below of the brake master cylinder now all hooked up.

R32 GT-R N1 Brake Master Cylinder Pics:
- Part number on front
- Outside view - BM50 | Nissan | Tokico
- Outside view closeup
- 3-ports overhead shot

So for all those doing big brake conversions on your Nissan Silvia or Skylines which didn't have ABS, or you're wanting to remove the ABS, then this would seem to be the solution. Of course there's the subject of brake bias that is still to be tested, but that's all par for the course.

Cheers
Brendan

PS> Thanks to some of the boys in the Japan sub forum on Skylines Australia for your Japanese-to-English translation help.

Wednesday, April 04, 2007

Some boring bits...like wiper motors

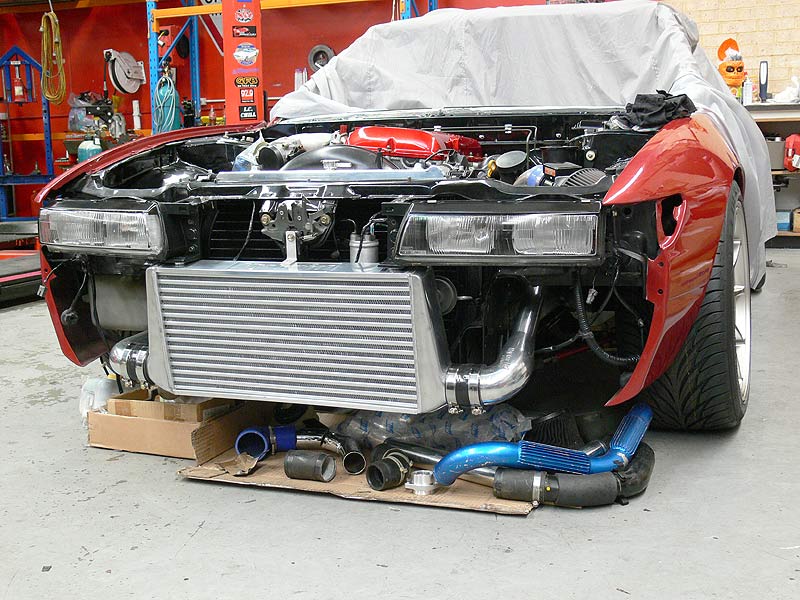
Hybrid Intercooler Mounted/S13 Square Headlights

Well it had to happen, especially after the high of the last post...seeing Sillbeer in the sun...a boring bit has descended. Not that it's any less significant, I mean without a wiper motor I'd be totally fubar in the rain. But the headlights do look mean.

So for this post I'm reporting on 3 main things, the first being the finding, cleaning and fitting of a wiper motor. I'm glad there was only one, because it was a pain to clean. For those looking to undertake such a project, parts that have the oiliest coating, are usually easiest to clean and bring up like new. This is because the metal hasn't had a chance to corrode. Unfortunately the wiper motor had corrosion on the aluminium casing and the painted cover so it took about an hour or so to clean up. I did contemplate just buying a new one, but that would cost easily between $200-$300.

- Wiper Motor 1
- Wiper Motor 2

The next thing to report on is the intercooler. It's now mounted (as seen in the top pic) and the attention to detail on the top mount is amazing. The boys went to the effort of cutting the bracket around the shape of the logo (following the shape of the 'b'). I mean you'll never see if once the bumper is on, but you'll see it now:

- Hybrid Intercooler top mount

And lastly is a few odds and sods. The headlights have been cleaned up with some degreaser and doused with silicon spray (ie. tyre shine) to give some moisture back into the plastics. The power steering reservoir was also given a clean, sand and paint along with all the hoses also getting a good coating of silicon spray. The original intention was to mount the white plastic reservoir from an S15 Silvia/200SX, but it was going to be too much of a pain to fabricate and modify mounts when this was going to do just as well. Not that you can see in this set of photos, I've also found, cleaned and silicon'd a carbon canister and hoses which is now mounted in place next to the radiator. And finally, with the necessity of monitoring engine vitals a must, the water temp sensor has been mounted. I had bought a water temp sensor adaptor which usually would get mounted on a cut and shut top radiator hose, but instead some bright spark at C-Red suggested mounting on the top of the pipe leading into the thermostat where there's a small flat spot. So it was drilled and tapped a hole and mounted up the sensor - looks and fits mint.

- S13 Square Headlights cleaned
- S13 Power Steering Reservoir
- Defi Water Temp Sensor mounted

Oh, and a start was made on the rest of the intercooler piping which has been continuing on this week with the mounting of a K&N Filter (test fit for time being) and the Z32 (300ZX) Airflow Meter. The main deal with this is that we have to mount the huge GReddy Type-R Blow-off Valve somewhere. Having just been down the workshop at lunch, I must say the solution they've come up with looks fantastic and will work a treat. I was sworn not to post pics until it's all welded, blasted and painted, so you'll just have to wait until later next week.

- Z32 Airflow meter/Intake Pipe

So that's it for this week, wish everyone a happy easter period and please drive safely.

Cheers
Brendan