Wednesday, November 30, 2005

Front Guards done, and off to paint

Patched M Sport Front Guards - no vent

A few posts back I mentioned the problem with fitting the Zenith Guard bracing with the vented Wide Body guards from M Sports. Basically they wouldn't fit due to the diagonal support fouling on the vent. So thanks to Tom, I've now had the vents removed and I reckon this is going to look more and more stock than ever - just really freakin' wide! Also had Tom cut the front bar around the intercooler and as you can see from the shots, he's done a really really good job.

And some news I've been waiting for for a long time, the car has been shipped off to get paint, and I'm hoping it'll be back before Xmas so I can do some work on it over the Xmas break.

Some pics of the modified guards:
- M Sports Front Guard sans vent (Left)
- M Sports Front Guard sans vent (Right)
- S13 Front Intrusion Bar cut for FMIC (Front-mount Intercooler) fitment
- S13 Nissan Aero Bar cut for FMIC

Should be a few more updates soon as I start to get things like coilovers etc sorted.

Cheers
Brendan

More Brace, more stiff

Zenith Tuning Boot Brace

As mentioned previously, I also purchased from Zenith their S13 Boot Brace and C-Pillar Brace. Unfortunately, the C-Pillar brace I think is suited only to the 180SX, so if anyone is interested in it, please get in contact with me. The Zenith Boot Brace however is a goer. Those who've peered into the boot of an S15 will know that they have something like this as standard, basically tying the rear of the chassis rails together to further reduce chassis movement. The pic above shows it basically in situ when it's eventually installed. You can see from the pics that these are a high quality product.

Some pics of the braces:
- Zenith Boot Brace
- Zenith Boot Brace (End Weld)
- Zenith Boot Brace (End Mount)
- Zenith Boot Brace (In Situ)
- Zenith C-Pillar Brace
- Zenith C-Pillar Brace (pre-tensioner)

Also, C-Red have been appointed Western Australian contacts for Zenith Tuning products, so or those wanting to get hold of anything from their range, please can contact Jeff at C-Red during normal business hours.

Cheers
Brendan

Wednesday, November 23, 2005

Brace positions

Zenith Tuning Guard Bracing

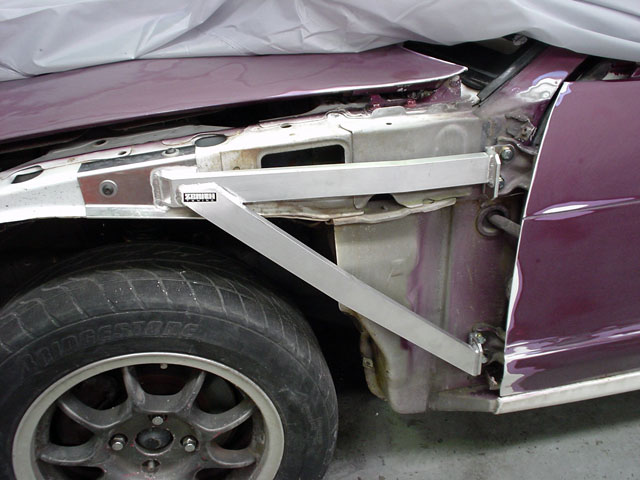
As part of the plans to stiffen the chassis, I came across a coming out of Adelaide called Zenith Tuning on the NissanSilvia.com web site. They're mainly focussing on bracing of all sorts and the first of many items I've picked up is the front 'Guard Bracing'. This has already been tried and tested in the heat of competition drift and is fitted to reduce chassis movement vertically at the front of the vehicle giving better suspension and braking response. The bracing is fitted from the front door hinges and fixed to the top of the inside guard structure, with a diagonal brace stretching from top of the guard to bottom door hinge as can be seen in the pics. The construction is of the brace is from aircraft grade aluminium making it extremely strong and extremely light.

The only downside is in the installation of the top bolts. This is where you need to get smart about getting a washer and bolt down a very narrow channel.

Some pics of the install:
- Zenith Guard Brace
- Zenith Guard Brace Door Mounts
- Zenith Guard Brace Top Mounts
- Access Hole 1
- Access Hole 2

Installation was relatively straight forward, encompassing fitting the door hinge mounts first with the extended bolts supplied. Drilling the holes in the top mounts - choosing a top and side whole for my setup (no rule of thumb here). Then last but by no means least, getting a washer and nut into a very tight space using a long spanner, some sticky goo from the interior door panels and many choice swear words.

In the end they really look the goods and can't wait to feel it the difference too. There is a caveat on fitting these with 'widebody' guards though. As most of these wide aftermarket guards come with vents behind the wheel arch, these braces will foul on them. There are two choices open to you at this point, either hack into the vent or as what I've done, have someone remove the vents altogether (Tom came to the rescue again on this).

Other bracing that I have so far are front and rear Cusco OS strut braces, Zenith Boot Brace and Zenith C-pillar brace (still yet to determine if it will fit as it's for a 180SX). Also got some Zenith aluminium pineapples for the rear subframe and a Zenith Steering Bush to give better steering response. All these bits should tie the chassis together quite nicely.

Update: As of a few hours ago, the guards have been refitted, and the front bar is being cut to suit the intercooler. A lot of preparation has already gone into the body, so the painter has been called to come down and check out the amount of work required. The choice of colour has been with me for some time, and I've chosen Mazda's 'Velocity Red'. It's a beautiful red with a slight orange tinge as well as a small fleck to boot:

Mazda MX-5 in Velocity Red

Should know a bit more by the end of the week, but I'm pushing to get it in for paint prior to Christmas so I can do more work over the break.

Cheers
Brendan

A chill in the wind

Hybrid GT Spec Intercooler

While waiting for other things to happen and priorities shuffle around, I managed to fit the intercooler kit up. This is the latest genuine Hybrid GT Spec Tube & Fin Intercooler kit, size being 600 x 300 x 75 (I think). Here's a snippet from [FLYN] on NissanSilvia.com:

"The GT Spec intercooler kits have the latest GT Spec Tube & Fin intercooler and not the discontinued Drift Spec Bar & Plate intercooler. The GT spec Tube & Fin Intercooler is the latest one from Hybrid, it flows 20% better, 50% lighter in weight than the Drift Spec Bar & Plate. And because the Tube & Fin has the one piece core structure, it is also a lot stronger than the old Bar & Plate as well.

That is why Hybrid has discontinued manufacturing the old Bar & Plate because the latest Tube & Fin GT Spec is just so much better."


Some pics of the setup session:
- Hybrid GT Spec Intercooler (Front View)
- Hybrid GT Spec Intercooler Inlet
- Hybrid GT Spec Intercooler Outlet
- Hybrid GT Spec Intercooler Engine Bay Inlet
- Hybrid GT Spec Intercooler Engine Bay Outlet

The aluminium strapping used to mount the cooler will be replaced later with something more robust, but the car needs to be painted and of course the front bar cut to suit. On the subject of the front bar, unfortunately the one I had lined up with the larger front intake hole was cracking whenever moved so I've gone back to a non-modified Nissan Aero Sport front bar.

Cheers
Brendan

Nismo Lower Control Arm - in disguise

Nismo S13 Lower Control Arms

Sorry sorry sorry. It's been a hideously long time between posts I know, but getting back into the swing of things now. Unfortunately a few months back my mother-in-law passed, and we've just finished settling the estate including cleaning up the house and belongings and selling the family home. But that is all behind us now so on with the show. I was lucky enough (thanks to C-Red) to get my hands on some Nismo Lower Control Arms which will help in the strength stakes. I am however wanting the underside looking pretty stock, so I have painted them in black and will affix some small Nismo stickers onto them soon.

Some pics of the testing session:
- Nismo Lower Control Arms (Top View)
- Nismo Lower Control Arms (Bottom View)
- Nismo Lower Control Arms now in satin black

I have also resprayed the rear subframe in the satin black too, and most other parts will be done the same to reduce the attention from the constabulary.

Seeya
Brendan