Wednesday, May 31, 2006

Possible Wheel change - WedsSport TC 105N

WedsSport TC 105N - 18x10.5+12

Yep, that's right, I might be changing the rim I'm getting. I've never been 100% on the CE28N's, and when I saw these WedsSport rims - they just clicked. Less fussy around the centre hub, less spokes, just a nice clean designed rim. And the colour is perfect too - I wasn't sure a custom colour in Gun Metal for the CE28N was going to be my liking. As it happens, these could be cheaper too. The rim shown above is 18x10.5+12 (8.35kg) which will be just about right for the rear, and along with that I'd be ordering an 18x9.5+10 (8.0kg) for the fronts.

Volk Racing CE28N

The offsets available on the CE28N's were slightly less, so that's a bonus too with an extra 5mm on the front and 6mm on the rear to fill the guards out. Both are a really nice rim and both are lightweight, but for me I just prefer the WedsSports. One more plus for the WedsSports TC 105N is that they're a 2006 release so they're hot off the press.

Will keep you posted.

Cheers
Brendan

Hi, my name is Thurge...

Sard (Single Pump) Fuel Collector

I was having a nice little sleep in this morning (which is past 7am for parents), with my baby boy curled up next to me when the kids come racing up the stairs saying there's a package being delivered. Damn I wish they wouldn't come so early. But, low and behold, the Austpost man had a lovely little box direct from Japan for me. The Sard Fuel Collector (Single Pump version) had arrived. I ordered this about a week ago through Takakaira.com and expected a delay on shipping when they mentioned a June 6 dispatch date. And I'd also been told by a local supplier that it'd be two months before they could get one in for me. So I was pleasantly surprised when I logged onto takakaira and it had shipped out on Saturday. Checked it last night and it was in the Perth dispatch centre. I love tracking stuff across the world, it's so cool.

Sard (Single Pump) Fuel Collector Lid

Anyway, for those not sure about what this does here's a quick run down. Sometimes under hard cornering, your stock fuel pump may end up sucking air as the fuel in the tank moves to the opposite side to the pickup, this can be detrimental to the health of a good engine, especially if caning it. So, what the Fuel Collector or Surge Tank does, is provides a small insurance policy against the main pump running out of fuel. In this case, a lift pump will sit in the fuel tank and provide fuel to the collector - keeping it as full as it can for as long as it can (it has a return line to the tank). Then, a high-flow pump is mounted in the Fuel Collector where it will have a constant supply of fuel to send to the engine. Most surge tank setups mount the hi-flow pump external to the surge tank itself - but this generates quite a bit of noise, and licensing don't like it a lot, thus the reason for going for this setup. Shipped to my door, this cost $330 and as you can see it's a nice bit of kit. Just need to try and get black fittings now to replace the blue ones ;)

Cheers
Brendan

Tuesday, May 30, 2006

Hey Picasso!!! (Clean and Scrub - Part 2)

Rear Wheel Well Painted

Actually, I felt more like Michaelangelo than Picasso doing the undercarriage painting - being on my back looking up (occasionally dropping paint in my eye/mouth/ear etc). This painting part was a little time consuming, and I still need to apply a second coat in bits (smoother areas) to get rid of the brush marks. The rougher parts under the car were a cinch though so all good there. Still not 100% finished though, as I need to remove the front bar, and paint the end of the chassis rail (see front wheel well pic below) and around under where the radiator is mounted. The paint I used I touched on in the previous post, and to give you an idea of coverage, I've done about 90% of the job with about 80% used of the paint (not much room for error).

Me Painting

- Front Wheel Well Painted
- Rear Wheel Well Painted
- Tunnel Painted (Before 1, Before 2)

Rear Subframe

As well as the undercarriage, I've been busy getting all the subframes and associated bits ready to be bolted back together. The rear subframe I had painted up previously, but we had to melt out the subframe bushes which of course messed some of the paint job up so the hold rear subframe was painted again. This then had a set of Nismo Subframe Bushes pushed in. I decided to go with these rather than the aluminium bushes so I don't get as much noise/vibration coming up through the floor. The rear lower control arms have also had their original bushes melted out and they've been resprayed now too. Will be fitting a set of Nolathane bushes (in red of course) into these.

I'll be using an S15 powersteering rack which I cleaned up along with the brackets and heatshield. This will get a new set of rubber boots too. The S13 subassemblies (which the hubs bolt onto) have been cleaned up and painted, and we're hoping we can get a set of 350Z disc brake shields from the 'Track' edition to fit up for the factory look around the R33 GT-R Brembos I have going on.

- Front Subframe
- Front Subassemblies
- Rear Subframe
- Nismo Subframe Bushes 1
- Nismo Subframe Bushes 2
- Rear Lower Control Arms
- S15 Powersteering Rack (among other things)
- Powersteering Rack Heatshield

Next is to complete the undercarriage painting, then onto prep and paint of the brake calipers - which at this point in time will be done in Silver with Red Brembo logo and a coat of gloss clear. Then once all the Kazama suspension parts arrive, the rear end will be bolted together along with (for now) a GT-R diff and half-shafts.

In the meantime, I've gone ahead and ordered the Nismo Power Brace (a review of which is here), Do-Luck Style Ladder Brace (goes between chassis rail under the gearbox) and Rear Lower Tie-Rod Brace (you may have seen these link the rear lower tie-rods together on the rear subframe). Then to make sure I'll be getting enough fuel, I've ordered in a Sard Fuel Collector (Surge) Tank (preview picture). Now I could have gone a normal one, but then the fuel pump would need to be mounted in the boot causing lots of unwanted noise. The beauty of the sard item is that the fuel pump sits inside the surge tank - making it nice and legal, nice huh?! The tank is currently in Melbourne and assume it'll be here by weeks end. Phew.

Cheers
Brendan

Monday, May 15, 2006

Clean and Scrub - Part 1

Unpainted Undercarriage

So this Saturday was the start of the final strip. Went out to Bayswater on Friday and picked up some PPC Chassiscoat and PPC Marine Clean. Then once I'd put the wheels back on the car, dropped it, rolled it outside and jacked the front and back up, I proceeded to use the Marine Clean (pretty good stuff) in concert with the Karcher high pressure hose to clean the undercarriage. The photo above is what it looked like after cleaning. It's not 100%, but after a quick wipe over this Saturday with some prepsol, I'll be giving it a nice coat of the PPC Chassiscoat. This paint is specially made for chassis and suspension components as it dries rock hard (a nice Satin Black) and is resistant to stone chips etc.

Front Leftovers

After the clean, a quick blow with the air compressor and it was back inside (after a quick rejig with car positions in the workshop and a mop of the floor - I like a clean working environment after all). Up on stands again, I made quick work of removing the struts, lower chassis rails and finally the front subframe. Dragged out of the road, it was then disassembled so I can clean and paint the subframe (with the Chassiscoat). What you see above is the leftovers that won't be going back on the car, instead replaced with new/used/uprated parts.

- Unpainted front subframe
- Engine bay without subframe

This Saturday it'll be onto removing the rear subframe, clean up the undercarriage a tad more before applying a coat of paint. In the meantime, I've been busy at home. Have cleaned the front subframe, an S15 power-steering rack, front hub knuckles and brake disc shrouds (which will be trimmed so the 330mm Brembo rotors can fit). Will try and spray paint these items before the weekend.

Cheers
Brendan

Tuesday, May 09, 2006

Mega May Photo Update

Yeah, I know, lame title, but it's hard to keep coming up with new witty titles all the time ;)
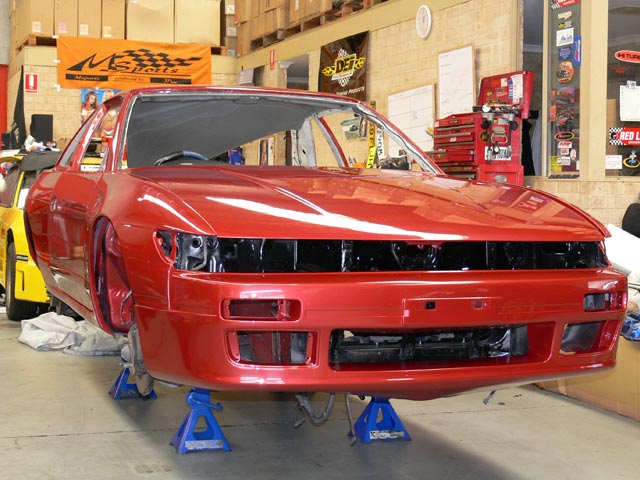
Sillbeer - Front Quarter

Well after the unfortunate failure of the SD (memory) card in my camera on Saturday, I got another on Monday and scooted out to C-Red to get some replacement pics. It really feels like I'm getting somewhere now, with attention turning to the underside/chassis. Enjoy these pics:

- Front View
- Front View (driver side)
- Front Quarter 1 (driver side)
- Front Quarter 2 (driver side)
- Side View 1 (driver side)
- Side View 2 (driver side)
- Rear View
- Rear View (passenger side)
- Rear Quarter (passenger side)
- Rear Quarter (driver side)

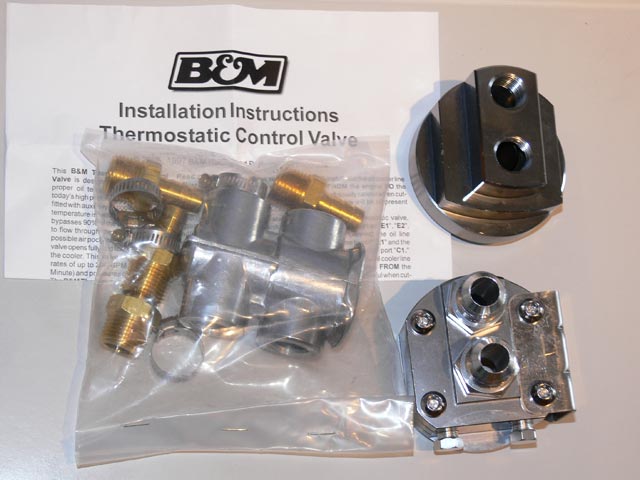
Oil Cooler hardware

Next up is the arrival of my B&M Inline Oil Thermostat (in the plastic bag), which I purchased from 'spandex' (who now has a website of his own as well - www.midnightmods.com.au) on the NissanSilvia.com forums (highly recommend the great service you'll get). This will make up along with the oil filter sandwich plates and the remote oil filter mount, the main part of my oil cooler setup. Still to get will be the oil cooler core which will probably be a top quality Serco unit from Go Gear in Mt Hawthorn. Once it's all mounted, I'll get the Earls lines made up to suit again with the Black connectors rather than the standard blue and red ones.
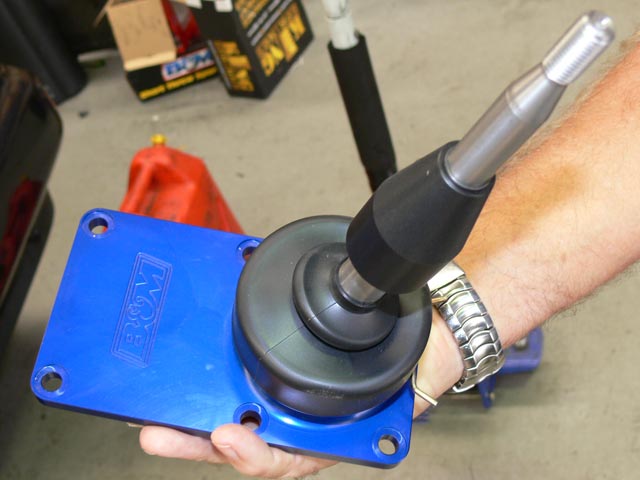
B&M S13 Short Shifter

Another item to arrive recently through C-Red was this B&M Short Shifter for the S13 gearbox. This will reduce the throw required on gear changes, making way for quicker times on the track when needed. This will mount up on the gearbox which has been resprayed, but may be powder coated instead now.

- B&M Short Shifter for S13 (top)
- B&M Short Shifter for S13 (bottom)

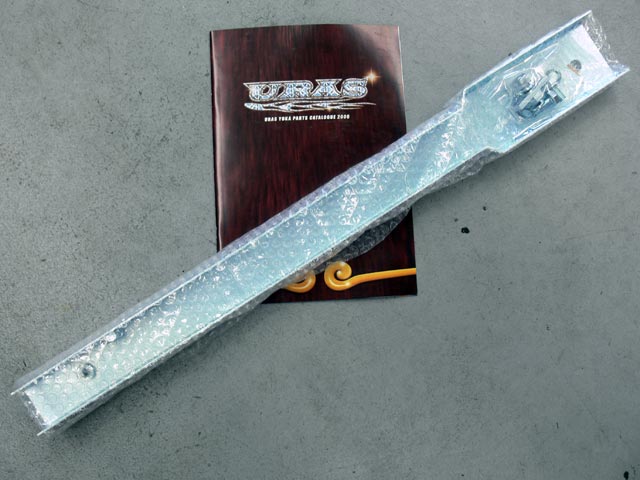
URAS S13 Chassis Rail

And finally, I received my new URAS S13 Chassis Rail from Japan. I ordered this through 'BT-Revolution' on the NissanSilvia.com forums and again I recommend this trader as I was taken care of very well. Now, why do I need a chassis rail, well if you've ever peeked under the S13, you notice that the passenger side chassis rail doesn't run all the way to the rear before supporting the rear sub-frame. Well this item bolts up and completes the missing rail, increasing chassis rigidity. For the rest of the chassis, I already have the Cusco strut tower bars, Zenith A-Pillar braces and the Zenith rear boot brace, I'm still looking into tying parts of the gearbox tunnel together along with a front castor rod chassis brace of some sort (either small brace or Nismo Power Brace).

Well hope you enjoyed this Mega May update, should be accelerating the amount being done to the car now that it's back in my possession (so to speak).

Cheers
Brendan
(aka. Grandpa [SWA], Sillbeer [NS] or VSPEC32 [SAU])

Saturday, May 06, 2006

Back into it now...

Well, I'm finally back into it. After a few weeks of not doing any work on the car due to renovations and having our new baby boy, I finally got back into the workshop. Today was pretty much a setup affair - find a free spot in the workshop where it won't need to be moved, clean up the workspace (ie. mop the floors, yeah I know, I'm anal), and put the car up on stands. I also gave her a quick wipe down to get rid of the dust and small bird droppings that had made their way onto the duco due to being moved in/out of the workshop. All I can say is she's looking sweet. I would love to show you the heap of photos I took, but looks like the memory card in my camera took a turn for the worst (cheap 1GB card from china that lasted 3mths = not a happy camper). Anyway, wiped her down, wiped the door jams out and the boot jam and gave the engine bay a good clean as it still had a lot of dust in it (it's black by the way, not red). All in all I'm pretty happy with the way it cleans up.

So what's next, well I'll be sending a few parts off the powder coaters while I have the chance so that cleaning will be much easier. This will include the front and rear subframe, some of other suspension components, possibly the gearbox, diff housing, diff rear cover and the yet to arrive genuine Trust Sump. While that stuff is off, I'll get down on floor trolley and give the underside a quick paint so it's all the one colour, including the inside wheel arches which copped a big does of overspray. I also need to do a clean out of the car and take inventory of what I will still be needing.

SR20DET Rocker Cover Coil Pack Cover Black Wrinkle

And so you didn't go without a picture, here's the coil pack cover after a coat of the now famous black wrinkle paint. Looks pretty good but will wait and see whether it stays once everything is together in the engine bay.

Cheers
Brendan