Tuesday, 12 June 2007 | | Categories: Engine, Interior
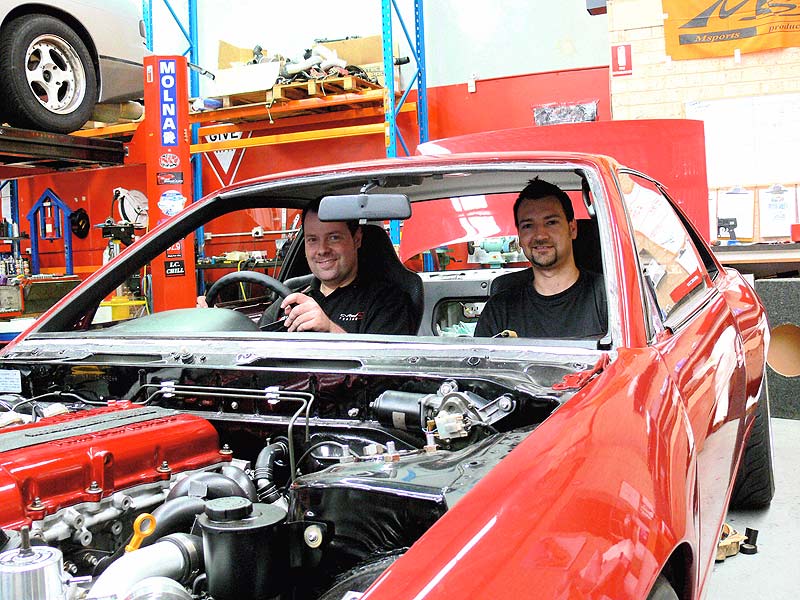
Greg and I (me in passenger seat) checking out the seating positions
So the focus on the interior was kept up last week...this time in the form of the front seats, carpet and dashboard. To start off with, I remind some of you that I did purchase a new set of carpets sometime ago for Sillbeer. They were really nice and moulded to a point for the S13 floorpan. Unfortunately, it required a fair amount of time in marking with chalk the holes and cuts required to make it all fit correctly. Now when I purchased a used interior a little while back, a carpet also came with it. The colour was a darker grey than the original, but had a few stains and a lot of glass fragments spread throughout. I decided that after I had vacuumed and cleaned this one, I'd make a final decision on whether to use the new or old. The old one won. It came up a treat, and took all of 5 minutes to install.
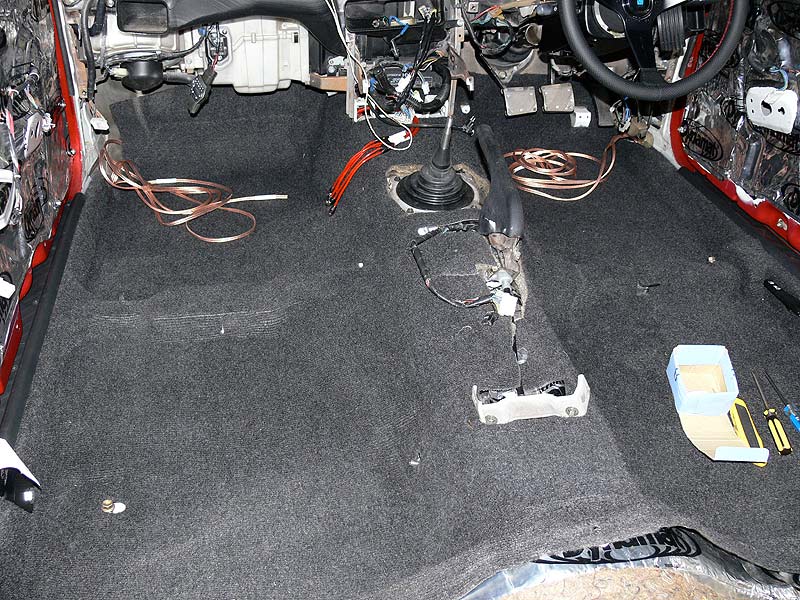
As you can see from the photo, it came up very nicely and all the holes are exactly where they're meant to be. Next job was the seats - which are from an R34 Skyline GT-R. Reasons for these are comfort, height and OEM function. The only requirement (as with all GT-R to S13 seat fitment) was a modification to the rear outside seat mount. I had previously fabricated up a tab in mild steel to sit in the groove of the original seat mount, and after tracking down the 'Welding Gnome', had him TIG weld the tabs in place. A quick coat of black satin paint and an overnight dry, a search for the appropriate class of bolt and we chucked them in. Needless to say that due to my perfect marking, they bolted in without a hitch. See pics of the tabs:
- Fabricated tab sized and marked
- Tab TIG'd into place by the 'Welding Gnome'
- Fabricated tab painted and bolted in
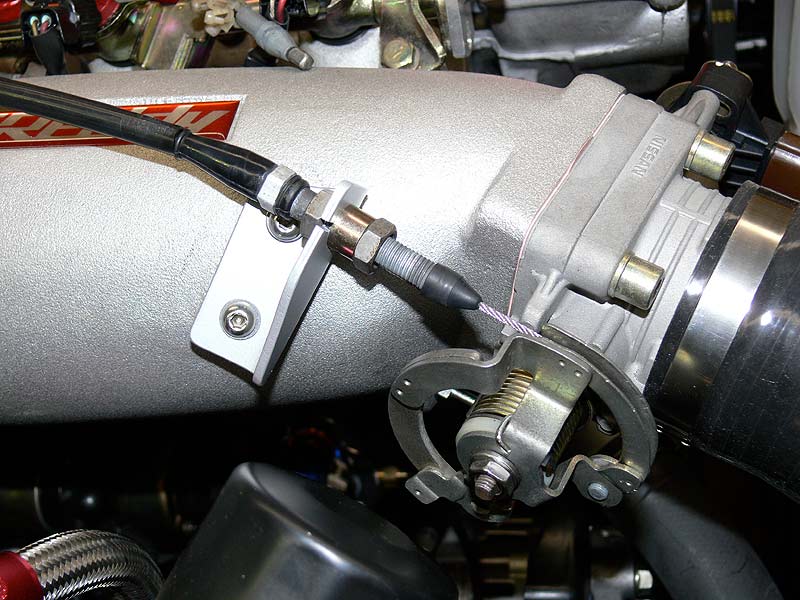
I mentioned previously that Greg had fabricated a new bracket up for the throttle cable so it fitted correctly on the GReddy Plenum. This was painted up and fitted, it should clear the bonnet easily while looking fantastic while it does it.
- Throttle Bracket from back/top
- Throttle Bracket from back
- Throttle Bracket from front
- Throttle Bracket with cable fitted

Another fitment in addition to the dashboard was the new Nardi Deep Corn steering wheel. This is a very stylish black leather jobby with the red stitching. I've used a genuine Nardi boss kit - but as I suspected (see pics), it's rear diameter doesn't cover the hole on the S13's steering column cover so I'll have to fabricate something to fit in there.
- Nardi horn button
- Nardi Deep Corn red stitching
- Dash and Steering wheel installed
- Nardi Boss Kit for S13 Box
- Nardi Boss Kit for S13 Front
- Nardi Boss Kit for S13 Back
The leather wheel I purchased from Yahoo Auctions in Japan, but I recently purchased a suede version of the Nardi Deep Corn for motorsport applications through a supplier on nissansilvia.com named 'natetune' at a very good price along with some pedals and the boss kit.
Other things done are the seat belts are now in - brand new from Klippan. I fitted the horns up to replace the tinny 'beep beep' ones that Silvia's usually come with. These have been tested, and they're more BMW spec than Barina now. And I ordered and received a nice black plastic air diversion plate for the radiator/intercooler air flow from High Octane (on their ebay store). Yesterday I took the rear seats, door trims, glove box, centre console lid, gear stick boot and handbrake boot down to Trimcare in Welshpool to be retrimmed in a material close to centre panel of the GT-R seats. Chris will be taking care of them all there and I should have back a week Friday. Some of these pieces will also be copping a logo I've designed for the car based around 'specB' which will also be placed at strategic locations on the body. The logo was designed with strong influence from the USDM Nissan Sentra SE-R specV.
This week while half of the interior is away, I'll finish off the boot Dynamat'ing now that I have had another box delivered, finish off the fuel system (delaying the Sard surge tank at this stage) and get it ready to turn over.
Drive safe.
Brendan
Tuesday, 5 June 2007 | | Categories: Audio, Interior
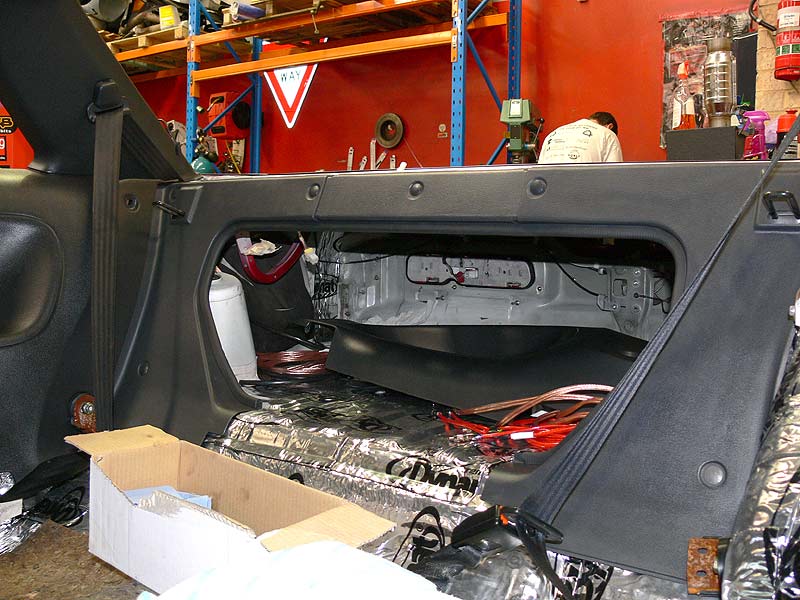
Finally after finishing the Dynamat in the main cabin, it was time to start fitting interior trim pieces back into Sillbeer. I would have been continuing on with the boot Dynamat installation, but I ran out half way through, so have to wait for another box to come from my ebay supplier (billy588). So first up it was through my box of bits and pieces for appropriate trim. Unfortunately that turned up a black for the back seat panel, so I went out to one of the shells and found the whole back section still intact. After a bit of grunting, and saw fingers on those little press studs (they really do fly when they pop out), I had what I needed. The cleaning process for most of this stuff is first to give it a wipe down with a wet sponge to remove the thick layer of dust. Second is a wipe down with some household cleaning spray to remove any dirt and grime. And finally a good wipe over with the tyre shine to give it back some moisture.
- Side interior trim
- Dynamat on rear floor area (driver side)
- Dynamat on rear floor area (passenger side)
The same car provided a lot of other panels, as well as from a few other sources. Rear seat belts were also fitted and test along with finding the hinges for the rear seat back - but they're quite rusty at the moment so will need to give them a quick sandblast before leaving them in place.
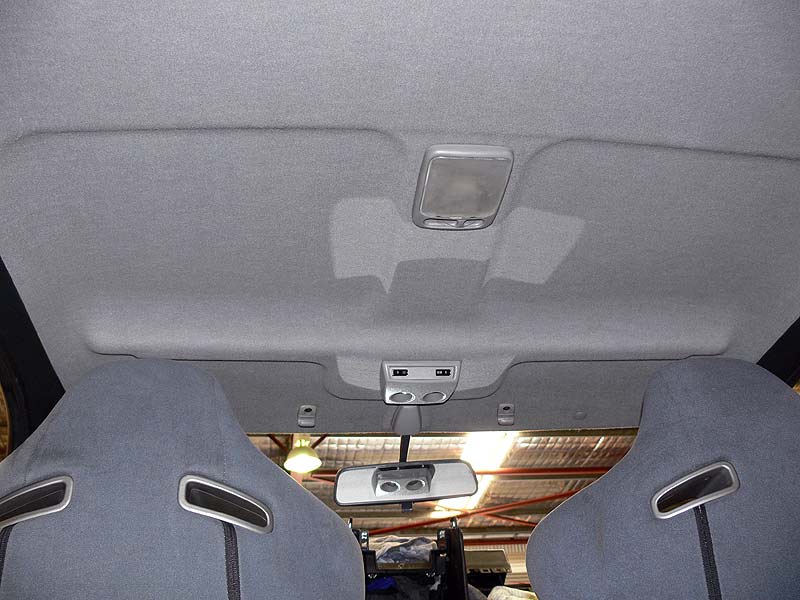
Another part of the interior is of course the roof liner (or hoodliner). I had a couple to choose from, but neither were in very good (clean) condition. So I chose the better of the two, and with some newly acquired Armor All interior cleaner, I gave the entire roof liner a good twice over (as well as a good scrub). The results are amazing and gives a nice smell to the roof too.
- Roof liner before cleaning
Saturday morning I attempted to find and fit a set of front seat belts, and I had some success in finding the correct brackets and the correct drivers side belt. Unfortunately the passenger side belt I found was made for another mounting angle so it would not reel out, only retract. This was after 3hrs mind you, so I gave up and have a new set on the way. In the mean time I tracked down a couple of good interior side panels - went through 3 drivers side ones before I found one with minimal scratches and all the clips in place. This is the one you see in the trim picture above.
While I was working (ie. wasting time) on the belts, Greg was in to make up the throttle cable bracket. The reason for a new one is that the GReddy plenum sits high in the engine bay and the mount on the plenum is also offset from the original location. Therefore and new low profile offset bracket was made. It looks mint, and after a lick of paint should be just fine visually too.
Marc at C-Red is working on the electrics this week, getting the wiring loom sorted and tucked away and the ECU plugged in. Hope there to be some news on when we can start her up when I go in on Friday.
Getting exciting now.
Cheers
Brendan
PS> Please note that I do get quite a few questions from people asking about things I have done previously on the car. To help out with this, I've dropped in a Google search for sillbeer.com to track down any info you're after.
Monday, 28 May 2007 | | Categories: Audio, Interior, Wheels/Tyres
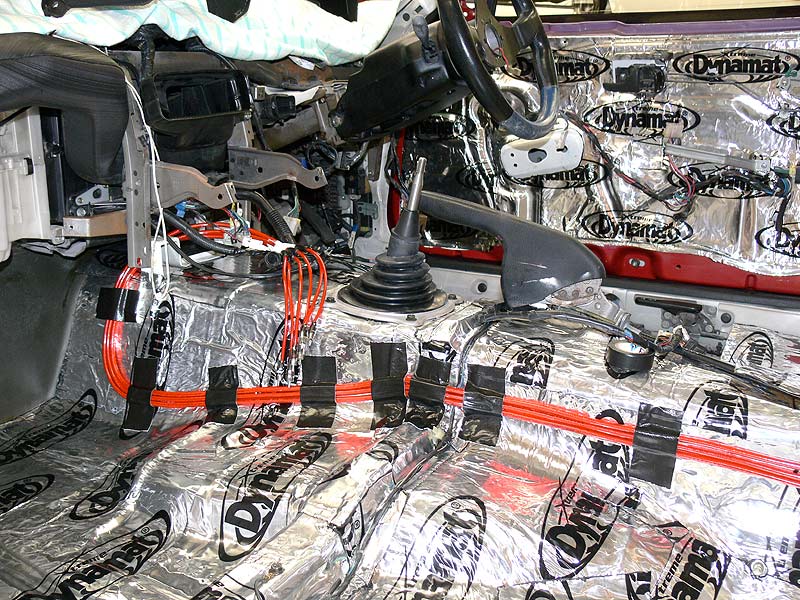
Wow, two posts in less than a week...I'm trying to make amends. And so as part of the interior install, between doing the Dynamat and putting the carpets in, the wiring for the impending stereo needed to be installed. So last Friday was the day. First up I went for a quick a trip down to JB Hifi in Cannington to get myself some quality interconnects that run the signal from the deck through to the boot where the amplifiers will be installed. After doing a quick bit of research on what to use, it was down to Stinger and Aepro (?). As luck would have it, JB's had the Stinger Helix in stock...these being their higher end product, and in a nice red to boot. Therefore if they do get seen, at least they won't stand out like dog's bollocks. Back at the workshop the fun begins.
After a quick run down from Marc Palmer (all-round nice guy and electronics whizz, also C-Red Workshop Manager) on where I should be running the cables, I set to work running them out. First up were the Stinger interconnects (RCA's) which have been run down the passenger side of the tunnel, across the back of the rear footwell and up and over the wheel arch into the boot (basically following one of the stock wiring loom paths).
- Stinger interconnects along rear passenger footwell
- Stinger interconnects over wheel arch
Next was a 7-wire multi-core cable which we've run for future needs if they should arise. This was run along the same path as the stock loom on the drivers' side of the car, followed by the speaker cables which run down each side of the car and up and over the wheel arches.
- Speaker wiring in Passenger footwell
- Speaker wiring along Passenger sill
- Speaker wiring along Drivers' sill
- Speaker & multi-core wiring over drivers' rear wheel arch
Also on Friday I received my next box of Dynamat (3rd so far) and before leaving the post office, I had it weighed. It came in at a smidge of 10kg. Not bad really considering that could be the difference between my planned stereo setup, and one with twice as much weight. And of course the amount of deadening in the car really has made a huge difference already.
Saturday I managed to get the rear seat area and wheel arches covered so next up will be the boot. I reckon we're getting pretty close to getting the interior back it. So far I'm undecided on whether to get the rear seats and door trim panels retrimmed before Autosalon. The interior I picked up has the option CA-version velour material with a grey and slightly red stripe patten. It's nice, but the grey doesn't quite match the same grey as the GT-R seats, but I may forego that...but as mentioned, undecided.
For the stereo, I'm looking to go something fairly basic, but still punchy starting out with an Alpine SWX-1042D Type-X 10" Subwoofer. The front splits will be the Alpine DLC-177R DDLinear 6.5" Component 2-Way Speaker System (6.5" mid-bass and tweeter) as after listening to the Type-X splits, these has a more appropriate sound for my liking. The head unit will again be Alpine - and having just spied the new Alpine iDA-X001 Digital Media Receiver on their website, I think that's the winner (oh, it's basically an interface to an iPod and Tuner with no CD player...more info). Now rather than installing some huge amps which weight a lot, I thought I claw some weight savings back from the Dynamat by going for the diminutive Alpine PDX Digital Amplifiers. In this case I'll be going an Alpine PDX-1.1000 Mono Power Amp for the subwoofer and Alpine PDX-2.150 2/1 Channel Power Amp to run the splits. All-in-all a very nicely rounded system methinks. Now I just need to find a place that will give me a decent price for it all.
Oh, and something I didn't mention last week and that's about tyres. I originally had a set of Federal SS595 tyres installed on the rims, but with my plan to do a bit of track work, and the desire to have something that is both street and track pliable in a 50:50 split, I've just had some new tyres put on. These are again Federals, but not the SS595RS Ultra High Performance tyre - this should give me what I'm after. Oh, and an unashamed plug goes to Shane at Exley's Motorsports Tyres down in Willeton for supply and fitting these up.
Until the next episode.
Cheers
Brendan
Thursday, 24 May 2007 | | Categories: Audio, Interior
Jeez I'm slack, another month between posts. Well, I'm slack, just busy...but that isn't to say that work hasn't been progressing. It has, just at a slower rate since I'm back to a few hours on a Saturday morning. But I now have a target to get sillbeer as close to finished as possible by Cabin Autosalon (Perth) on 21-22 July.
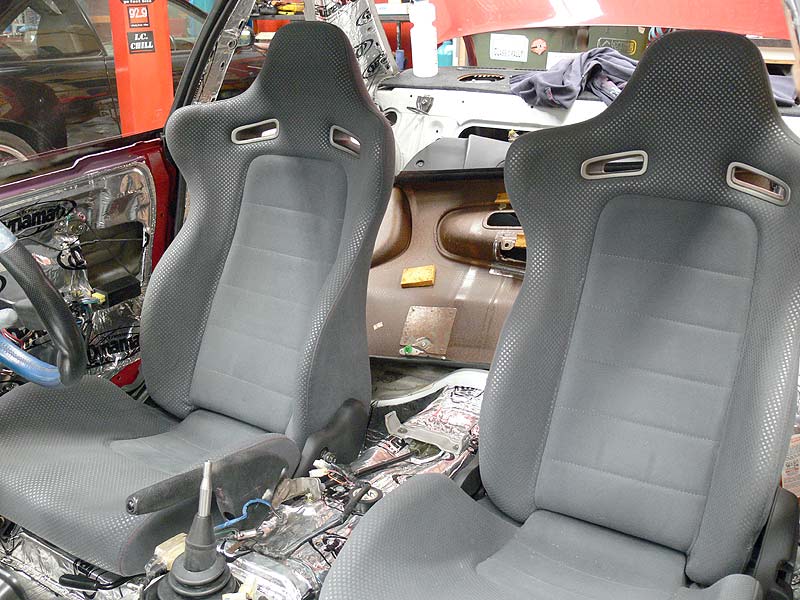
So what have I been doing...well changing mind as per usual. This time with regard to my seating arrangements. The original plan was to use a set of Recaro recliners from a Honda DC2 Type-R Integra which I already had (and at great expense I might add). The more and more I thought about it though, the results of using recliners and aftermarket rails in the S13 has just been littered with saw heads. This is because the standard seats have the rails built into the seat itself and they're offset by close to 40-50mm on the inside rail. This basically means that you're never going to get an OEM ride height, and with the need to put a lid on my melon every now and then and being a touch over 6-foot means headroom would be at a premium. Now I've always liked the look of the R34 Skyline GT-R seats, and I knew they'd be a relatively easy fit only requiring the outside rear mount to be lengthened for the S13 floorpan. The only major problem was sourcing them. Thankfully Jeff at C-Red already had a passenger seat, but the driver's side was a problem. After a quick look on Yahoo Auctions Japan I found a possible suiter, and after Jeff arranged how we'd get it and I passed over the fold, I had the driver's seat on its way down.
Now other than a great looking seat, they're also extremely comfy especially for someone with a slimmer frame (such as myself), there's also the added bonus that they have full OEM movement. Meaning you lift the tab and the seats folds and moves forward...great for getting my kids in and out, and keeps the wife happy that everything works as expected. So without ado, here's some special piccy's of the new set:
- R34 GT-R Seat - Test Install in S13
- R34 GT-R Driver's Seat
- R34 GT-R Seat - Detail
- R34 GT-R Seat - Controls
- R34 GT-R Seat - Stitching
- R34 GT-R Seat - Front Outer Mount in S13
- R34 GT-R Seat - Front Inner Mount in S13
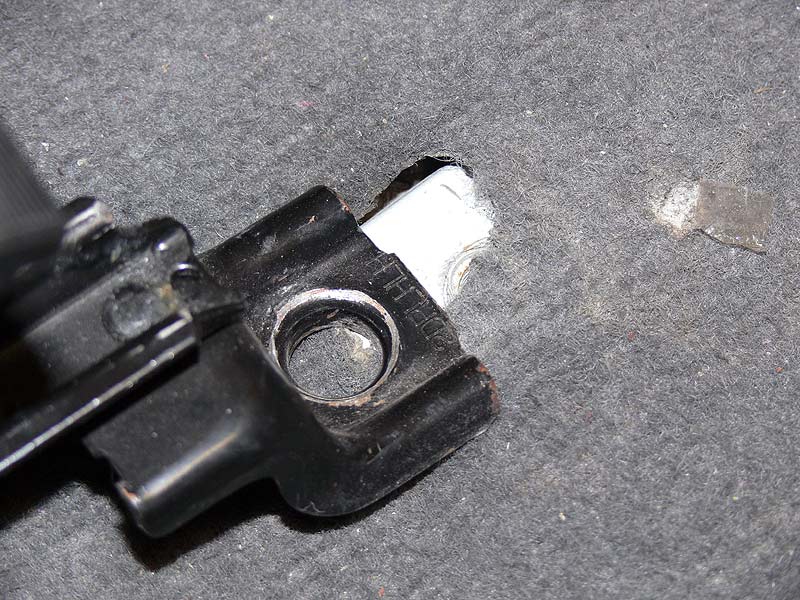
As can be seen in the pic above, it's a simple matter of welding on an extended tab to reach the S13 mounting hole. Yippee.
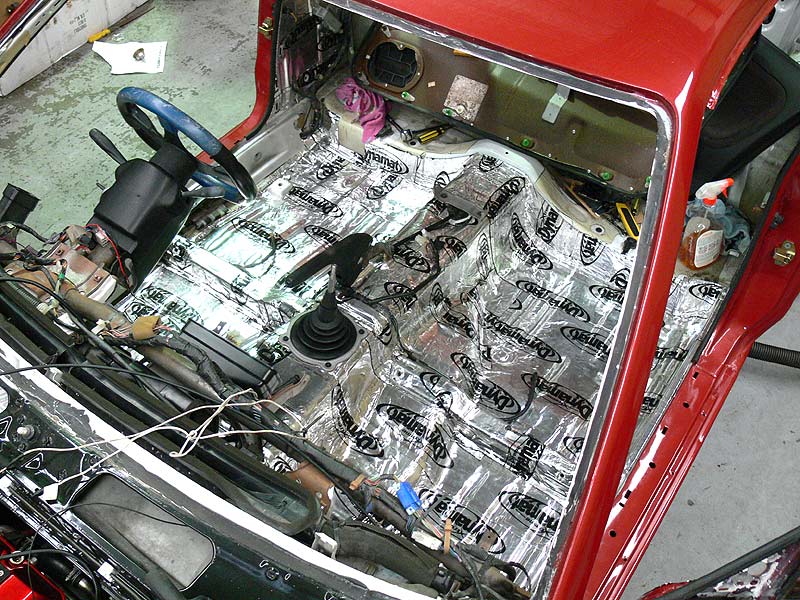
Now, at the moment, all interest is on the interior...with the Dynamat continuing to be spread from here to kingdom come. I've completed both rear passenger compartment sides and the B and C pillars a couple of weeks ago. Last week I removed the old carpet and laid the dynamat down on the main floor area. As can be seen in the photos, it's shiny. You're probably wondering how much weight I'm adding? I don't know, but the amount of deadening I now have is amazing and should make the driving and stereo listening experience that much nicer. The doors now close with a thud and the roof now sounds like a wooden chopping board rather than a tin can when you rap on it.
- Dynamat on floor
- Dynamat on side rear
There's still more to do, but I'm waiting for another box to arrive before continuing. It will cover pretty much everything in the end. On another note, finally went and picked up the door handles. They took about 4 hrs to fit in the end because I had to remove the old latch mechanisms because they'd been painted over and then go find any missing parts. Also needed to shave a bit of the paint from the key hole so the small black plastic key lock surround would mount through the hole (too much paint build up - very tight tolerances required). Fitted new strikers as well (the bits that bolt to the main body) and fitted back the window rubbers and a couple of bits of trim. I tracked down a nice set of horns...as I couldn't well have Sillbeer with a beep beep. It'll now perform a nice loud two tone honk.
- Door handles fitted
- New Alpha Horns
One last thing to report, and that's the child restraint mounts. They've now been fitted in and await the occasion of fitting the seat for my son Kai. Not to mention that they're required for compliancing.
- Child Restrait point from top
- Child Restrait point from bottom
So I'm currently working extra hours Monday to Thursday so I can take Friday off to do a full day in the workshop. Tomorrow will be laying cable for the stereo before I have to put the new carpets back in.
Signing-off
Brendan
Friday, 27 April 2007 | | Categories: Audio, Engine, Interior
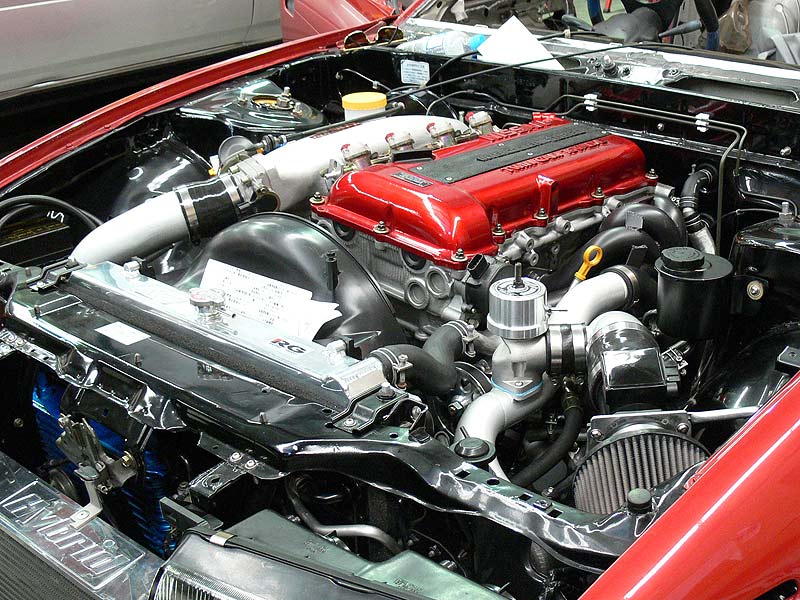
First up, sorry about the delay in the posting. I've been on holiday for a week and just haven't had a chance to post up. But now we are now finally able to reveal the BOV setup. This took quite some time to work out mainly because of the size of the GReddy Type-R blow-off valve that I'm using and because I wanted it setup in a recirculating configuration. The pipework was worked up over a couple of days between other things, and then finally painted with the VHT Brake Caliper Silver and Clear overcoat. Jury is still out on whether they would look better in black, but for now they look pretty nice. For the intercooler setup, all the hoses were changed from the blue silicon that came in the Hybrid kit for black Samco silicon hoses. Don't think we've seen another setup like this before but it's neat and tidy.
- Air filer side with Z32 AFM and BOV
- Overhead of GReddy Type-R and pipework
- Intake Plenum intake pipework
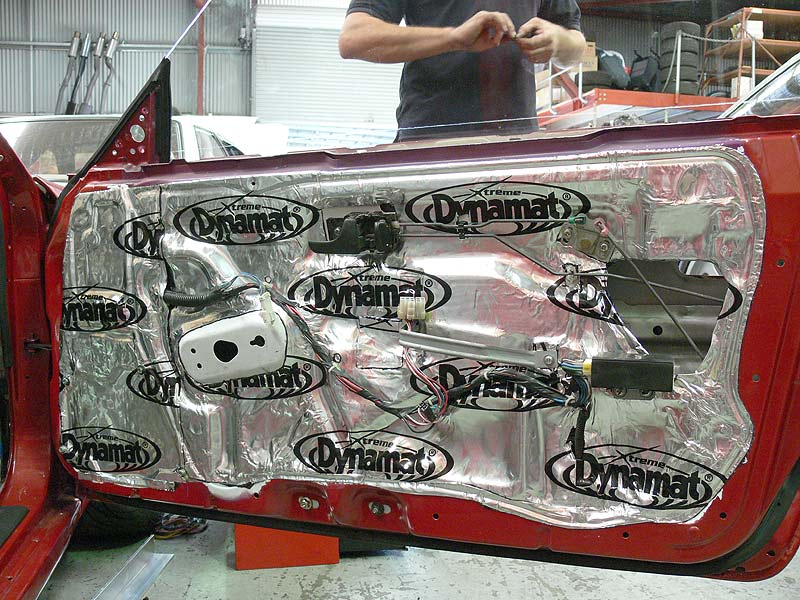
The next few weeks I'll be focusing on getting the interior ready for stereo and trim, this means covering as much as possible with Dynamat. Some of you might be thinking about all the extra weight it will add, but then I'll just have to turn the boost up. The main reasons for the Dynamat is sound quality from the stereo, and making the interior livable. Just from putting it on the doors and roof, the difference to the way the roof sounds when you tap and the doors feel in closing is amazing. No more flimsy S13. Feeling much more like a Skyline now.
Dynamat Application Pics:
- Drivers Door
- Passenger Door
- Bootlid
- Roof
The firewall, floor, rear wheel arches and boot floor are still to be done, hopefully the amount I have left should be able to cover it.
Just a little extra bit done was the radiator cap. To match the RG Radiator, I've put on an RG Power Radiator Cap.
- RG Power Radiator Cap
- RG Radiator with Cap
A special thanks to Boney and Josh at C-Red for doing a little after hours work. Boney for helping with welding up the pipe work for the BOV setup/intercooler, and Josh for finding and removing an ECU loom for Sillbeer, thanks fellas (Dally put me up to this).
Cabin Autosalon is fast approaching now, so the aim is to have it all run in and completed by then. If it's not 100% complete, it'll be going in anyway.
Cheers
Brendan
Sunday, 8 April 2007 | | Categories: Brakes
OK so a lot of you would already be aware that I'm running the front and rear Brembo calipers (with DBA4000 slotted rotors) from an R33 GT-R on Sillbeer (couple of pics here). Unfortunately the model of Silvia I've used as a base rolled out of the Nissan factory without ABS. Now this wouldn't seem like such a problem, but then I need to be able to fill these massive calipers (in comparison to the stock) ones with decent pressure and the stock Silvia brake master cylinder (BMC) just would not be up to the task with a resulting deep pedal. The other problem being that non-ABS cars need three ports on the BMC, 1 for the rear circuit and two for the front circuit. In the Nissan line up there's little choice in the larger sized BMC's available.
So the hunt was on for a larger BMC. Now there's quite a number of articles from the USA that says that their Z32 300ZX NA version did come up with a 1" (BM50) and 1 1/16" (BM55) BMC, and has been used successfully on their S13 240SX cars with larger caliper kits...so that was the first direction I took. After looking at a number of the photos of this setup, it finally clicked that this just wouldn't work...they drive on the left hand side of the car...so the ports on the BMC are on the wrong side. This was backed up by the fact that Nissan Australia couldn't find anything in their parts database for an Australia equivalent. Back to the drawing board.
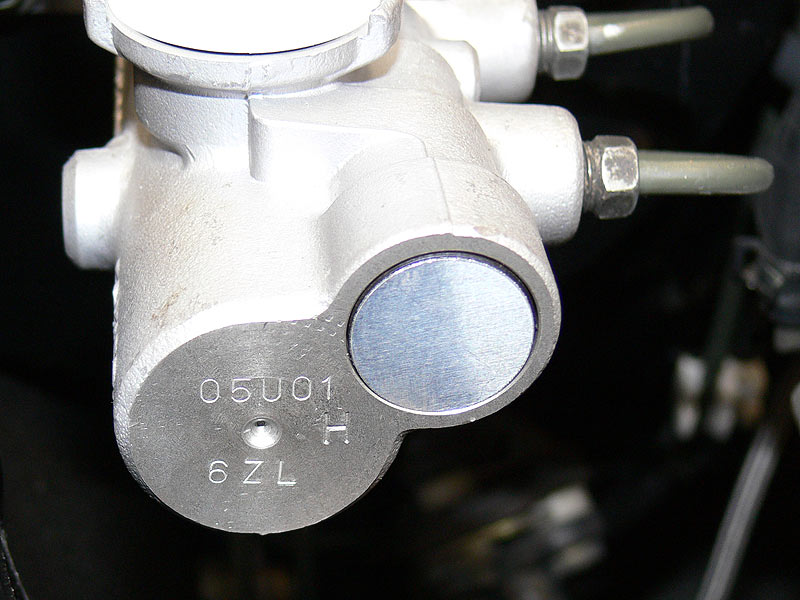
After a couple of weeks, another light blinked on at the end of the tunnel. I recalled that the R32 GT-R N1 came from the factory without ABS fitted. Now the N1 came in two basic versions. The first was based on the standard GT-R, and the second as I understand it was based on the V-spec and V-spec II versions, which used the same Brembo calipers as the R33 GT-R (which I'm using). Next was to find some pics of it...and after a bit of search on the Yahoo Japan auctions, I found some and this confirmed the existance of a 1" BM50 brake master cylinder with 3 ports on it. Yay. Now it was just a matter of finding the Nissan part number. Part of the clue came from these photos with some of the part number stamped onto the end of the BMC body. The other bits came from the Nissan Fast software.
- Screen capture of GT-R Brake Master Cylinders
Relavent Translations:
(5) #46010-05U01 | *RB26DETT.GT-R.17 | Tokico 1" N1 Specification
(6) #46010-05U21 | *RB26DETT.GT-R.17 | Nabco 1" N1 Specification
After confirming that there were two numbers matching my requirements, a call to Northside Nissan in Perth confirmed their availability - which was affirmative ex-Japan. Pricing was reasonable at around $530 retail and about $450 trade. When we ordered, it wasn't sure which item of the above two would come in, but in the end we go the Tokico unit (46010-05U01). Here's the pics below of the brake master cylinder now all hooked up.
R32 GT-R N1 Brake Master Cylinder Pics:
- Part number on front
- Outside view - BM50 | Nissan | Tokico
- Outside view closeup
- 3-ports overhead shot
So for all those doing big brake conversions on your Nissan Silvia or Skylines which didn't have ABS, or you're wanting to remove the ABS, then this would seem to be the solution. Of course there's the subject of brake bias that is still to be tested, but that's all par for the course.
Cheers
Brendan
PS> Thanks to some of the boys in the Japan sub forum on Skylines Australia for your Japanese-to-English translation help.
Wednesday, 4 April 2007 | | Categories: Engine, Exterior
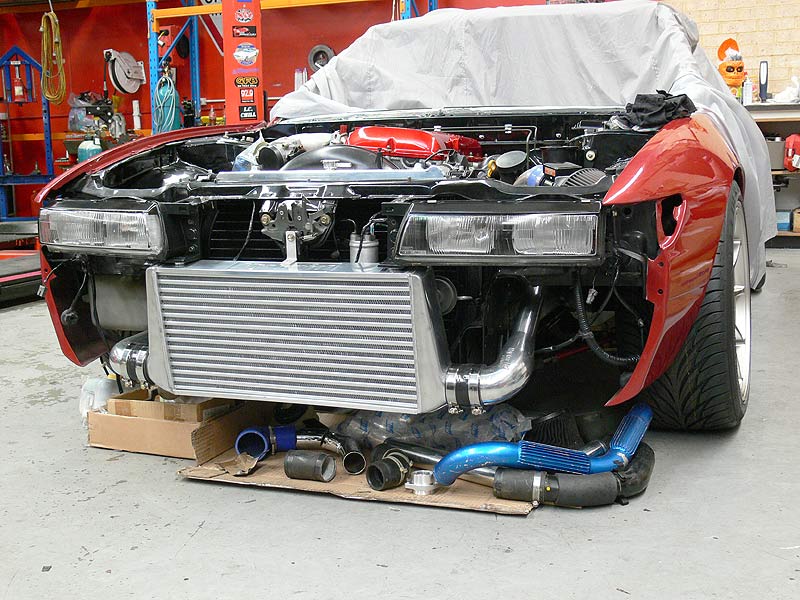
Well it had to happen, especially after the high of the last post...seeing Sillbeer in the sun...a boring bit has descended. Not that it's any less significant, I mean without a wiper motor I'd be totally fubar in the rain. But the headlights do look mean.
So for this post I'm reporting on 3 main things, the first being the finding, cleaning and fitting of a wiper motor. I'm glad there was only one, because it was a pain to clean. For those looking to undertake such a project, parts that have the oiliest coating, are usually easiest to clean and bring up like new. This is because the metal hasn't had a chance to corrode. Unfortunately the wiper motor had corrosion on the aluminium casing and the painted cover so it took about an hour or so to clean up. I did contemplate just buying a new one, but that would cost easily between $200-$300.
- Wiper Motor 1
- Wiper Motor 2
The next thing to report on is the intercooler. It's now mounted (as seen in the top pic) and the attention to detail on the top mount is amazing. The boys went to the effort of cutting the bracket around the shape of the logo (following the shape of the 'b'). I mean you'll never see if once the bumper is on, but you'll see it now:
- Hybrid Intercooler top mount
And lastly is a few odds and sods. The headlights have been cleaned up with some degreaser and doused with silicon spray (ie. tyre shine) to give some moisture back into the plastics. The power steering reservoir was also given a clean, sand and paint along with all the hoses also getting a good coating of silicon spray. The original intention was to mount the white plastic reservoir from an S15 Silvia/200SX, but it was going to be too much of a pain to fabricate and modify mounts when this was going to do just as well. Not that you can see in this set of photos, I've also found, cleaned and silicon'd a carbon canister and hoses which is now mounted in place next to the radiator. And finally, with the necessity of monitoring engine vitals a must, the water temp sensor has been mounted. I had bought a water temp sensor adaptor which usually would get mounted on a cut and shut top radiator hose, but instead some bright spark at C-Red suggested mounting on the top of the pipe leading into the thermostat where there's a small flat spot. So it was drilled and tapped a hole and mounted up the sensor - looks and fits mint.
- S13 Square Headlights cleaned
- S13 Power Steering Reservoir
- Defi Water Temp Sensor mounted
Oh, and a start was made on the rest of the intercooler piping which has been continuing on this week with the mounting of a K&N; Filter (test fit for time being) and the Z32 (300ZX) Airflow Meter. The main deal with this is that we have to mount the huge GReddy Type-R Blow-off Valve somewhere. Having just been down the workshop at lunch, I must say the solution they've come up with looks fantastic and will work a treat. I was sworn not to post pics until it's all welded, blasted and painted, so you'll just have to wait until later next week.
- Z32 Airflow meter/Intake Pipe
So that's it for this week, wish everyone a happy easter period and please drive safely.
Cheers
Brendan
Monday, 26 March 2007 | | Categories: Engine, Exterior, Wheels/Tyres
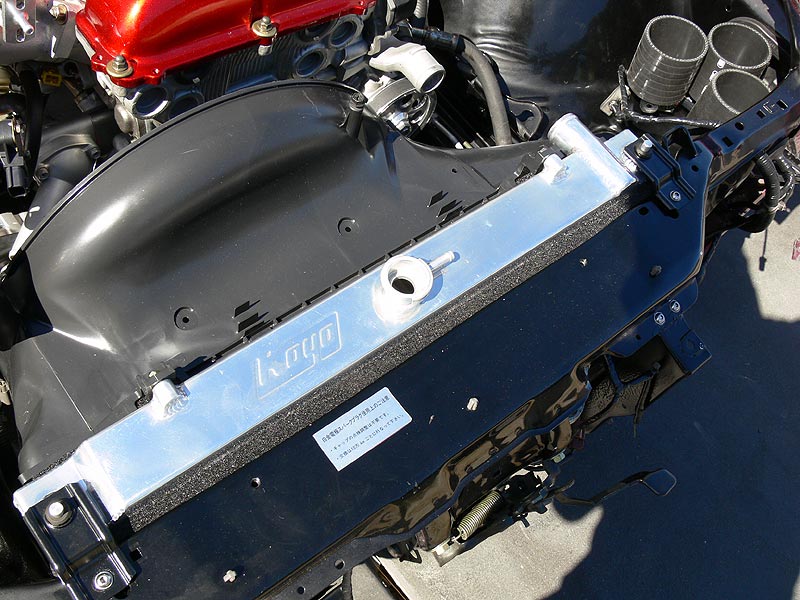
Progress is happening, but to coin the old phrase, the devil is in the detail is an understatement. And with two of the most anal people I know (Greg and I) working on the project, everything must be done to the best of our abilities (his are higher in this regard than mine). This last week or so has been spent getting the A/C condenser cleaned (and fins straightened), more rummaging through wrecks getting much needed pipe work and bits and pieces. The radiator, an S14 Racing Gear jobby (re-branded Koyo), is now in place along with the S14 shroud. There was a plan to fit up thermo fans, but we've changed tack now and gone back to the clutch fan and shroud. I went and got some foam and rubber stripping for Greg to use in the radiator mounting and the job is beautiful. You'll see the foam in and around all the gaps in the pics above and below.
- Air conditioning Condenser Installed
- Grex (Trust/GReddy) Oil Filter Sandwich plate for Oil Cooler and Remote Filter mount
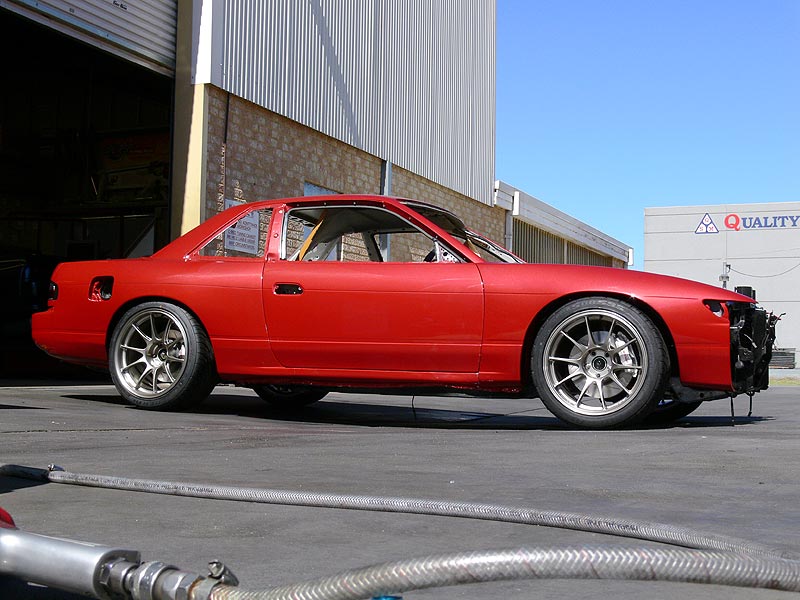
On Saturday, I decided it was time for Sillbeer to get some Vitamin D, so with the help of Josh and Woody, we pushed it out into the sun and OMG...isn't it just jaw droppingly beautiful. It's the first time I've seen it from the rear as it's usually parked up in front of a wall. You really see how wide those guards are and the width of the tyres isn't really as big as first thought. Our current thinking is that some spacers will be required to get the rims out to the lip, but that will come after she's up and running. The view from the front is just awesome, looking more like it's about to pounce with those massive guards looking more like a danish strong man's shoulders...grrrrr (sorry lame). The colour really is shown a lot better in the sun, with a slight orange shown in the highlights that compliment the wheels. And speaking of wheels, they just shine. So enough of my rabbling, enjoy the pics:
Sillbeer in the Sun:
- Front View 1
- Front View 2
- Front View 3
- Rear View 1
- Rear View 2
- Rear View 3
- Side View 1
- Side View 2
- Front Wheel
- Rear Wheel 1
- Rear Wheel 2
- Engine Bay
- Colour close up
Breathtaking hey?
Anyway, this week it's onto fitting up the Hybrid Intercooler and GReddy Type-R BOV. Because of the size of the BOV, this is where our main problems will lie. It will be plumbed back, as I don't really want huge noise, it will be loud enough just coming back through the air filter. The intercooler couplings etc have now all be replaced from the standard blue silicon to some Samco Black silicon pieces. A big thanks goes to Steve at Hyperflow (the Australia distributors for Samco hoses) in Sydney for sending these over so quickly. Much appreciated.
Speak to you all later.
Brendan
Wednesday, 14 March 2007 | | Categories: Engine, Driveline
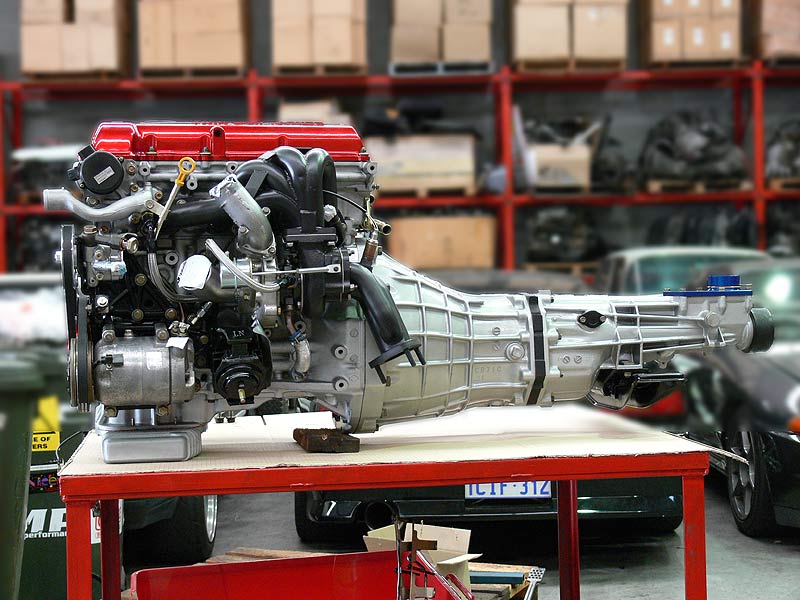
Well these past couple of weeks have been pretty exciting around the Sillbeer project starting out with the engine meeting up with the gearbox for the first time...and doesn't it just look fantastic. Makes me want to mount it on a mantel piece in a clear plastic box. Also the stainless screws I got last week are now holding the injectors down.
- OS Giken Twin-plate Fitted to Engine
- Inside S13 Gearbox Bell Housing
- Engine and Gearbox (Driver's Side)
- Fuel Rail and Nismo 740cc Injectors
- Detail shot of under plenum
- B&M; Short Shifter fitted
So now is where it gets really exciting...the engine was fitted into the car on Monday. All went in or up, or down depending which way you look at it - with the front crossmember being dropped out, the car raised on a hoist, engine fitted to crossmember, then car lowered over and crossmember bolted back onto the car. This means it's the first time it's sitting on its new suspension and wheels. Enjoy the photos:
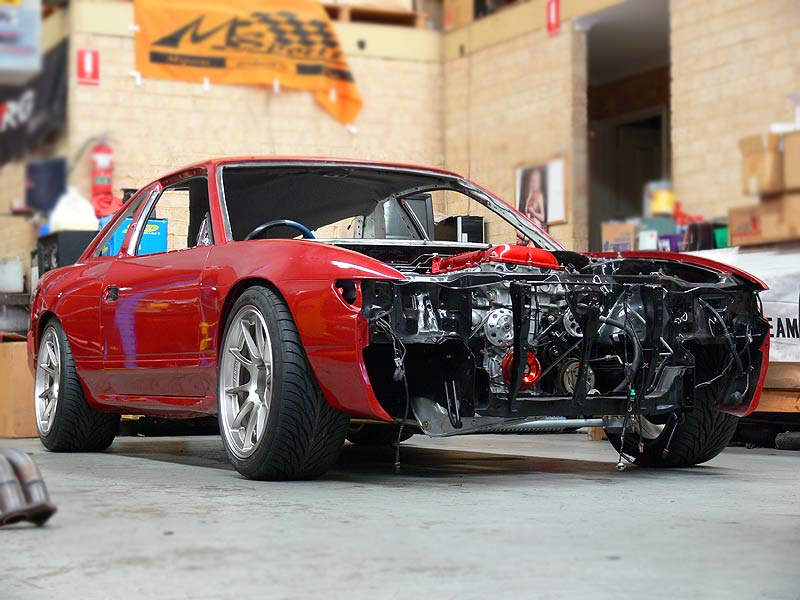
- On Wheels (Side View)
- On Wheels (Rear View)
- Engine Fitted (Driver's Side)
- Engine Fitted (Passenger's Side)
- Engine Fitted (Under from front)
- Engine Fitted (Under from Rear)
Oh, and those with a keen eye may have noticed the oil lines coming from the engine block...that's the start of the new GReddy Oil Cooler kit that C-Red got in for me...they're now an official Trust agent.
A couple of problems cropped up of course which were that we had fitted a non-Nissan Clutch Master Cylinder from another S13 in the workshop which had a bleed nipple at the top, and was longer in the body that the Nissan one. Needless to say it fouled on the GReddy Intake Plenum, so we've ordered an OEM one. This will then have a new HPI Stainless Braided clutch line kit installed. Also looking at my best options for the Brake Master Cylinder at the moment - will keep you posted on that.
Had a few pieces painted last week too - Nismo Grill, Nismo Front Bar insert grills, B-pillar covers and top side window trims. These are in storage and will go on when the time is right. We'll be fitting up the Hybrid Intercooler and RG Radiator very soon along with a test fitting of a set of thermo fans and shroud from an AU Ford Falcon. Stay tuned on that one. I've changed my mind once again and have decided to add just a little bit of rice with regards to the gauges. The original plan was to fit a gauge hood...but this was going to be a world of pain in itself, then the Defi DIN Gauge was a possibility, now I'll just use what I've got which are a set of Def-Link Meters with Hoods mounted on the stands directly to the dash. If they look bad, then I'll look at other possibilities.
Cheers for now
Brendan
Friday, 9 March 2007 | | Categories: Engine, Old School, Track
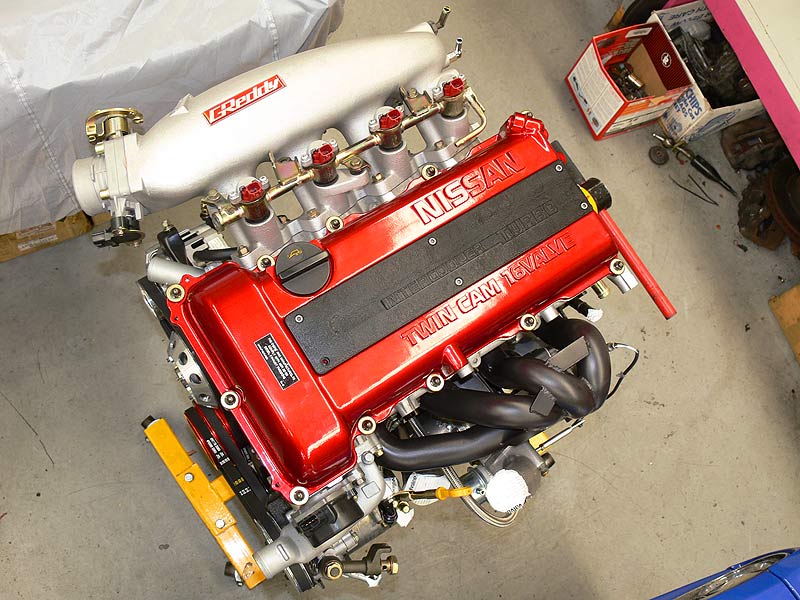
I can't stop looking at this engine. It just looks mint. The red ceramic coating on the rocker cover, with the contrasting coilpack cover in wrinkle black is a combo I'm yet to see. This is the engine as it was last Saturday morning, with just some new stainless screws to be put in to replace the steel ones in the coilpack cover and the fuel injector caps. And for a bit of Dally humour, he's fitted up a small plaque (see pic below) that pays homage to the SR20's beginnings as a diesel truck motor. All the pulley's and belts have all been fitted up - I think all being custom ordered according to the new lengths required by the downsized pulleys.
- Under the Intake side
- Meets diesel emission standards
- SR20DET Belt/Pulley Setup
Now with the upcoming SilviaWA track day (or skid pan day) coming up tomorrow, I had to install my HPI harness into the Sigma as the original belts don't lock unless you really put the anchors on. So last Saturday, Greg helped (read did 99% of the work) put the harness into the Sigma. These belts are just beautiful, and are available through C-Red for $400...not bad for full FIA spec harnesses. I still have a second one to come, which will be setup for each in/out attachment in Sillbeer.
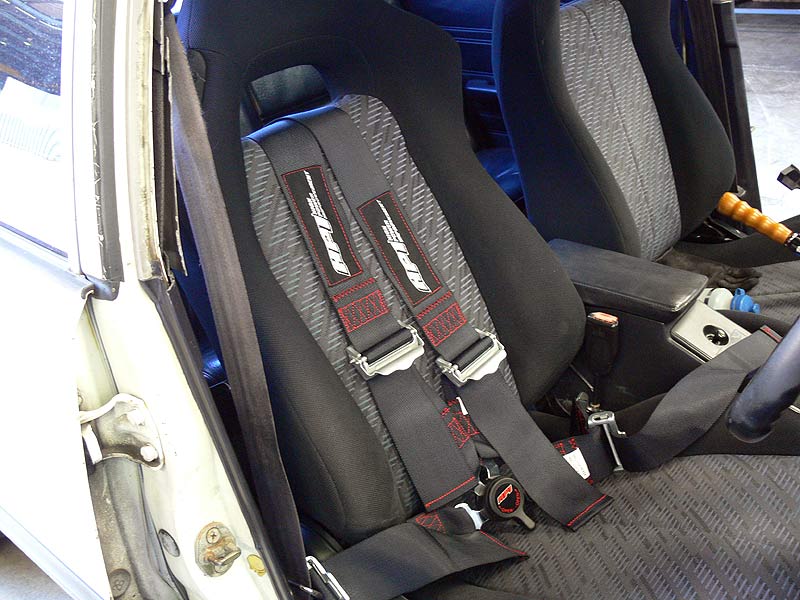
For those interested, I have fitted a set of seats from a Mitsubishi FTO into the Sigma as the original seats were completely shagged (as attested by my back giving me grief). They're actually very close in shape to GT-R seats, just a little more sectioned on the side and thigh bolsters. No work will be done on Sillbeer tomorrow morning as I need to fit new tyres up to the Sigma and do a minor service ready for a bit a thrashing in the afternoon!
Cheers
Brendan
PS> Also just made an update the 'The Plan' based on recent changes.


