Category: Brakes
Tuesday, 6 May 2008 | | Categories: Brakes, Engine, Exterior, Driveline, Suspension
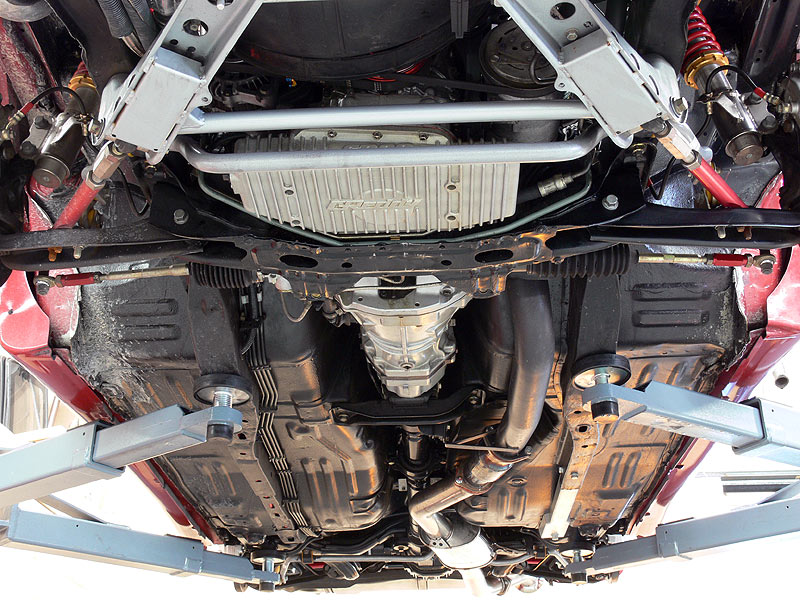
A number of weeks ago now, I did a photoshoot with Rick McDowell, a well known WA based photo journalist. The results of which were brilliant, but with a fair amount of work gone into the undercarriage, and an award to prove it, we needed to get some photos done of the underbelly along with additional engine and interior shots. This being something best done on a hoist of course, so last Saturday we were lucky enough to get some time on the hoist in the C-Red workshop (thanks to Marc, C-Red's Workshop Manager). I went in and first detailed the engine bay, which wasn't too bad really. But as I drive this on a daily basis, and that the road near work as had some work done on it recently (plus rain), I had quite a lot of dirt and mud built up under the guards. With the help of the trusty truck wash and a bit of elbow grease (and mess on the floor) the front and rear suspension on the passenger side came up a treat.
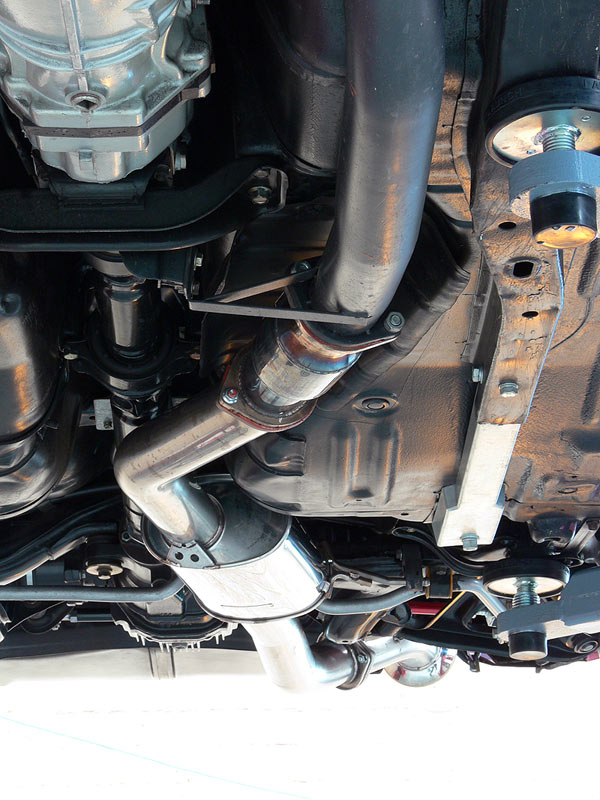
While Rick was snapping away, I thought I'd take the chance to update the undercarriage shots...being there's no longer the Ikeya Formula lower control arms in place, and the exhaust has been completed and changed since the last set I did 6mths ago or so. A couple of things to note though, first being the URAS Floor Reinforcement Kit which extends the chassis rail on the passenger side from the usual S13 cutoff point to the rear. Also, if you look on the drivers side, there's dirt there just to prove that it does indeed get driven. On a whole, I was surprised at how clean the undercarriage is considering the rain we've had lately. Having the fresh'ish paint surfaces certainly helped in cleaning it all up easily though.
Anyway, photos for all to enjoy:
- Rick taking his photos
- Under the engine bay
- Front Suspension
- Front Brakes and Coilovers
- Front Pipe and Gearbox
- Rear Subframe assembly
- Rear Suspension
- Air time
The photos that Rick have done so far were really ace, so looking forward to getting a gander at these new ones.
Cheers
Brendan
Sunday, 8 April 2007 | | Categories: Brakes
OK so a lot of you would already be aware that I'm running the front and rear Brembo calipers (with DBA4000 slotted rotors) from an R33 GT-R on Sillbeer (couple of pics here). Unfortunately the model of Silvia I've used as a base rolled out of the Nissan factory without ABS. Now this wouldn't seem like such a problem, but then I need to be able to fill these massive calipers (in comparison to the stock) ones with decent pressure and the stock Silvia brake master cylinder (BMC) just would not be up to the task with a resulting deep pedal. The other problem being that non-ABS cars need three ports on the BMC, 1 for the rear circuit and two for the front circuit. In the Nissan line up there's little choice in the larger sized BMC's available.
So the hunt was on for a larger BMC. Now there's quite a number of articles from the USA that says that their Z32 300ZX NA version did come up with a 1" (BM50) and 1 1/16" (BM55) BMC, and has been used successfully on their S13 240SX cars with larger caliper kits...so that was the first direction I took. After looking at a number of the photos of this setup, it finally clicked that this just wouldn't work...they drive on the left hand side of the car...so the ports on the BMC are on the wrong side. This was backed up by the fact that Nissan Australia couldn't find anything in their parts database for an Australia equivalent. Back to the drawing board.
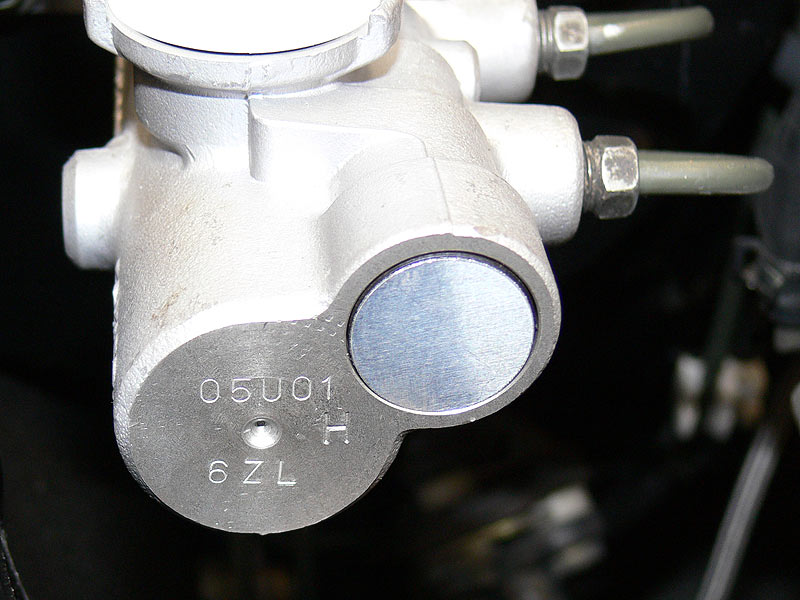
After a couple of weeks, another light blinked on at the end of the tunnel. I recalled that the R32 GT-R N1 came from the factory without ABS fitted. Now the N1 came in two basic versions. The first was based on the standard GT-R, and the second as I understand it was based on the V-spec and V-spec II versions, which used the same Brembo calipers as the R33 GT-R (which I'm using). Next was to find some pics of it...and after a bit of search on the Yahoo Japan auctions, I found some and this confirmed the existance of a 1" BM50 brake master cylinder with 3 ports on it. Yay. Now it was just a matter of finding the Nissan part number. Part of the clue came from these photos with some of the part number stamped onto the end of the BMC body. The other bits came from the Nissan Fast software.
- Screen capture of GT-R Brake Master Cylinders
Relavent Translations:
(5) #46010-05U01 | *RB26DETT.GT-R.17 | Tokico 1" N1 Specification
(6) #46010-05U21 | *RB26DETT.GT-R.17 | Nabco 1" N1 Specification
After confirming that there were two numbers matching my requirements, a call to Northside Nissan in Perth confirmed their availability - which was affirmative ex-Japan. Pricing was reasonable at around $530 retail and about $450 trade. When we ordered, it wasn't sure which item of the above two would come in, but in the end we go the Tokico unit (46010-05U01). Here's the pics below of the brake master cylinder now all hooked up.
R32 GT-R N1 Brake Master Cylinder Pics:
- Part number on front
- Outside view - BM50 | Nissan | Tokico
- Outside view closeup
- 3-ports overhead shot
So for all those doing big brake conversions on your Nissan Silvia or Skylines which didn't have ABS, or you're wanting to remove the ABS, then this would seem to be the solution. Of course there's the subject of brake bias that is still to be tested, but that's all par for the course.
Cheers
Brendan
PS> Thanks to some of the boys in the Japan sub forum on Skylines Australia for your Japanese-to-English translation help.
Tuesday, 23 January 2007 | | Categories: Brakes, Exterior, Wheels/Tyres
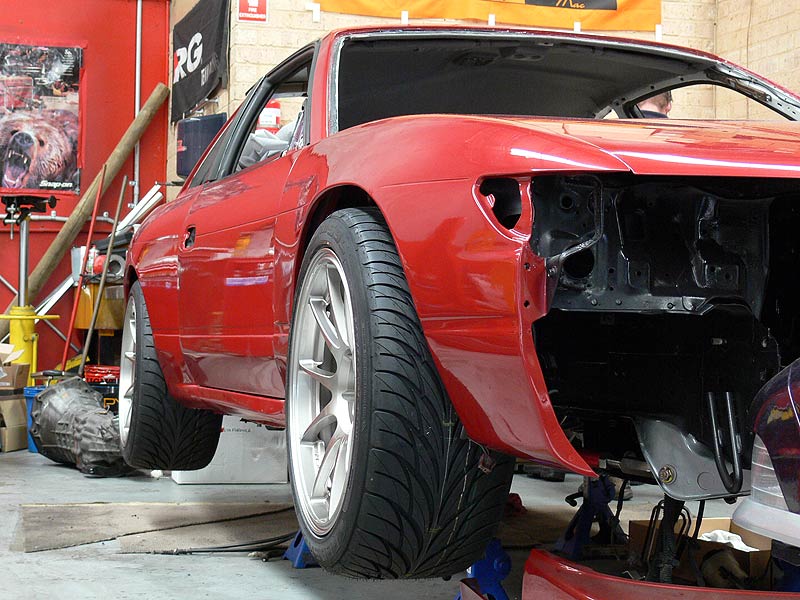
So Saturday morning I was very excited know that today was the day I'd get to see my car finally with some proper shoes on. Firstly though, I made a quick dash down to Jap Parts Plus to pick up a drivers side window glass, regulator and motor as my door was just empty (thanks to Raj at JPP). Then swung back through to Exley's Tyre Service in High Road, Willeton to grab the wheels which had been fitted with the tyres (thanks Shane). Quite a few people commented on how fine they look while I was there...and after squeezing them into the Sigma, it was off to the workshop for some rubber love.
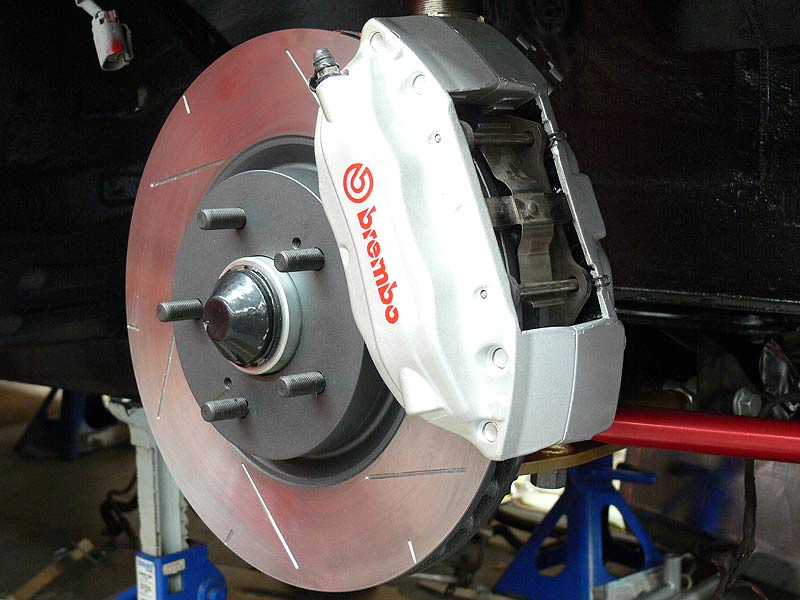
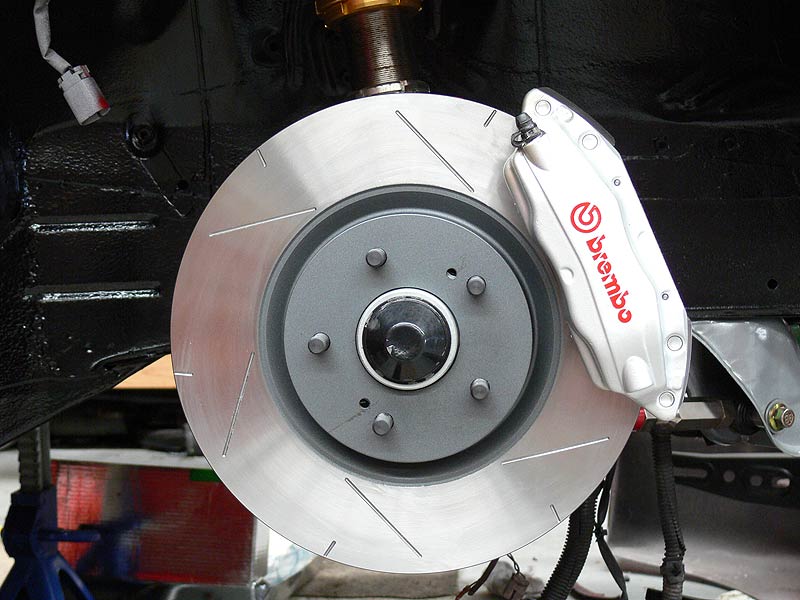
Before I could fit up the wheels though, I needed to complete the fitting of the calipers. One was already assembled, so after pushing the pads out a bit to clear the the massive DBA rotors, the front 4-spot Brembo calipers were bolted on. They look bloody fantastic.
So with a quick adjustment to the rear camber to bring reduce a lot of the negative camber that was in it, the rims went on. One that really strikes you is the solidness that you get when fitting large rims and tyres to a car of this stature. I mean when you stretch tyres on big rims too much, IMHO it looks too 'try hard'. These look like they were meant to be there...a little GT-R'ish from the rear too. You'll notice I have quickly chucked in the rear taillight to see how it looks. I was a little unsure before fitting it up that it would look cheap, nasty and common seen as quite a few people have them now, but I love it...looks factory.
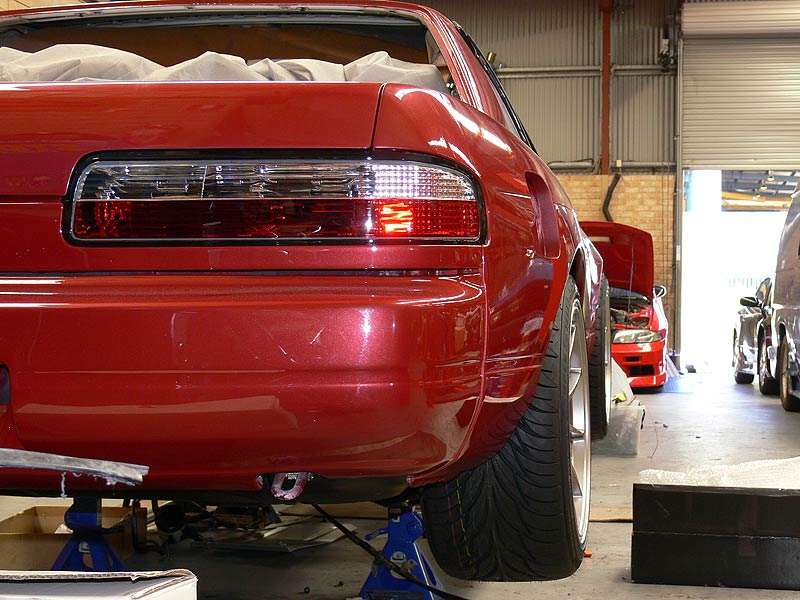
- WedsSport TC105N Fitted - Rear Quarter view
- WedsSport TC105N Fitted - Side view
- WedsSport TC105N Fitted - Rear Wheel closeup
- Sillbeer wrapped up tight...night night
So, now that that little climax is over, it theoretically can roll...although I should connect up the steering rack so it can be coaxed into a particular direction now. Really need to get stuck into the engine bay, engine and gearbox now...and for those that haven't read previous posts, the engine is built, the gearbox needs doing.
Cheers
Brendan
Tuesday, 16 January 2007 | | Categories: Brakes, Suspension, Wheels/Tyres
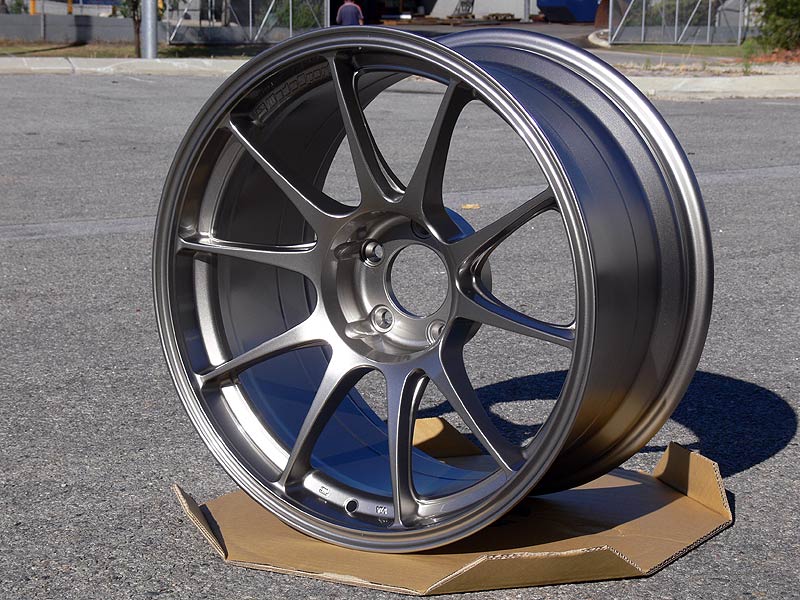
The call came about 11.00am last Friday morning from Jeff Ash at C-Red to say my wheels had arrived at the workshop. Although I felt like jumping in the car and racing out there to see them, I held off and waited until Saturday morning.
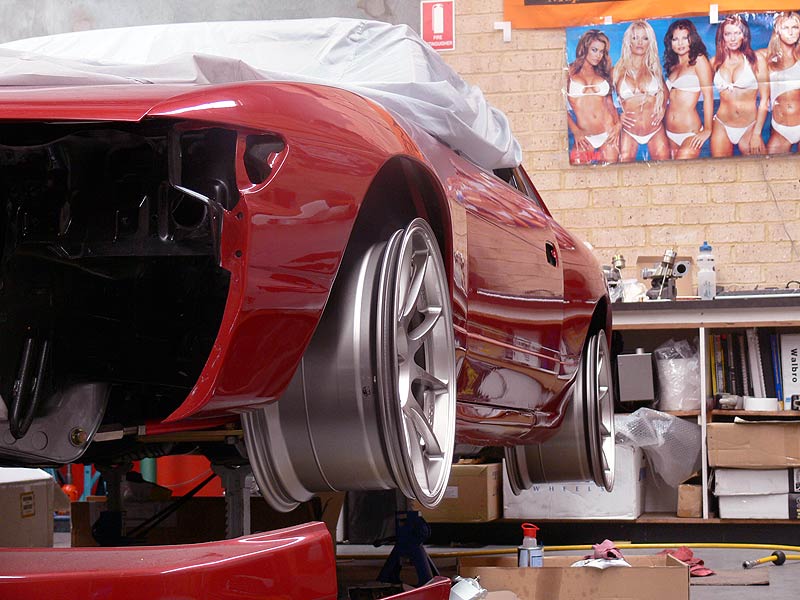
And was the wait worth it...abso-freakin-lutely! For those who haven't seen previous posts, they're from Japanese manufacturer Weds Co Ltd, and are part of the WedsSport range called the TC105N (released in 2006). These rims are just gorgeous and will suit the build down to a tee. They're very race oriented, with minimal obvious dish, and a spoke the goes from the outer lip into the centre hub which is very important for me aesthetically. The colour, which is best described as Titanium Silver (TS colour code according to Weds). The sizes are as mentioned before:
Front - 18 x 9.5 +10 @ 8.0kg
Rear - 18 x 10.5 +12 @ 8.35kg
They're seriously light and very well made. Here's a selection of pics to help you get a feel for how nice these are:
- WedsSport TC105N
- WedsSport TC105N
- WedsSport TC105N (Detail 1)
- WedsSport TC105N (Detail 2)
- WedsSport TC105N (Detail 3)
Tyres have been ordered in the form of Federal 595SS in 245/40R18 for the front and 265/35R18 for the rears. May even have by weeks end.
The offsets were always going to be hard to guess, especially with such a wide car (as it is now), but we nailed it I reckon. Not that we had much choice we ordered them as big as was available. When it came time to fit them up, I was a little disappointed with the amount they say in the guards, but on closer inspection, it was more that I had not adjusted the camber arms or lower control arms as yet. Here's a couple of shots before and after the adjustment:
- Rear Wheel fitted Before Adjustment
- Rear Wheel fitted After Adjustment
The front is on and sitting out from the guards just a smidge, but again nothing has been adjusted yet and we have about 2-3mm clearance on the coilover at the moment.
- Front Wheel fitted no adjustment
And check this out, it shows how much width I really have front and rear...it just looks so brawny it's nuts! It even has glimpses of GT-R in the rear now.
While in on Saturday, by myself mind you, I managed to get the rear Brembo's fitted up. The pins and retainer clips required a bit of scrubbing with a metal brush to remove some of the baked on brake dust, along with a quick polish. The rear's now fill the rims very nicely. Will get on the fronts this week.
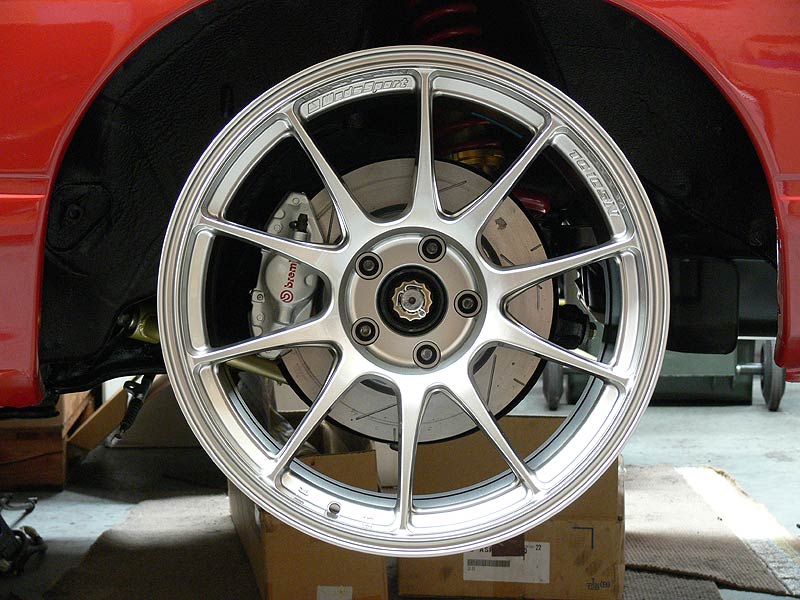
- Rear (R33 GT-R) Brembo Caliper
- Rear (R33 GT-R) Brembo Caliper - Top View
- Rear (R33 GT-R) Brembo Caliper - Fitted
It's been an exciting time getting the rims because it really shows we're getting close now. Just finishing off a couple of private jobs at the moment so I can purchase a few things for the interior (Dynamat, headunit and retrim) so that I have a nice comfy and relatively quiet and cool driving environment.
Until next time.
Cheers
Brendan
Thursday, 5 October 2006 | | Categories: Brakes, Suspension, Wheels/Tyres
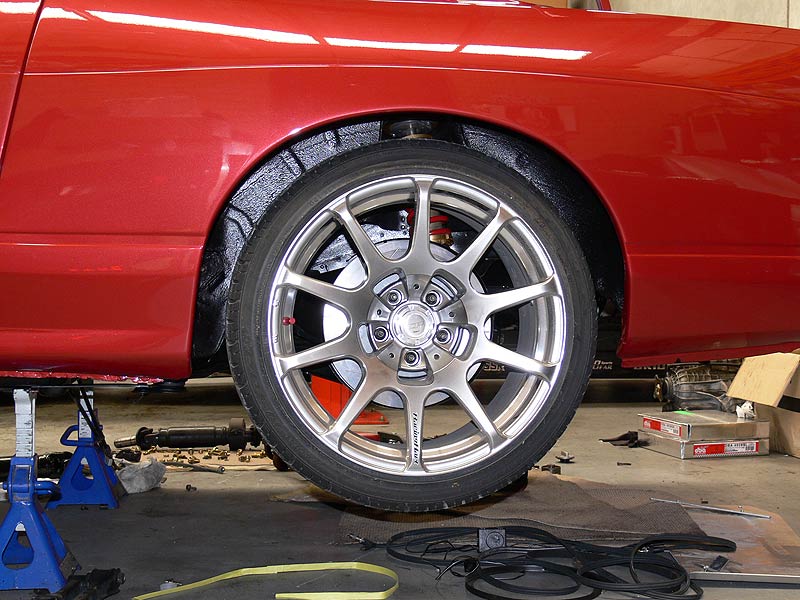
Many apologies for the delay in action over the last couple of weeks, I needed a break and sometime with the kids.
Anyway, a couple of weeks back I was prepping some stuff around the new plating kit I'm working on (to make old bolts and brackets shiny and new again), and Trent from TKO Tinting rocks up at C-Red for some cooler pipe clamps. After a bit of ooohing and aaahing at his nice red R32 he's been building he offers me the chance to trial fit his new shiny rims. They're a newish model from Racing Hart called the CP-S10 and from memory they're 18x10+19's which are fairly close to what I'm after. Now you can see from the pics here that even with these specs, they're well within the 50mm wide M-Sports guards. The wheels I have on order at the moment are the Wedsport TC-105N's with rear specs of 18x10.5+12 (see previous blog post for decent pictures), so looking at these in front of me we're thinking a 20mm spacer could be required to fill the guards nicely.
- Side on View of CP-S10 fitted
- Rear View of CP-S10 fitted
- Front on View of CP-S10 fitted
- Coilover clearance 1
- Coilover clearance 2
From those angles you also get a really good feel for how wide it is too. Mmmmm, yummy. Hope I can fit it into the carport at home.
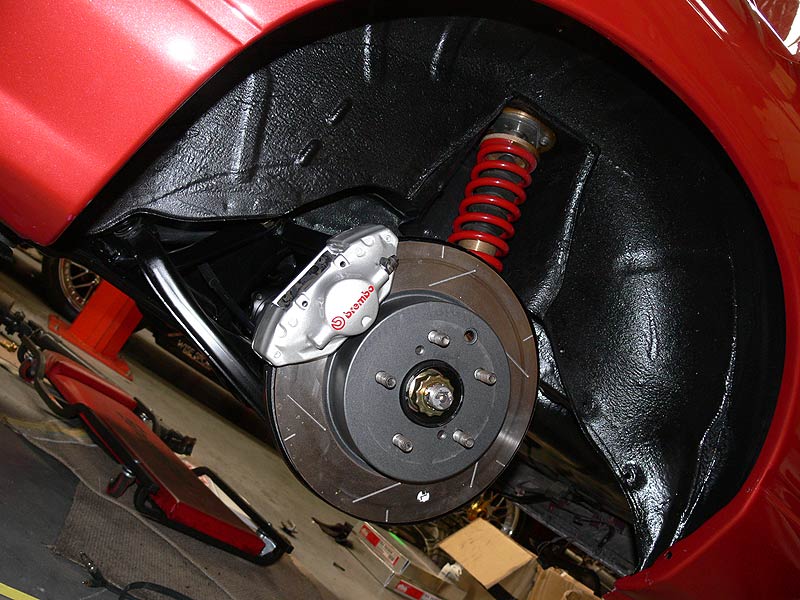
While I had the brake rotor and coilover fitted, I thought I'd just trial fit one of the rear Brembo calipers I'd re-finished. Doesn't it looks tops! There were no pads in these and I had a hard time finding the original bolts as they use a much more coarse thread than standard Nissan bolts. I think I have lost the fronts :( While I was there I took a shot of the 5-stud hubs I'd cracked open too.
- Nice shot of the rear caliper fitted up
- Close up of caliper and rotor
- With an R34 GT-R 18" wheel fitted
- Front aftermarket S13 5-stud hub
Cheers
Brendan
Saturday, 19 August 2006 | | Categories: Brakes, Driveline, Suspension
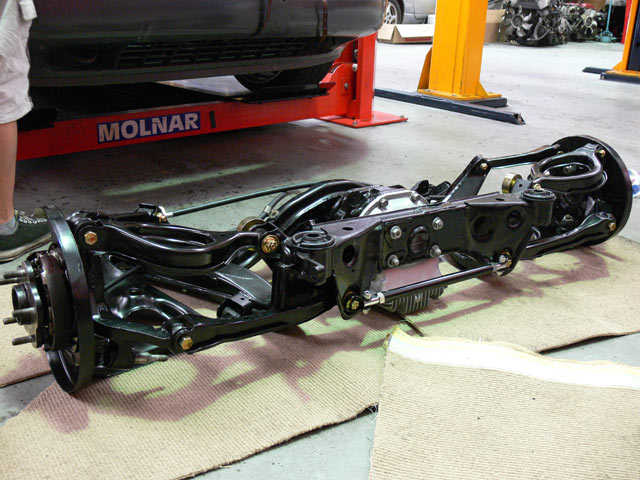
So it's been a while since my last post, but with more renovations going on and Autosalon now out of the road, I got back into the workshop for a full day to complete the rear end assembly. It all went together fairly smoothly, with Roy helping me out with one side of the hand brake assemblies (from an R33 GT-R) before I did the other under his watchful eye. Of course this was after we figured out that I had both the hubs and the hand brake pivot on the wrong sides (left on right and right on left)...der! Then came another minor hiccup...the rear lower control arms. Now after burning out the old crusty bushes with an oxy acetylene torch and repainting up nicely, I put some new bushes in one side only to find out they weren't going to fit! They were from an R32 GT-R and for some reason I had got them mixed up ages ago (about 12mths ago). I went and grabbed the originals, quickly gave it a clean up and coat of paint, and I'll redo the bushes when I replace all the arms with the Kazama ones I have on back-order. Here are some pics mid and after assembly, minus the half shafts which I missed out until someone mentioned I had better put them in then rather than after it was bolted up.
- Partly assembled
- Rear control arms
- Rear control arms
- Diff in place...sexy hey!
- R33 GT-R Handbrake Assembly
- R33 GT-R Handbrake Assembly
- Lower Tension Rod Brace
- Fully assembled (minus shafts)
The handbrake cables used were new Nissan R33 Skyline GTSt, please check new prices from Nissan before forking out for second hand ones as I've heard of some used ones going for same price as new. So once it was all together, we lifted it onto a trolley jack, wheeled it under the car, lined it up and bolted it in. Finally, I felt as though I had achieved something. Although now that it's bolted in, I know I'm going to have to take apart the outside arm assemblies anyway to replace all the arms - but at least it looks like I've done something. Pics of it bolted in:
- Rear Bolted Up 1
- Rear Bolted Up 1
- Rear Bolted Up 1
- DBA 4000 Rear Brake Rotor
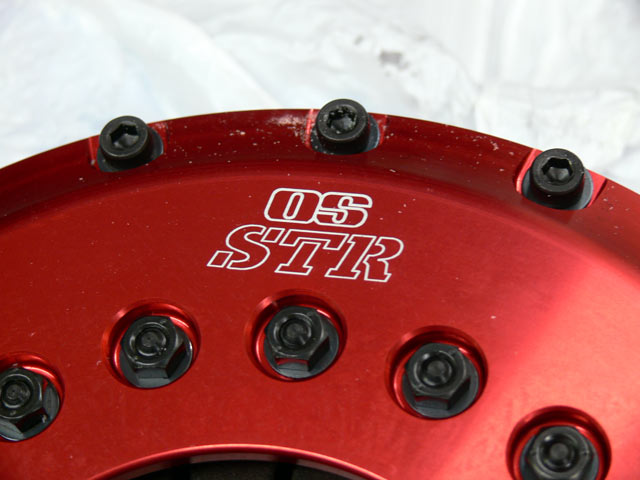
After a short wait, my new OS Giken STR (STR2C) Twin-plate Clutch arrived, and damn it's beautiful (as much as a clutch can be). Just a recap about the clutch for those that missed it previously:
The New OS Giken STR series can handle up to 600hp, yet retains drivability very close to standard with 30% lighter pedal effort than most multi-plate clutches. By using special new plate and diaphragm designs, OS Giken has achieved ample power handling with just 715kg clamping pressure. This makes the STR series perfect for everyday driving applications, along with most race and drift applications.
The clutches come complete with lightweight chrome-moly flywheel, ruby red-anodised billet aluminium clutch cover and the required bearing/carrier set or pull-push converter kit where required.
- STR2C Top
- STR2C Side
- STR2C Logo
- STR2C Thrust Bearing
A few other bits and pieces have come in too. The DBA4000 discs for the front brakes are now in, will take pics when I test fit them up. I purchased a Cusco OST Brace - for those who haven't heard of these, it mates up with a Cusco OS Rear Strut Tower Brace and adds two additional arms to tie the struts to the floor of the boot in a triangle configuration. These will need to be refinished as per my other braces (black wrinkle finish on the bar and semi-gloss on the plate). I've also purchased a kit that allows me to do my own Zinc electroplating of metal parts, saving me time in dropping them down to the platers (takes about 60mins to do parts in a bucket on site).
Not sure what's next, I know I have a lot of painting still to do (Sard fuel surge tank, intercooler, IC pipes), but also want to get the front engine support in and start on bolting the front suspension together.
Until next time.
Cheers
Brendan
Wednesday, 26 July 2006 | | Categories: Brakes, Driveline, Suspension
After recovering most of Saturday from a big night out with the boys on Friday, Roy said he'd be in at the workshop so I trundled in around lunch time to do some work on the car.
The intention was to put some of the rear end together and get the brake and fuel lines bolted back up. So, once I got there my first job was to find a fuel tank - after checking a few cuts out the back, I found one on a car up the back of the workshop in top condition - no hits. Next I dragged the brake and fuel lines out and gave them a quick wipe down with some prepsol. Once clean, slid them back under and after a bit of cursing, had them bolted into position with the newly coated bolts. Looked great.
Next was the rear end. I had brought some old bits of carpet from home a few weeks before so I layed out a few bits so I didn't scratch any of the new paint on the concrete floors. I man handled the sub-frame out from under the car, and layed it over the differential which I then...damn I didn't get the nuts coated for the diff. After a quick sandblast I bolted the diff up. This was followed by the arms. It was only now I noticed I didn't get all the bits I needed for the diff to bolt up - missing were some rubber gromets and spacers. So I moved onto the hubs and hub assemblies, where I sandblasted the bolts, layed on some anti-sieze paste and bolted hub, brake disc shield, handbrake bracket and hub assembly together.
Sorry about no pics, but that's about when Roy was closing up shop and I didn't get a chance to snap a few off.
Oh, and I received my Cusco OST Brace in the mail from JDM Concept. Cost $190 for this brace which extends my Cusco OS Rear Strut Brace down to a bracket on the floor, essentially triangulating the brace for better stiffness. Will post some pics once it's been painted the same as the other braces.
Bye for now.
Brendan
Saturday, 22 July 2006 | | Categories: Brakes, Driveline
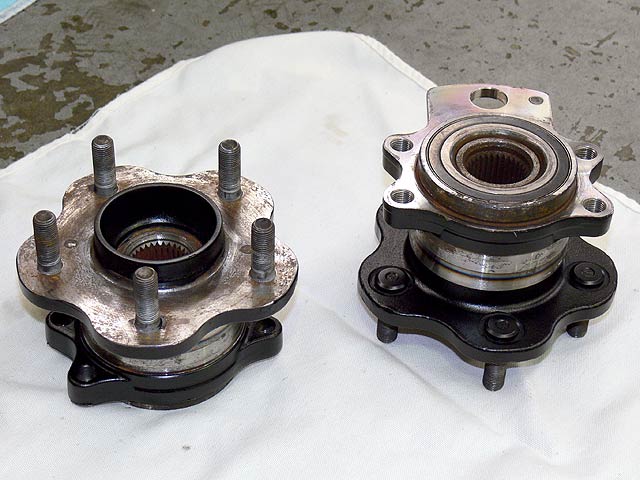
Here's a pic of the R33 GT-R hubs I cleaned up and painted last week. These will match up with the GT-R half-shafts and of course the 5-stud hubs I have for the front.

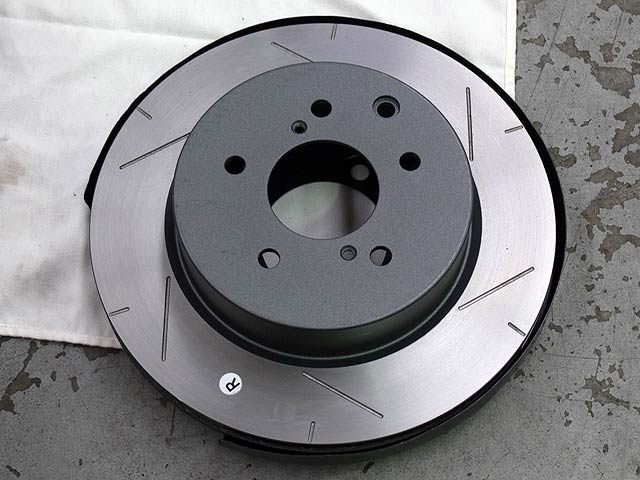
Also mentioned previously that I straightened and painted up the R33 GT-R rear brakes disc shields, so here's a pics, along with one of my new rear DBA4000 rotors sitting inside it. Fronts are on back-order from Victoria.
- DBA4000 4929 (Front of Disc)
- DBA4000 4929 (Back of Disc)
- DBA4000 4929 (Box)
Front DBA4000 Specifications:
- Model: DBA 4928S (S = Slotted)
- Diameter: 324mm
- Thickness: 30mm (Minimum 28mm)
Front DBA4000 Specifications:
- Model: DBA 4929S (S = Slotted)
- Diameter: 300mm
- Thickness: 22mm (Minimum 20mm)
This discs are specified to be used with the R32 GT-R V-spec, R33 GT-R and R34 GT-R Brembo brakes which I have. Back to the workshop tomorrow for (fingers crossed) some bolting things together.
Cheers
Brendan
Monday, 17 July 2006 | | Categories: Brakes, General
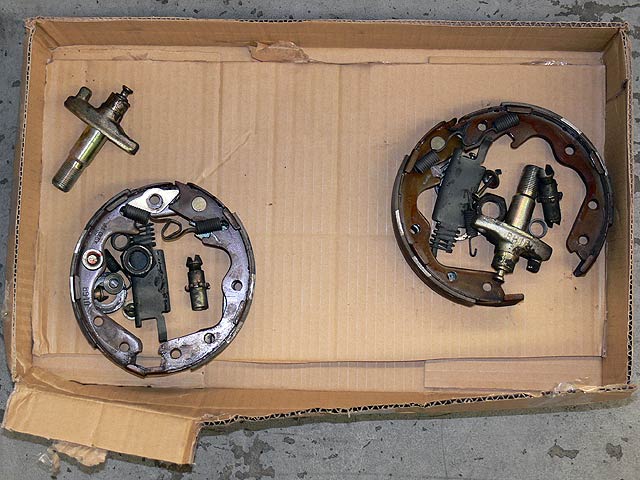
I know I mentioned that I was going to be bolting some stuff together on Saturday, but it just wasn't meant to be. Roy called on Friday and said that I'd have to look at getting the GT-R hubs out from the back corner, as the Just Jap 5-stud ones won't work with the GT-R half-shafts (or something to that affect). So first up I go the hub carriers and hubs etc off of the subframe that I'd been using, then it was a matter of taking it all apart. Thankfully it all came off fairly easily, with Roy using the hub carriers for another C-Red project that's being bolted together for the Perth Autosalon at the end of this month.
While I was at it I had to disassemble the handbrake assemblies, picture above. These basically are a small drum brake system (mechanical rather than hydraulic though) that pushes the drums against the inside of the brake disc/rotor. The hubs themselves were a little rusty in parts, so after a little bit of a scrub with a drill and nylon abrasion wheel/brush, it was masked and hit with a light coating of black paint. Also part of this lot were the rear brake rotor guards, which after a little bit of bending back into shape, a good clean with the prepsol, were also treated to a quick coat of satin black too.
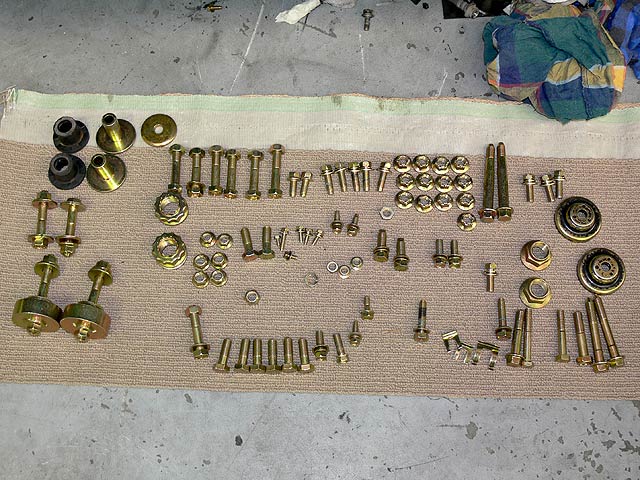
I mentioned also in my last post about getting a box of bolts etc re-coated in zinc (gold). Here they are, by no means are they the last of them, but it's a good start. Of course as soon as I looked under the car again, I spotted more that I should have done. Oh well, I know I'll have to do another batch anyway.
Thanks for listening.
Cheers
Brendan
Tuesday, 27 June 2006 | | Categories: Brakes, Paint
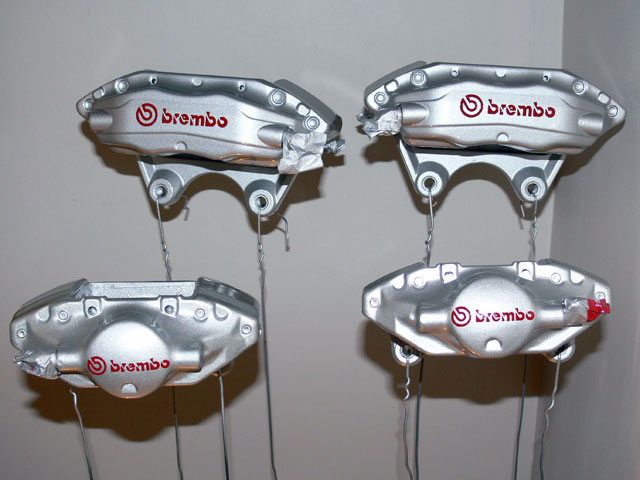
On Saturday I finally completed the R33 GT-R Brembo Brake calipers. Original Black with a White logo, I wanted something different, so using VHT's special Caliper spray paint in Cast Aluminium, Red and Clear, the transformation is now complete.
Cheers
Brendan


