Category: Engine
Monday, 13 December 2010 | | Categories: Engine
Recently I had a question sent through from 'obnxsh' on JDM Style Tuning regarding my fusebox.
I was wondering how you have the fuse box mounted where it is? Mine is currently there as well, but it is not done very well. Did you make up your own brackets?
Well, the unfortunate thing is that I wasn't there when this item was installed, so here's some pics of the item as it's mounted on the front right side of the engine bay. Excuse the water drops, they're from driving in the rain without inner guard liners.

So here you can see it's tucked right in to the corner behind where the battery would have originally been located. You can see the simple bracket I made up for the washer bottle in front of it. In behind is an access hole to the inside of the front guard where the loom is fed through and over the top of the front chassis section out of the way of the tyre.
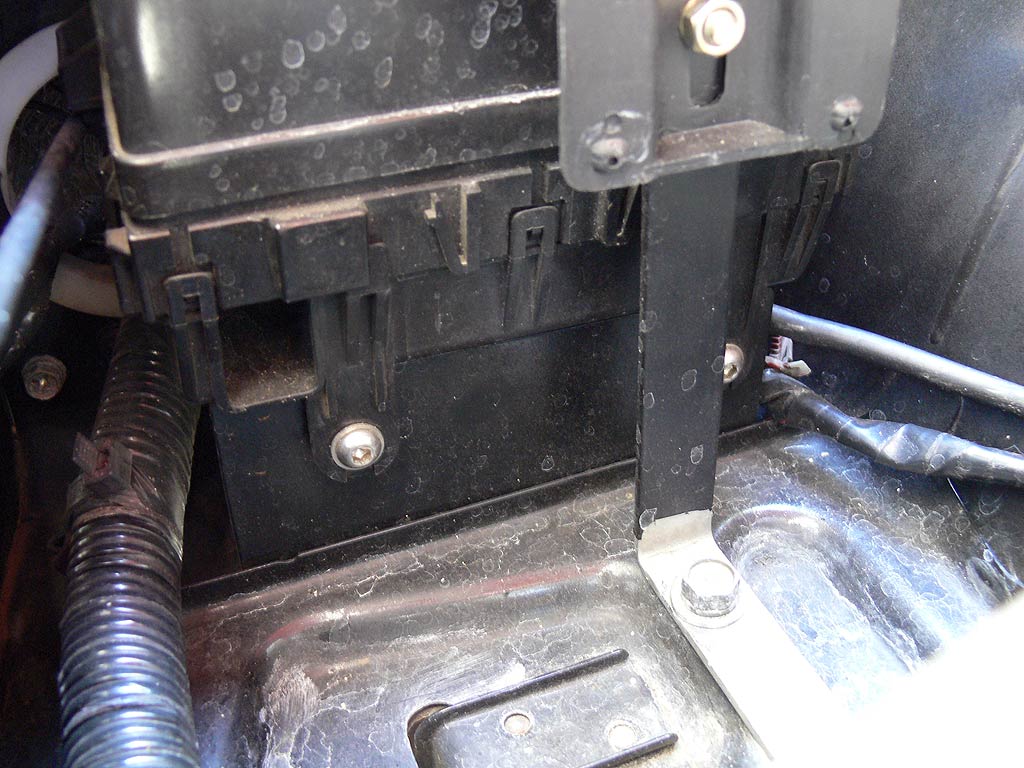
Here's a closeup of the fusebox mounts. The box is held in place by two stainless allen screws attached to a metal bracket that is an 'L' plate bolted down to the horizontal next to the battery tray.
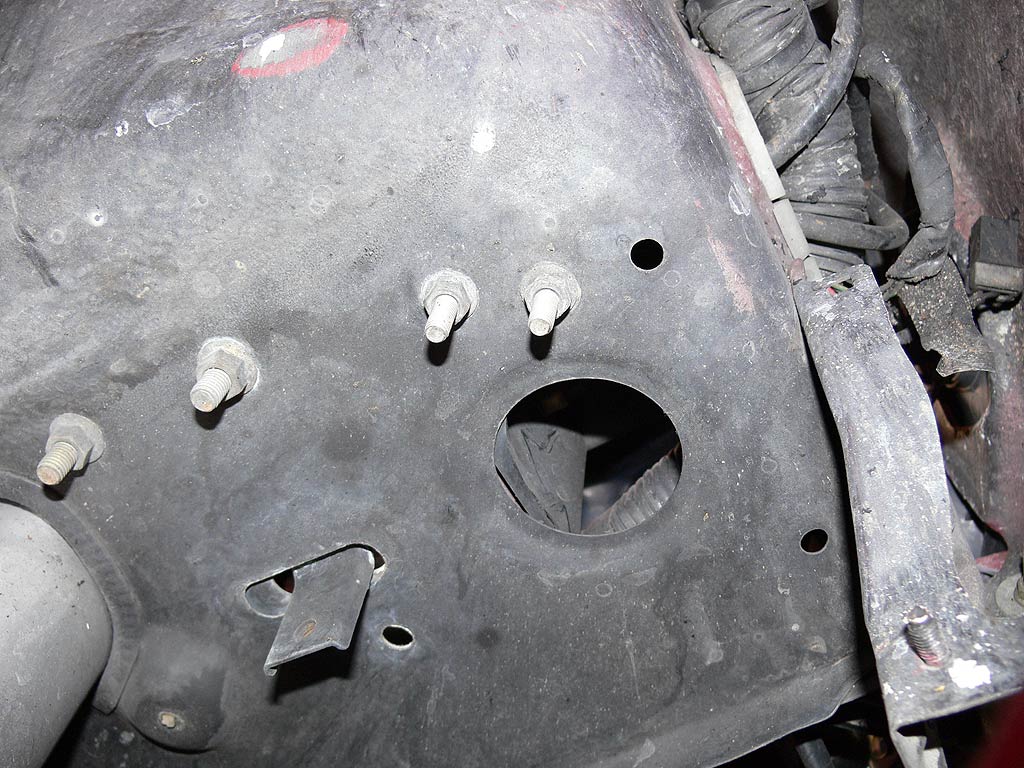
From underneath you can see the two bolts (centred in the photo) holding the bracket in place and also see the vertical section of the 'L' bracket through the hole. I believe this hole would originally have been used by the filler neck running down to the washer bottle which would have taken up residence underneath in this location. The loom can be seen going through the guard in the top right of the photograph.
I hope that helps those looking to mount their fusebox snug in the engine bay and providing room for an aftermarket washer bottle and mounting the battery in the boot.
Cheers
Brendan
Saturday, 1 May 2010 | | Categories: Engine
Jeez, what a hectic couple of months, and it's just getting stupider (is that a word?).
Anyway the car is back on the road again, and is currently being run on. Almost got 500kms racked up, which has been a little difficult as I work from home now so my daily commute is walking 3 steps from the bedroom to the office.
The guys at C-Red have done a great job. The head work done previously from the person I bought it from and the work done by Josh and Boney have produced an engine that doesn't have the usual truck rattles you hear from an SR20.
Additions on this full engine rebuild included new forged 9.0:1 compression CP Pistons (to replace the Z32 slugs in there before), ACL Race bearings (the original Nissan ones were living a hard life), Tomei N2 Oil Block (to replace the GReddy sandwich block), new Nissan S13 SR20 Oil Pump (to replace the GTi-R pump as it wasn't mating to the engine properly - causing oil leaks) and the Ross Performance harmonic balancer (to replace the lightened GFB crank pulley).
Cosmetically I also changed over the old rubber radiator and intercooler (yes there was still some) hoses with Samco Black silicon items. The oil breather hose that was originally rubber with an orange heat shield sheathing has been replaced with a stainless item.
It's a great feeling to get back in the seat. The Sigma is getting a little old and grumpy now so almost time to put that to pasture.
Will probably be a delay on the next post as Blogger is pulling the plug on FTP publishing to domains other than their own, so I'm having to move the site content to another system.
Cheers
Brendan
Friday, 25 December 2009 | | Categories: Engine
Dropped into C-Red this afternoon to say Merry Xmas et al. Marc started out with the bad news when I arrived...the block has been machined too much from past rebuilds and can't be used. Then he delivered the good news in that they'd already sent another block off to them. Apparently the workshop floor looked no dissimilar to how a South African lions meal looks like after tearing it apart with oil, coolant and SR20 gizzards all over the place to not stop the rebuild train.
Many thanks to Boney for getting this done quicksmart.
See you on the other side of New Years.
Cheers
Brendan
Wednesday, 16 December 2009 | | Categories: Engine
Just got word that the short block and related parts have been sent off to Heinz for it's rebuild where it will be fully balanced and blueprinted (a lot of the parts are already done, but assume it will be done again).
It doesn't mean it'll be started immediately as I believe there's a few engines already in the queue before me. But I'm excited anyway.
Cheers
Brendan
Sunday, 13 December 2009 | | Categories: Engine, Driveline
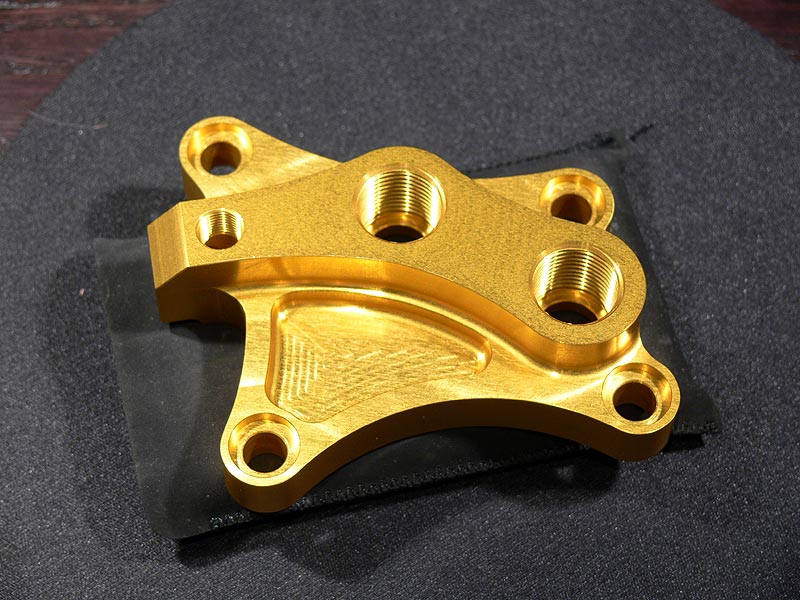
A few pieces that I got from eBay have arrived. After an initial problem with the first order being made and the seller not actually having stock, it was cancelled and re-ordered with another ebayer after confirming they did actually have the stock ready to deliver.
The first and more blingy item is the Tomei N2 Oil Block to replace the standard Nissan Oil block made for an oil filter, not oil cooler lines.
Here's what the Tomei website say about it:
The SR20 engine's oil block tends to fail due to the weak oil filter sensor screw which oftens breaks. We at TOMEI had found the problem while we were competing in professional N2 race series over 10 years ago. So we designed this upgraded product which solved the problem. THis was later discountined but due to it's extremely popular demand we decided to re-release this product with a new design. Now lighter than ever before and has the ports for the original OEM sensors for direct fitting as well. The failure of your oil block can lead to disasterous results with terminal engine failure. With all the time and money spent on your race engine this is an absolute must have upgrade to protect your investment. Especially with engines running a sandwhich plate or similar oil cooler this is an essential safety precaution.
The other item is to replace the little thing that broke and started all these shenanigans. Back in June, the standard Nissan clutch fork release pivot failed after being hammered most of the day at Barbagallo Raceway. It was more than likely the same was originally fitted to the S14 5-speed box from factory and wasn't really something made for punishing use with a twin plate clutch. Again, in hindsight I should probably have replaced this item when the clutch plates were replaced in March this year. Again...meh.
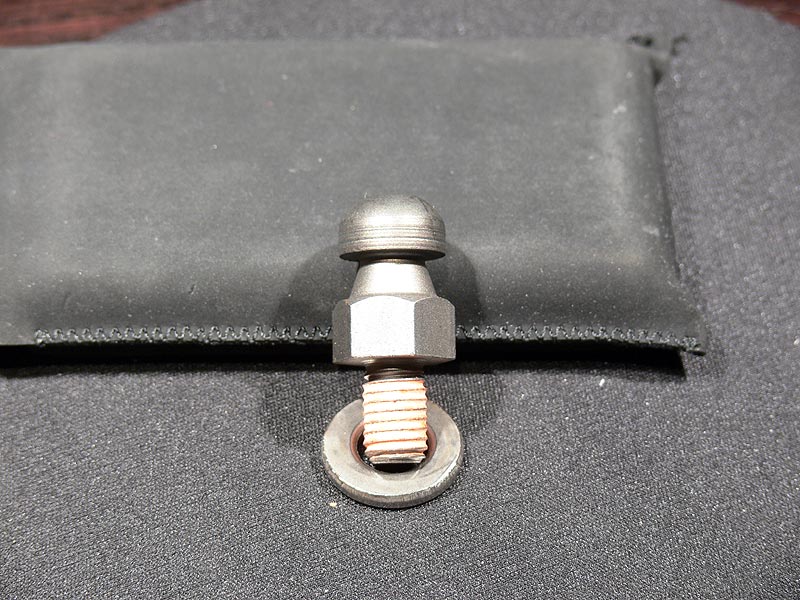
So this is the Nismo Reinforced Release Pivot that will now be taking a pounding under the clutch release fork.
That's pretty much all the crucial bits I need at this stage, one final item I will need to get will be the replacement silicon hose that I went and replaced while at the track - it was bright blue, and I'll be replacing with a nice black Samco item to match the rest of them.
Have a Merry Xmas and drive safe.
Cheers
Brendan
Wednesday, 2 December 2009 | | Categories: Engine
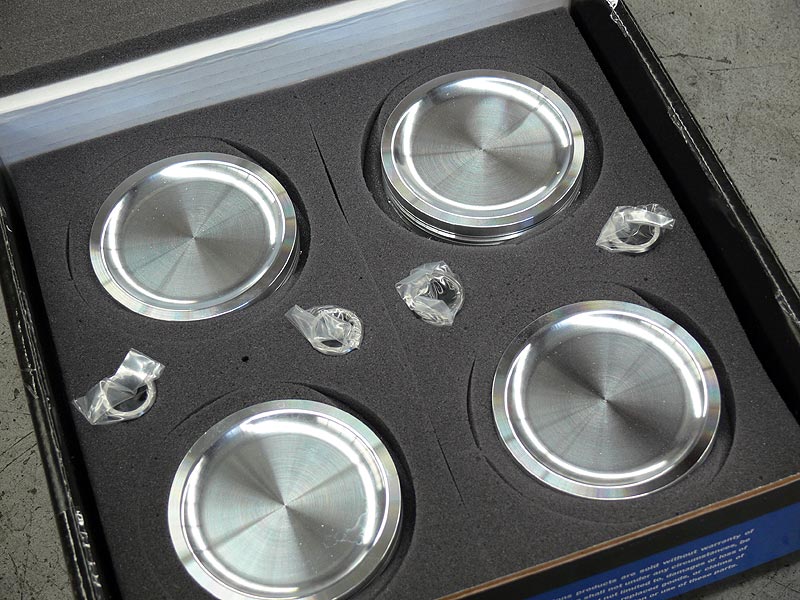
A couple of other items have arrived in the last few days being the pistons and oil pump. Firstly the beautiful CP Forged Pistons setup for 9.0:1 compression ratio and 3.425inch (86.995mm) bore diameter. These will replace the standard Nissan Z32 pistons from a VG30DETT which were in the engine when it was removed from the shelf in its original rebuild. In hindsight, a set of these should have gone in originally thus why we're doing it now.
- CP Pistons box
- Label on side of the box (Shelf Part SC7326 / Serial 114465)
- Four set of rings
- Close up of rings label - CPN-3425
- Gudgeon pin circlips I think
- Piston specification sheet
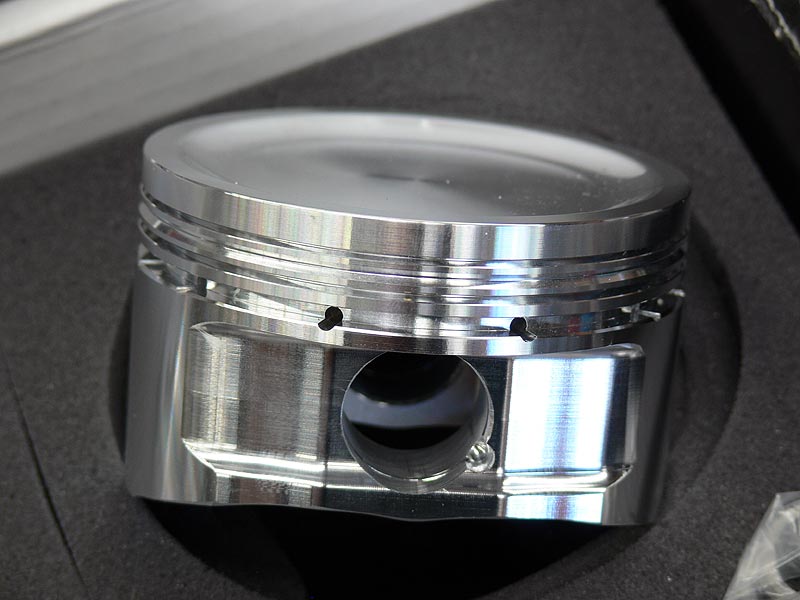
- Underside of CP Piston
- Another side closeup of piston
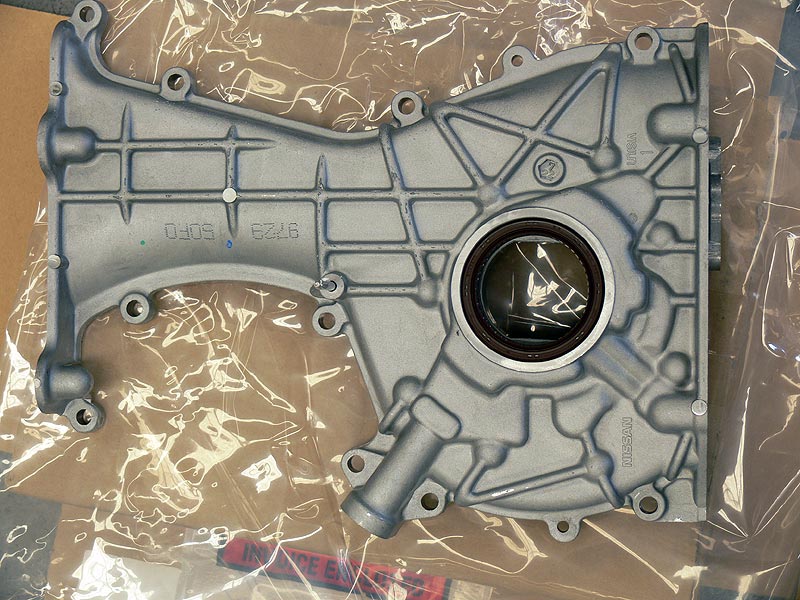
Of course the other main item that's been shipped over from Japan thanks to Nissan is a brand new Oil Pump for S13 SR20. This will replace the problematic GTi-R Oil Pump that was fitted the first time. It was a constant problem leaking oil mist down the front of the engine and making a right mess. The new pump will be mated with the Ross Tuffbond Metal Jack Harmonic Balancer that I've already received.
- Oil Pump box
- Closeup of front cover serial I think
- Embossed Nissan logo on cover
- Oil pumps main seal
- Oil pump gears/rear of cover
The oil pump gears have been sent off along with the rockers to be cryogenically treated by Lou from Cryogenics West given both items of better chance of survival under the beating up they will get with "increased wear resistance, enhanced durability".
I have the Nismo Reinforced Release Pivot and Tomei N2 Oil Block on order and just waiting for them to get delivered.
Cheers
Brendan
Saturday, 21 November 2009 | | Categories: Engine
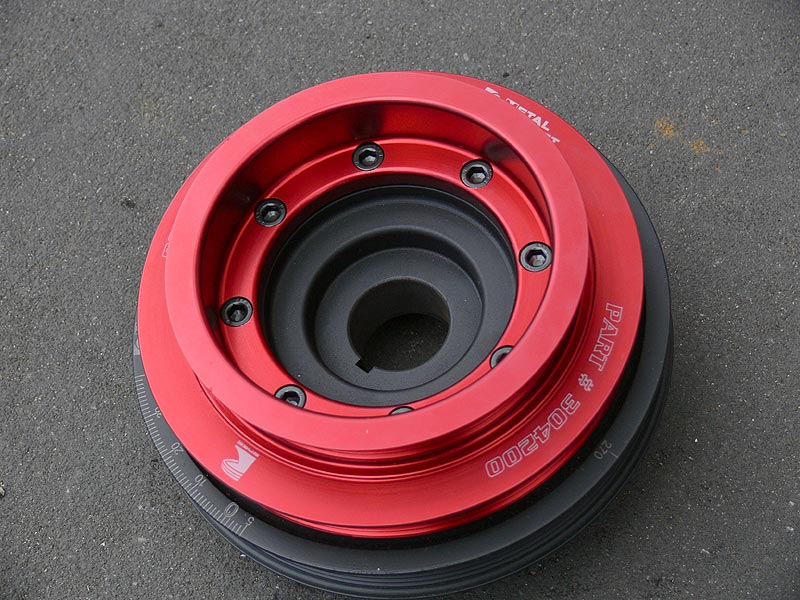
Well the parts have started to arrive through to C-Red. The first worth of posting (among assorted replacement gaskets etc) is this beautiful piece of automotive art from Ross Tuffbond. It's their Metal Jacket Harmonic Balancer for Nissan SR20. They usually come in a nice shade of deep anodized blue, but this was a part that would be seen and as I'd chosen red for my highlight colour I made a custom order in Red. It's so nice I almost used it as a Xmas bauble for the tree this year.
- The box it comes in
- Close up of label - Ross Part Number 304200 (for SR20 RWD only)
Of course once the box is opened this is what you get:
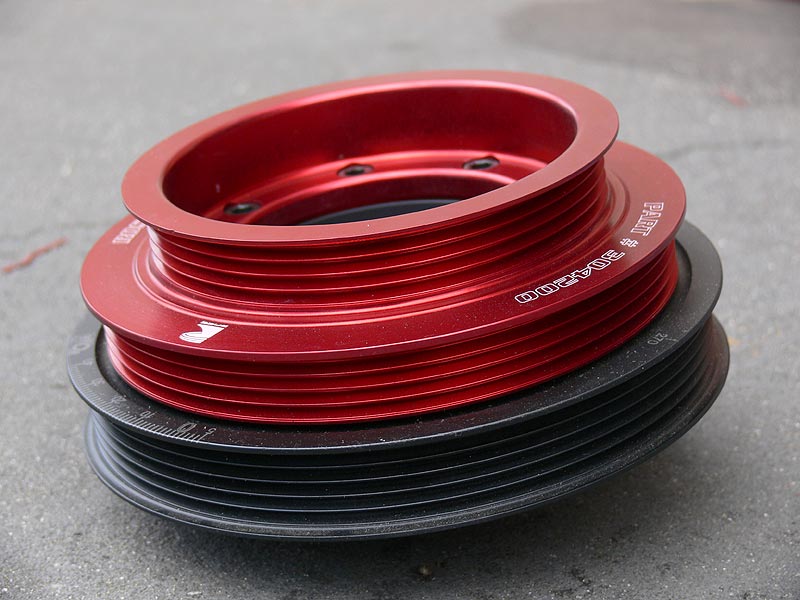
- Close up of the timing marks
- Another profile shot
- Close up of inner bolts
- Reverse side of the crank pulley
Information from the Ross website:
Introducing a revolutionary development in torsional dampening technology. Utilising the ROSS Tuffbond original elastrometric bonding process to produce the ROSS Metaljacket® series harmonic balancers / crank pulley dampers.
-
360 timing marks at 1deg intervals
-
Adjustable timing disc, for TDC accuracy
-
Precision CNC machined 40 Tonne tensile alloy steel hub and vibration dampening ring
-
Dampening ring and hub permanently bonded together on TWO axis by our exclusive Tuffbond elastrometric bonding process, ensuring maximum harmful vibrations are absorbed.
-
balancer is anodized for durability and appearance
-
Absorbs more damaging torsional harmonic vibrations
-
Quicker engine acceleration
-
Increases engine life
-
Lifetime warranty, even for racing use - a world first!
-
Never requires maintenance or rebuilding - ever!
-
Rated to 1500 HP
-
Encapsulated MetaL Jacket® design exceeds AN DRA and SF1 i8.1(USA) requirements
-
Fits standard or modified engines
-
Affordably priced
Now this is a pretty trick bit of kit and have only heard good things about them...admittedly mainly used on high output RB26 engines. It will also bolt up directly to the S13 SR20 Oil Pump which is having to come over from Japan.
More to come as more arrives.
Cheers
Brendan
Sunday, 18 October 2009 | | Categories: Engine
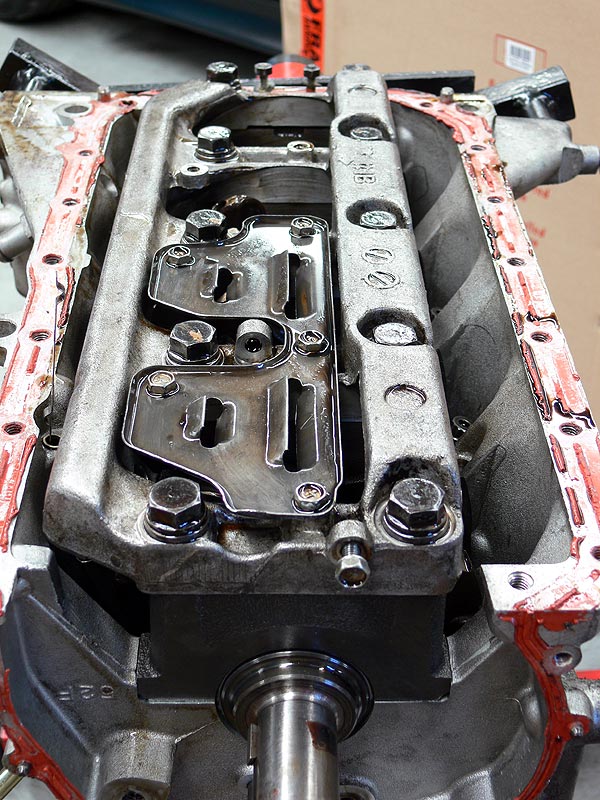
Yesterday I completed the tear down on the SR so it could be sent off to Heinz for the bottom end rebuild once the replacement parts arrive. The task though was to remove the crank, rods and pistons so all I was left with was a block.
- SR20 Crank girdle and oil baffles
- SR20 GTi-R Oil Pump removed
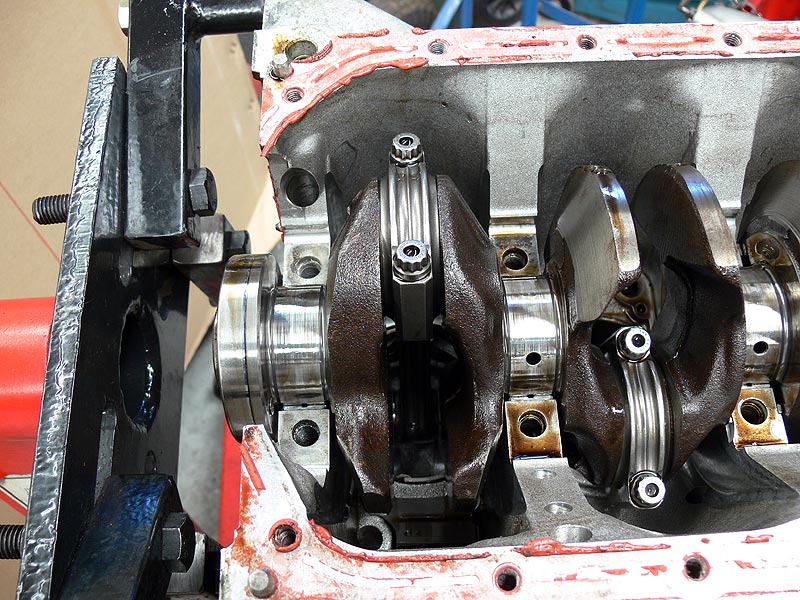
Once the oil pump was gone, the girdle could be removed and then the main caps for a good view of the journals and bearings. These are Eagle Forged Conrods with ARP rod bolts. The journals seem to be on OK condition and should just require a polish.
- Piston 3 Conrod caps
- Piston 2 Conrod caps
- Piston 1 Conrod caps
- Main bearings - show some heavy usage
- Close up of the bore
- Close up of the crank journals
- Rod and pistons now removed
- Eagle Rod with Z32 piston
After this was all done, it was time to put the shopping list together. I made the decision to no longer use the GTi-R oil pump as after a bit of research it was hit and miss on the whether or not the oil leakages can be stopped. It will be replaced with a standard S13 pump and we'll get the gears cryo treated for some extra insurance. With the reversion back to the standard pump, the GFB light weight pulley will no longer fit properly. This means with another GFB pulley, a standard SR20 dampened pulley or another aftermarket one. I'd heard nothing by good things about the Ross Harmonic Balancers, and although a 4-cylinder doesn't really need it, it's just good to use them anyway. So that will be on the shopping list.
Of course the Tomei metal head gasket can't be reused without a few hours work so a new one will be ordered. Now the big question comes around pistons...what to get. The original intention with the engine was response over all out power, and after good results from other engines C-Red had built with higher compression pistons, the decision to order a set of CP Forged Pistons with a 9.0:1 compression ratio has been made.
If you remember back to the track day, I was a little surprised to see oil up on the intake side of the engine and my thoughts are that the sandwich plate for the GReddy Oil Cooler kit is a potential fail point in the system. It uses only a single screw in the centre to latch onto the original mounting for an oil filter. I'd been eyeing off an item from Tomei call the N2 Oil Block which basically replaces the standard factory oil block with one that takes -10 AN lines instead of a filter...tick! The last obvious item is a replace releave pivot in the form of a Nismo Reinforced Release Pivot.
So now it's a matter of waiting for the parts to come in and then send off for bottom end rebuild. I thinking that will put us fair and square in the Xmas shutdown period so I am expecting some delays. Not to mention I know I have too much work on too.
Cheers
Brendan
Tuesday, 13 October 2009 | | Categories: Engine, Driveline
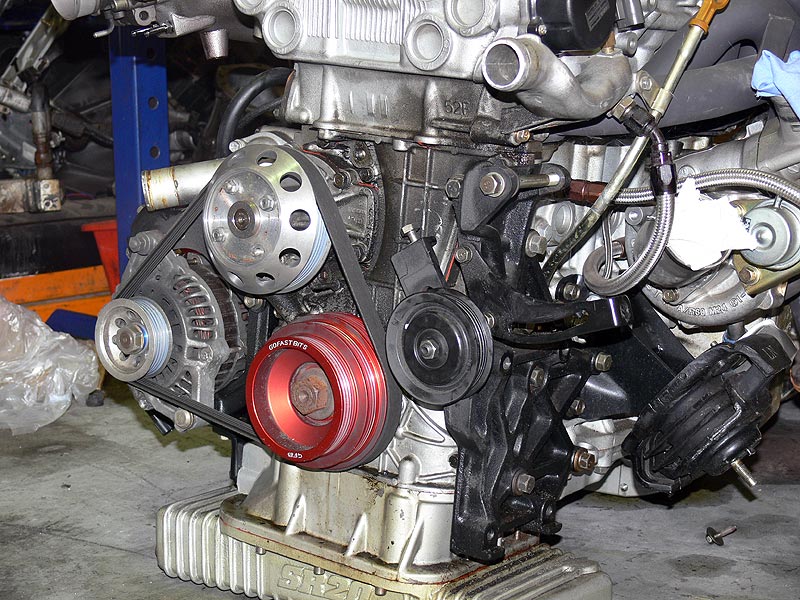
After the engine was taken out, I had a chance to talk over the plan with Marc, Josh and Boney from C-Red. We knew we'd be removing the head and doing all the stuff around that - alleviating any problems with the valve seats being too far gone. But that left the question on whether or not to freshen up the bottom end while it was out doing rings and bearings. That lead on to the question about the pistons. During tuning, Sean at Allstar had mentioned the engine getting a little 'noisy' up high...possibly a function of the pistons being standard Z32 pistons. The consensus from all was that it would be prudent while the opportunity was there to go with a set of forged pistons. These would then match with the Eagle conrods already in the engine with the Nissan bearings being replaced with ACL Race bearings to top it all off. So the strip down begun...
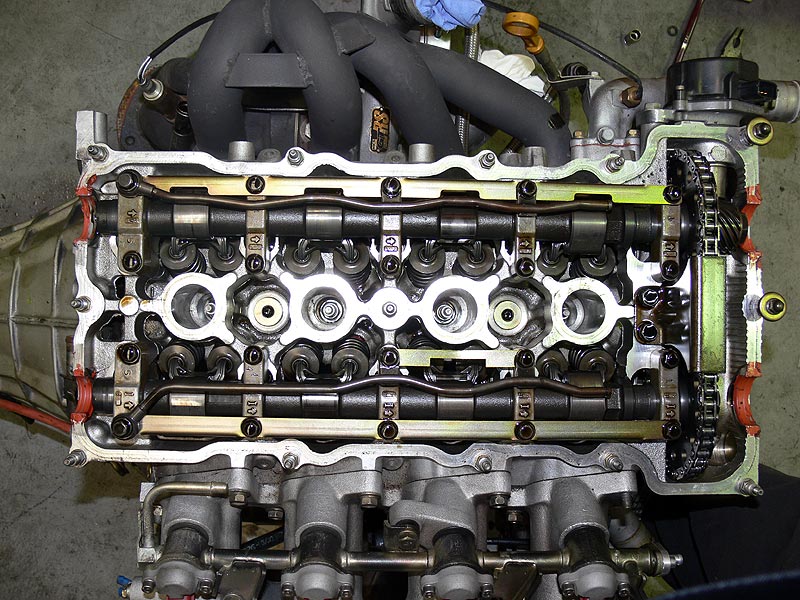
Firstly the cam cover was removed and all the camshafts were removed to allow access to the head studs.
- Specifications on the GReddy Pro Exhaust cam - 264deg 11.5mm lift
- Adjustable Cam Gears - unknown manufacturer (more than likely from Japan)
- GReddy Cams out with Tomei Rocker stoppers in the box
- GReddy branding on front camshafts
- IN and EX label on GReddy cams
- Close-up of specifications and serial number on GReddy Pro Cams
- SR20 Rockers and Cam caps all lined up - all seem to be in good condition
- SR20 Adjustable cam gears front
- SR20 Adjustable cam gears back
- Spark plugs looking pretty good
Now the reason for choosing the head in the first place was the porting and knife-edging that had already taken place on the head. In hindsight (which is a wonderful thing), I should have looked more closely at the head for the valve seat condition and depth.
- SR20 Head porting on cylinder intake 1
- And then well matched across all cylinder intakes
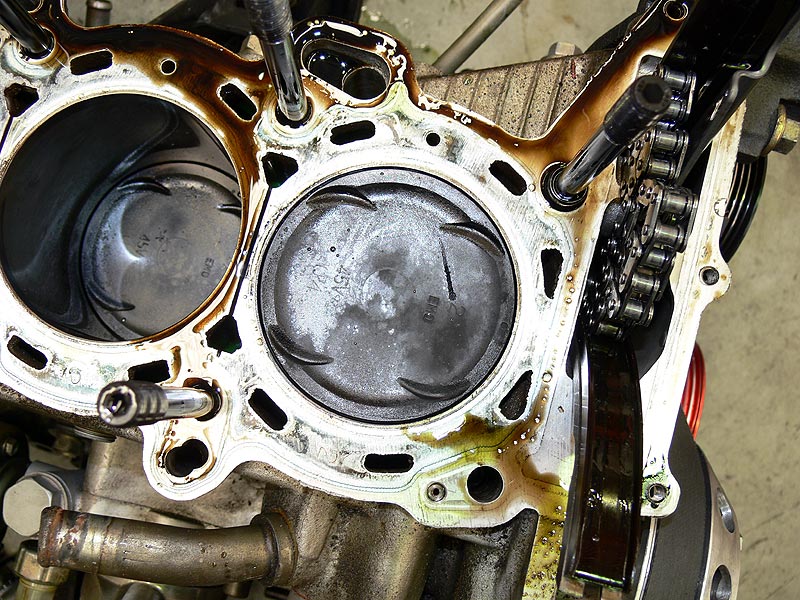
Now that the head was off, it was time to see how the pistons and bores had fared. These pistons came originally from the engine that came off of the shelf for SILLBEER - it didn't have an engine in the hole when I started. We eventually figured out they were from a Z32 VG30DETT engine and were fitted to this engine when it was rebuilt in Japan. We decided to stick with them originally because I was running short of cash, again in hindsight I should have just waited until I had some more fold but...meh.
Note the numbers on the top of the piston for reference are '2 EMO' followed by '45V' and '04'.
- Cylinder number 2
- Cylinder number 3
Just a slight amount of carbon built up.
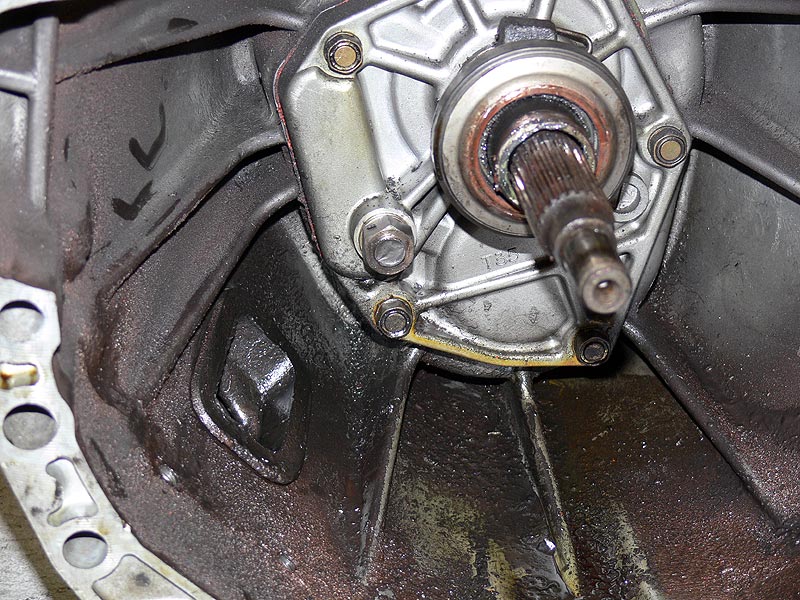
Next item was to remove the gearbox and confirm the breakage that occurred at the track. Looking at the inside of the bell housing, the clutch fork was loose, and no longer attached to the release pivot. The snapped release pivot was indeed the failure - seen above as the nut looking thing to the lower left of the input shaft.
- Release Pivot Ball snapped off inside clutch fork
- OS Giken STR Twin plate clutch
- Broken SR20 Release Pivot
And that was pretty much the day. Here's a few shots of where I got to after about 3hrs or so.
- SR20 stripped intake side
- SR20 stripped exhaust side
- SR20 front with oil pump still fitted
- SR20 sump removed showing crank girdle
Next week I'll finish off the rest of the tear down removing crank, rods and pistions, oil pump and anything else left over.
Cheers
Brendan
Saturday, 26 September 2009 | | Categories: Engine, Driveline
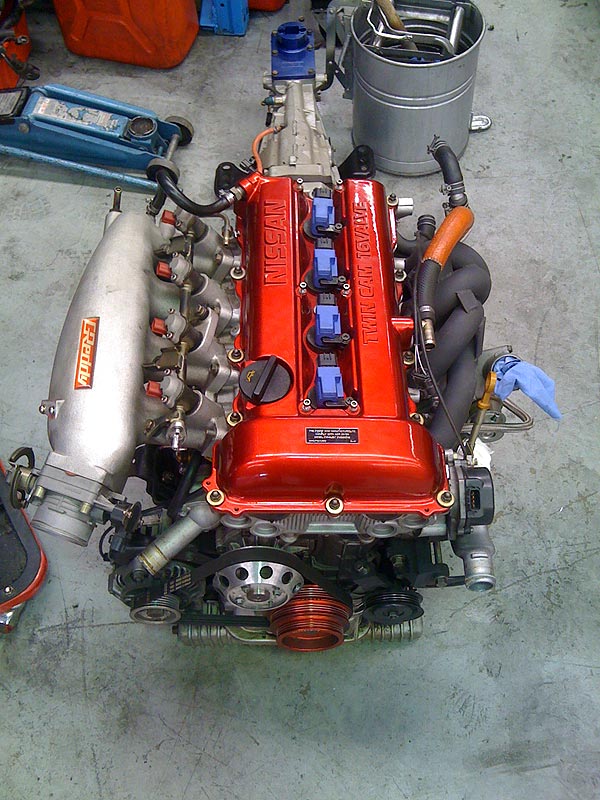
Well it's been a few months since the car broke and was sent to the workshop corner for its misdemeanours...or is that my misdemeanours? Anyway, the boys at C-Red have been very busy and also been on holidays so my project was put on hold while they cleared their backlog of work. Having said that, I've been stupidly busy as well...this being my first year working for myself (since Decmber 2008), and I'm happy I've been busy too. Unfortunately it left little time to work on getting the Silvia sorted.
A few weeks ago I got in and removed all the ancilliaries from the engine ready for it to be removed. Now why am I removing the engine you may ask? Well if you've been following the blog, last year I reported problems with the engine, specifically the head and have been meaning to replace the head for some time. As the gearbox had to come out, and it's much easier to work on the engine with it extracted from its home, the whole package has been removed.
- Exhaust side of the SR20DET
- Intake side of the SR20DET
- Front side of the SR20DET
As you can see at the front, there's a fair amount of oil mist coming from around the GTi-R Oil Pump. Still yet to decide what to do about this, whether to try and fix or replace with an S13 pump again. Replacing the pump though means I'll need to get a new crank pulley. But they're all decisions we can make once the engine has been torn down which I will be doing over the next few weeks.
With the engine out, I'll also be cleaning up the engine bay back to top shape ready for it to be re-inserted.
Cheers
Brendan


