Category: Driveline
Saturday, 12 December 2009 | | Categories: Engine, Driveline
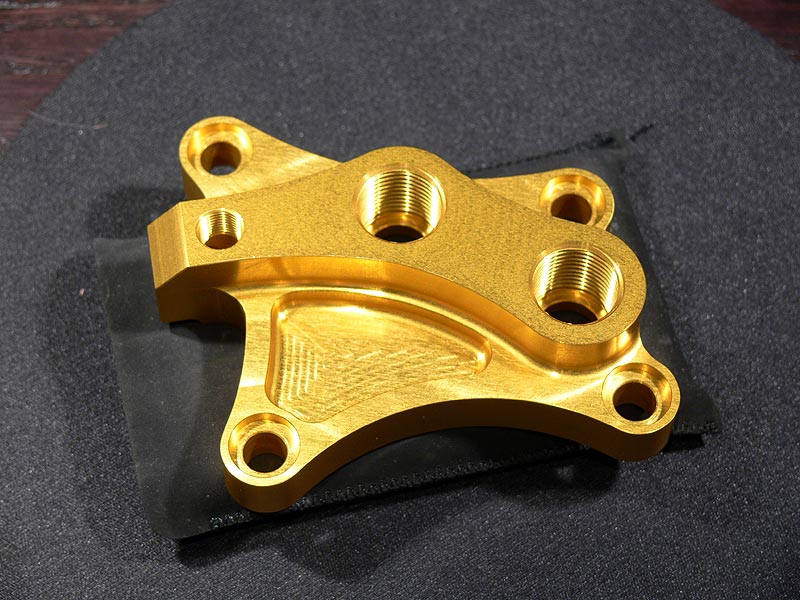
A few pieces that I got from eBay have arrived. After an initial problem with the first order being made and the seller not actually having stock, it was cancelled and re-ordered with another ebayer after confirming they did actually have the stock ready to deliver.
The first and more blingy item is the Tomei N2 Oil Block to replace the standard Nissan Oil block made for an oil filter, not oil cooler lines.
Here's what the Tomei website say about it:
The SR20 engine's oil block tends to fail due to the weak oil filter sensor screw which oftens breaks. We at TOMEI had found the problem while we were competing in professional N2 race series over 10 years ago. So we designed this upgraded product which solved the problem. THis was later discountined but due to it's extremely popular demand we decided to re-release this product with a new design. Now lighter than ever before and has the ports for the original OEM sensors for direct fitting as well. The failure of your oil block can lead to disasterous results with terminal engine failure. With all the time and money spent on your race engine this is an absolute must have upgrade to protect your investment. Especially with engines running a sandwhich plate or similar oil cooler this is an essential safety precaution.
The other item is to replace the little thing that broke and started all these shenanigans. Back in June, the standard Nissan clutch fork release pivot failed after being hammered most of the day at Barbagallo Raceway. It was more than likely the same was originally fitted to the S14 5-speed box from factory and wasn't really something made for punishing use with a twin plate clutch. Again, in hindsight I should probably have replaced this item when the clutch plates were replaced in March this year. Again...meh.
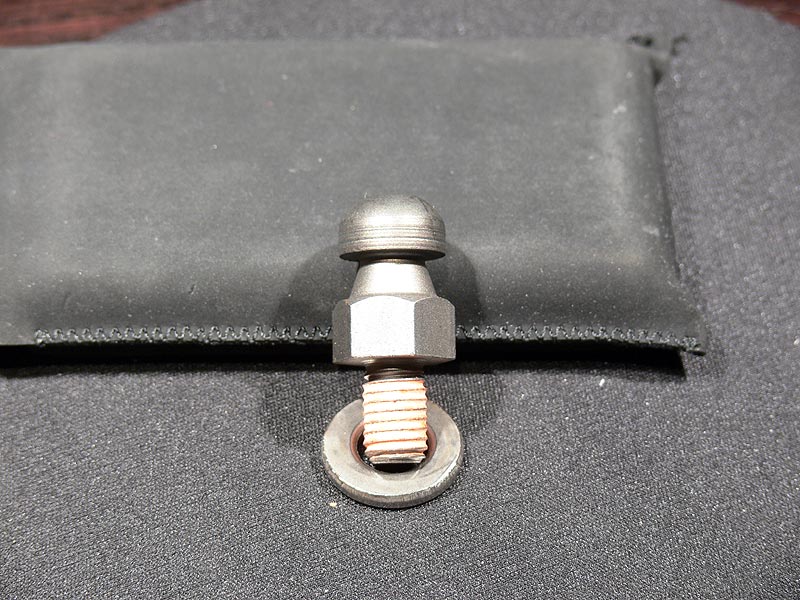
So this is the Nismo Reinforced Release Pivot that will now be taking a pounding under the clutch release fork.
That's pretty much all the crucial bits I need at this stage, one final item I will need to get will be the replacement silicon hose that I went and replaced while at the track - it was bright blue, and I'll be replacing with a nice black Samco item to match the rest of them.
Have a Merry Xmas and drive safe.
Cheers
Brendan
Tuesday, 13 October 2009 | | Categories: Engine, Driveline
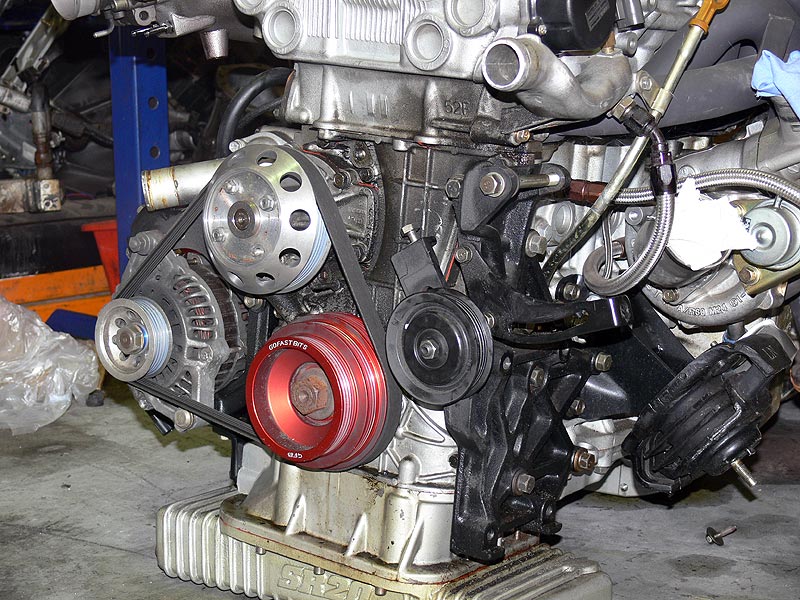
After the engine was taken out, I had a chance to talk over the plan with Marc, Josh and Boney from C-Red. We knew we'd be removing the head and doing all the stuff around that - alleviating any problems with the valve seats being too far gone. But that left the question on whether or not to freshen up the bottom end while it was out doing rings and bearings. That lead on to the question about the pistons. During tuning, Sean at Allstar had mentioned the engine getting a little 'noisy' up high...possibly a function of the pistons being standard Z32 pistons. The consensus from all was that it would be prudent while the opportunity was there to go with a set of forged pistons. These would then match with the Eagle conrods already in the engine with the Nissan bearings being replaced with ACL Race bearings to top it all off. So the strip down begun...
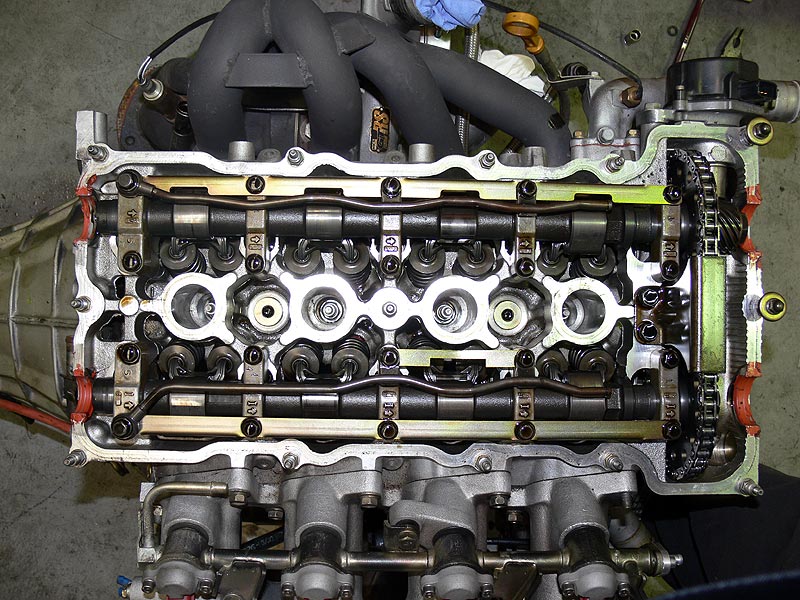
Firstly the cam cover was removed and all the camshafts were removed to allow access to the head studs.
- Specifications on the GReddy Pro Exhaust cam - 264deg 11.5mm lift
- Adjustable Cam Gears - unknown manufacturer (more than likely from Japan)
- GReddy Cams out with Tomei Rocker stoppers in the box
- GReddy branding on front camshafts
- IN and EX label on GReddy cams
- Close-up of specifications and serial number on GReddy Pro Cams
- SR20 Rockers and Cam caps all lined up - all seem to be in good condition
- SR20 Adjustable cam gears front
- SR20 Adjustable cam gears back
- Spark plugs looking pretty good
Now the reason for choosing the head in the first place was the porting and knife-edging that had already taken place on the head. In hindsight (which is a wonderful thing), I should have looked more closely at the head for the valve seat condition and depth.
- SR20 Head porting on cylinder intake 1
- And then well matched across all cylinder intakes
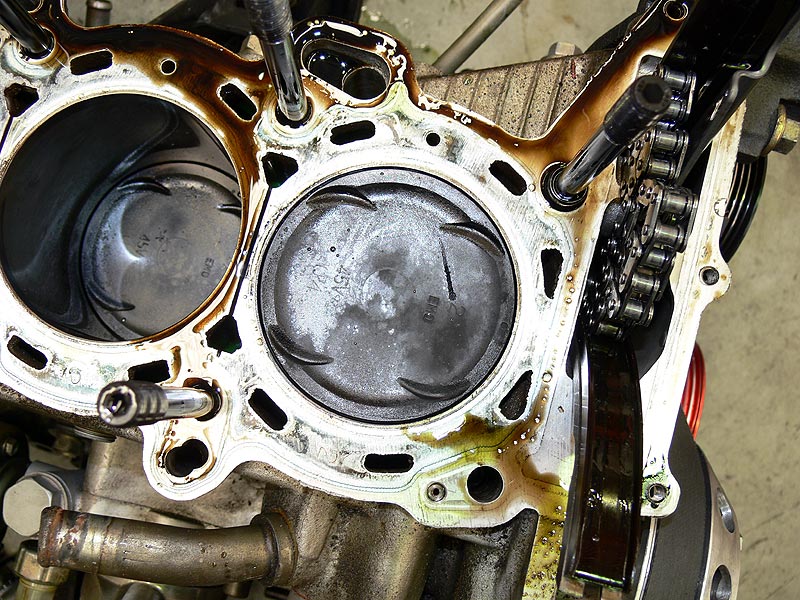
Now that the head was off, it was time to see how the pistons and bores had fared. These pistons came originally from the engine that came off of the shelf for SILLBEER - it didn't have an engine in the hole when I started. We eventually figured out they were from a Z32 VG30DETT engine and were fitted to this engine when it was rebuilt in Japan. We decided to stick with them originally because I was running short of cash, again in hindsight I should have just waited until I had some more fold but...meh.
Note the numbers on the top of the piston for reference are '2 EMO' followed by '45V' and '04'.
- Cylinder number 2
- Cylinder number 3
Just a slight amount of carbon built up.
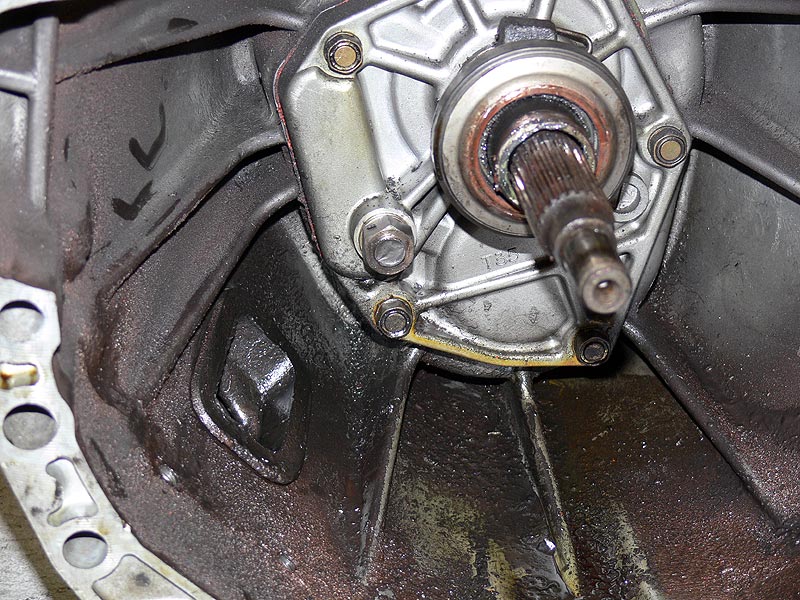
Next item was to remove the gearbox and confirm the breakage that occurred at the track. Looking at the inside of the bell housing, the clutch fork was loose, and no longer attached to the release pivot. The snapped release pivot was indeed the failure - seen above as the nut looking thing to the lower left of the input shaft.
- Release Pivot Ball snapped off inside clutch fork
- OS Giken STR Twin plate clutch
- Broken SR20 Release Pivot
And that was pretty much the day. Here's a few shots of where I got to after about 3hrs or so.
- SR20 stripped intake side
- SR20 stripped exhaust side
- SR20 front with oil pump still fitted
- SR20 sump removed showing crank girdle
Next week I'll finish off the rest of the tear down removing crank, rods and pistions, oil pump and anything else left over.
Cheers
Brendan
Saturday, 26 September 2009 | | Categories: Engine, Driveline
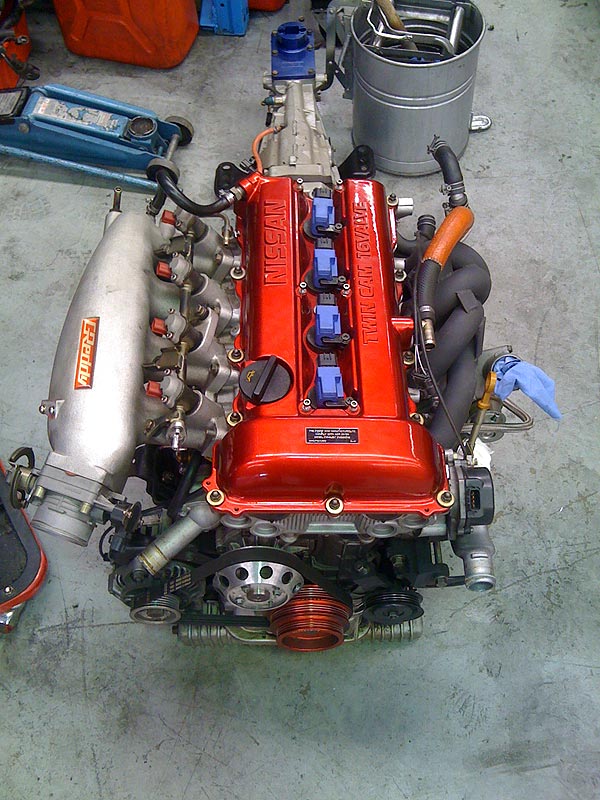
Well it's been a few months since the car broke and was sent to the workshop corner for its misdemeanours...or is that my misdemeanours? Anyway, the boys at C-Red have been very busy and also been on holidays so my project was put on hold while they cleared their backlog of work. Having said that, I've been stupidly busy as well...this being my first year working for myself (since Decmber 2008), and I'm happy I've been busy too. Unfortunately it left little time to work on getting the Silvia sorted.
A few weeks ago I got in and removed all the ancilliaries from the engine ready for it to be removed. Now why am I removing the engine you may ask? Well if you've been following the blog, last year I reported problems with the engine, specifically the head and have been meaning to replace the head for some time. As the gearbox had to come out, and it's much easier to work on the engine with it extracted from its home, the whole package has been removed.
- Exhaust side of the SR20DET
- Intake side of the SR20DET
- Front side of the SR20DET
As you can see at the front, there's a fair amount of oil mist coming from around the GTi-R Oil Pump. Still yet to decide what to do about this, whether to try and fix or replace with an S13 pump again. Replacing the pump though means I'll need to get a new crank pulley. But they're all decisions we can make once the engine has been torn down which I will be doing over the next few weeks.
With the engine out, I'll also be cleaning up the engine bay back to top shape ready for it to be re-inserted.
Cheers
Brendan
Monday, 5 May 2008 | | Categories: Brakes, Engine, Exterior, Driveline, Suspension
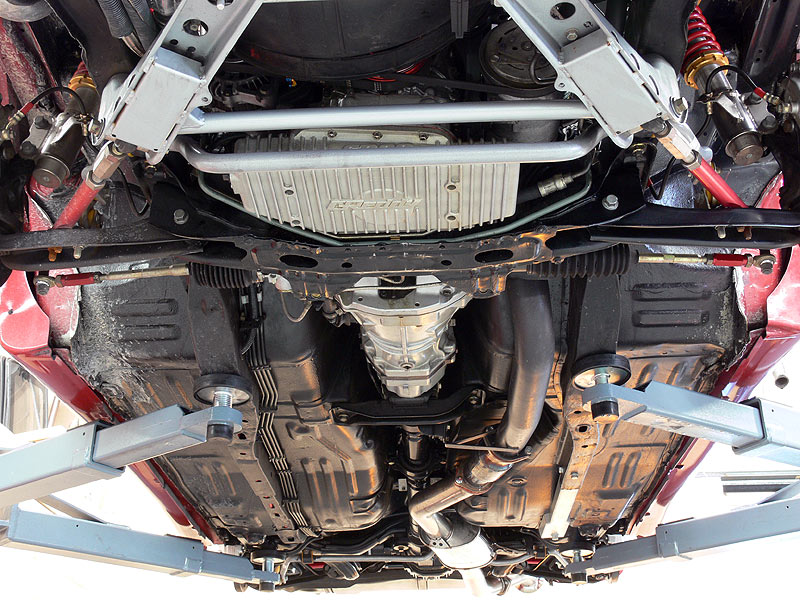
A number of weeks ago now, I did a photoshoot with Rick McDowell, a well known WA based photo journalist. The results of which were brilliant, but with a fair amount of work gone into the undercarriage, and an award to prove it, we needed to get some photos done of the underbelly along with additional engine and interior shots. This being something best done on a hoist of course, so last Saturday we were lucky enough to get some time on the hoist in the C-Red workshop (thanks to Marc, C-Red's Workshop Manager). I went in and first detailed the engine bay, which wasn't too bad really. But as I drive this on a daily basis, and that the road near work as had some work done on it recently (plus rain), I had quite a lot of dirt and mud built up under the guards. With the help of the trusty truck wash and a bit of elbow grease (and mess on the floor) the front and rear suspension on the passenger side came up a treat.
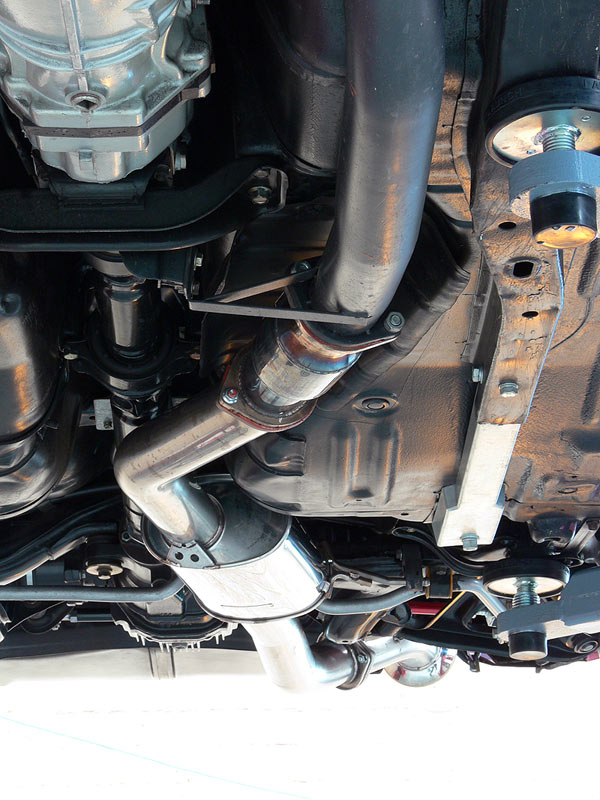
While Rick was snapping away, I thought I'd take the chance to update the undercarriage shots...being there's no longer the Ikeya Formula lower control arms in place, and the exhaust has been completed and changed since the last set I did 6mths ago or so. A couple of things to note though, first being the URAS Floor Reinforcement Kit which extends the chassis rail on the passenger side from the usual S13 cutoff point to the rear. Also, if you look on the drivers side, there's dirt there just to prove that it does indeed get driven. On a whole, I was surprised at how clean the undercarriage is considering the rain we've had lately. Having the fresh'ish paint surfaces certainly helped in cleaning it all up easily though.
Anyway, photos for all to enjoy:
- Rick taking his photos
- Under the engine bay
- Front Suspension
- Front Brakes and Coilovers
- Front Pipe and Gearbox
- Rear Subframe assembly
- Rear Suspension
- Air time
The photos that Rick have done so far were really ace, so looking forward to getting a gander at these new ones.
Cheers
Brendan
Monday, 9 July 2007 | | Categories: Interior, Driveline, Suspension
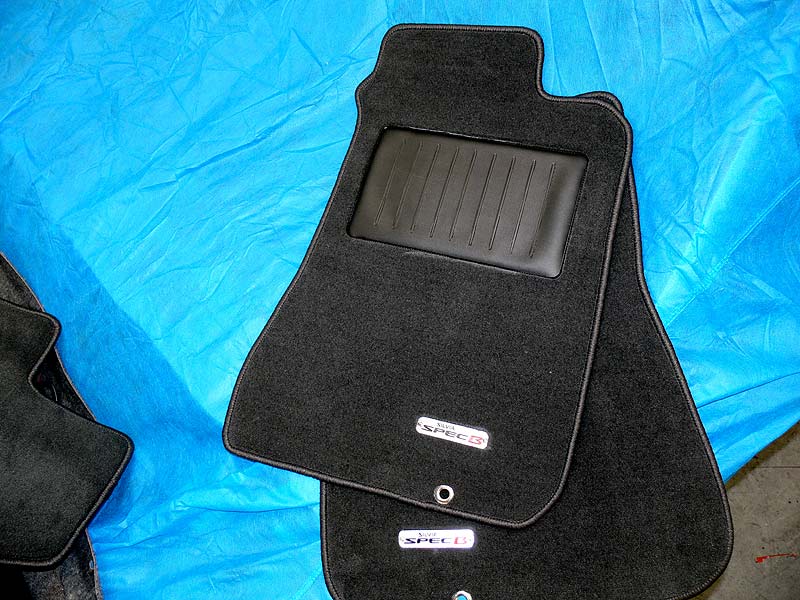
Jeez, the pressure is really on now to get the car done. And now I'm taking a holiday! Last week was a little hectic with a lot of little things to do. Of the main things, the interior is all in (just need to bolt in the glove box once the loom's been tied away), the fuel system is finished, the mirrors are being painted and the carpets are done. The main battery line has been secured in its final resting place, the stereo installer is all set to do his magic (Daniel Jurkovic - 0408 792 466), and Tomas is scheduled to come in later in the week to refit the body kit.
So, how does the trim work look...in two words - bloody fantastical. Pete, Chris and the guys at Trimcare have done a great job, in minimal time and fuss...if you need any trim work done, please don't hesitate to go see them (Trimcare - Unit 3, 233 Bank Street, Welshpool - 9470 3381).
With the floor mats, they used originals as a template for the main shape and had the edges bound. For the specB badge, we mounted in the factory position, but as it wasn't as solid as the original, and the carpet is rather plush, they had to melt the fibres under the badge so it didn't bow in the middle once riveted into place.
- S13 specB Floormats
- S13 specB Floormats (closeup)
- Boot Carpet (centre)
- Boot Carpet (drivers side)
- Boot Carpet (passenger side)
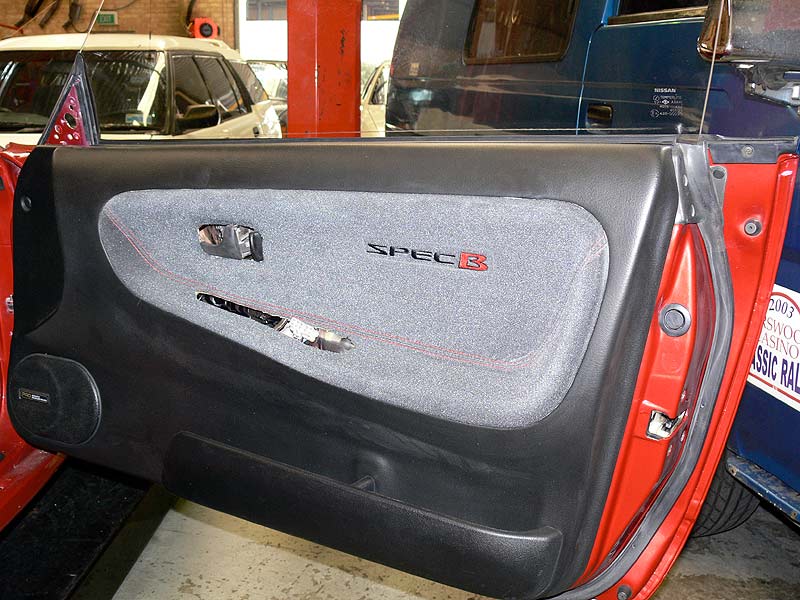
The door trims came up a treat - ignore the whitish tinge, it's chalk marks that I'm yet to clean off. The plastic trims and centre console were all sprayed back to the original black colour, and the gearboot and handbrake cover are now in place. You can also see that the centre console box lid is trimmed in the same material as the back seat, door trims and glovebox.
- Centre Console
- Dash all fitted
- Air-conditioning Controls
I tell you I had a rabbit of a time with the air-con control. Firstly the head unit I had hadn't been cleaned once in its lifetime and it took me 30mins of rubbing hard with the prepsol to get down to the shiny plastic again. Once it was all clean, it was time to fight the octopus which was the wiring. I had to go track down a fuse, and missing solenoid for the airbox - along with a bunch of running around to different cars trying to figure out what went where. I also found one of the Nissan console DIN-sized storage boxes too (woohoo).
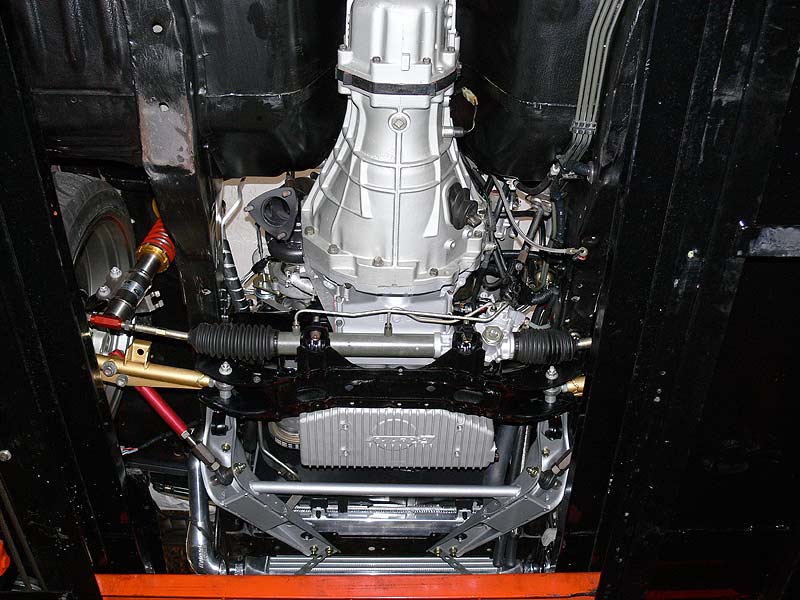
Doing all this work took place on the hoist, so while it was in the elevated position, I took a few pics of the underside for all those that haven't see it yet. Note you may see some flaking red paint in bits which is actually the hoist, not the car.
- Back of gearbox/tunnel
- Diff from the front (R33 GT-R Diff and Half-shafts)
- Diff from the back
- Rear Wheel suspension etc from the back
- Rear Wheel suspension etc from the front
- Front Wheel suspension etc from the back
Taking the weekend off as we've had a place booked down south for quite a number of months now, then next week I'm focussing only on the car to have it ready for Autosalon. Hopefully I can get one more post in before the show.
Cheers
Brendan
Wednesday, 14 March 2007 | | Categories: Engine, Driveline
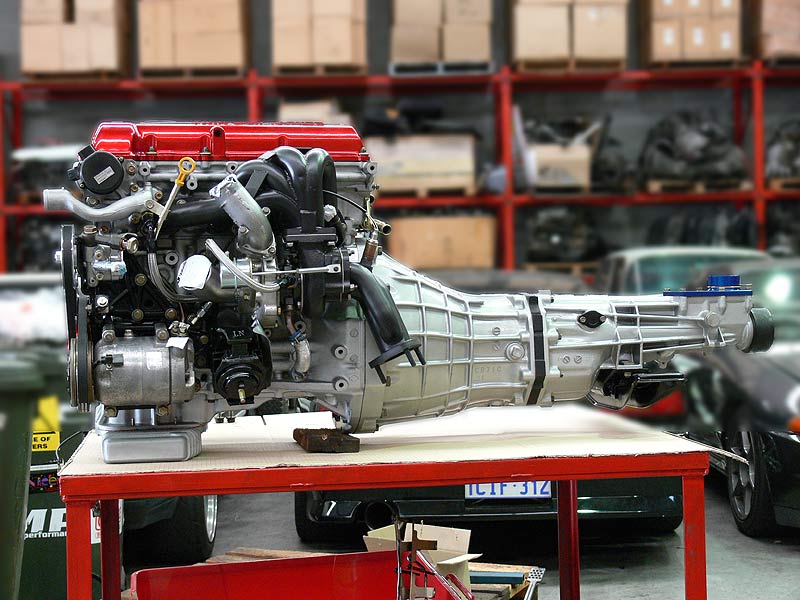
Well these past couple of weeks have been pretty exciting around the Sillbeer project starting out with the engine meeting up with the gearbox for the first time...and doesn't it just look fantastic. Makes me want to mount it on a mantel piece in a clear plastic box. Also the stainless screws I got last week are now holding the injectors down.
- OS Giken Twin-plate Fitted to Engine
- Inside S13 Gearbox Bell Housing
- Engine and Gearbox (Driver's Side)
- Fuel Rail and Nismo 740cc Injectors
- Detail shot of under plenum
- B&M; Short Shifter fitted
So now is where it gets really exciting...the engine was fitted into the car on Monday. All went in or up, or down depending which way you look at it - with the front crossmember being dropped out, the car raised on a hoist, engine fitted to crossmember, then car lowered over and crossmember bolted back onto the car. This means it's the first time it's sitting on its new suspension and wheels. Enjoy the photos:
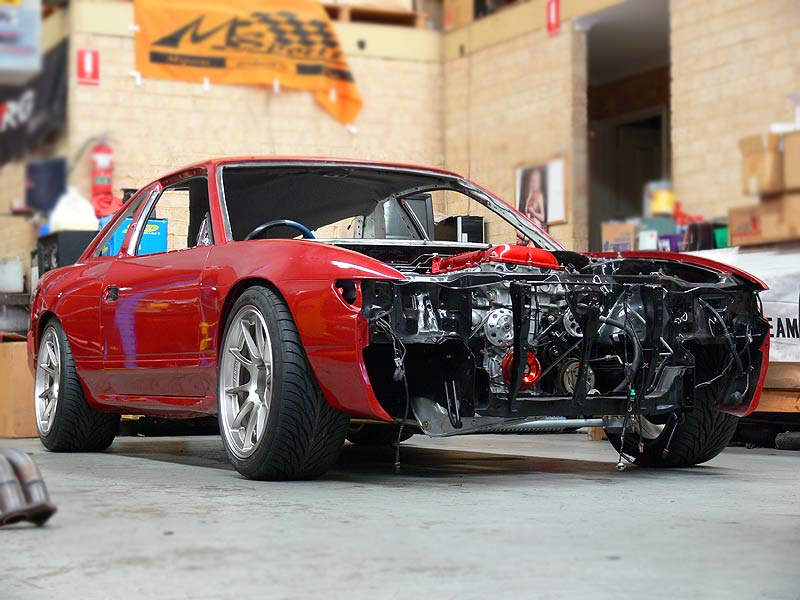
- On Wheels (Side View)
- On Wheels (Rear View)
- Engine Fitted (Driver's Side)
- Engine Fitted (Passenger's Side)
- Engine Fitted (Under from front)
- Engine Fitted (Under from Rear)
Oh, and those with a keen eye may have noticed the oil lines coming from the engine block...that's the start of the new GReddy Oil Cooler kit that C-Red got in for me...they're now an official Trust agent.
A couple of problems cropped up of course which were that we had fitted a non-Nissan Clutch Master Cylinder from another S13 in the workshop which had a bleed nipple at the top, and was longer in the body that the Nissan one. Needless to say it fouled on the GReddy Intake Plenum, so we've ordered an OEM one. This will then have a new HPI Stainless Braided clutch line kit installed. Also looking at my best options for the Brake Master Cylinder at the moment - will keep you posted on that.
Had a few pieces painted last week too - Nismo Grill, Nismo Front Bar insert grills, B-pillar covers and top side window trims. These are in storage and will go on when the time is right. We'll be fitting up the Hybrid Intercooler and RG Radiator very soon along with a test fitting of a set of thermo fans and shroud from an AU Ford Falcon. Stay tuned on that one. I've changed my mind once again and have decided to add just a little bit of rice with regards to the gauges. The original plan was to fit a gauge hood...but this was going to be a world of pain in itself, then the Defi DIN Gauge was a possibility, now I'll just use what I've got which are a set of Def-Link Meters with Hoods mounted on the stands directly to the dash. If they look bad, then I'll look at other possibilities.
Cheers for now
Brendan
Thursday, 8 February 2007 | | Categories: Audio, Engine, Interior, Driveline
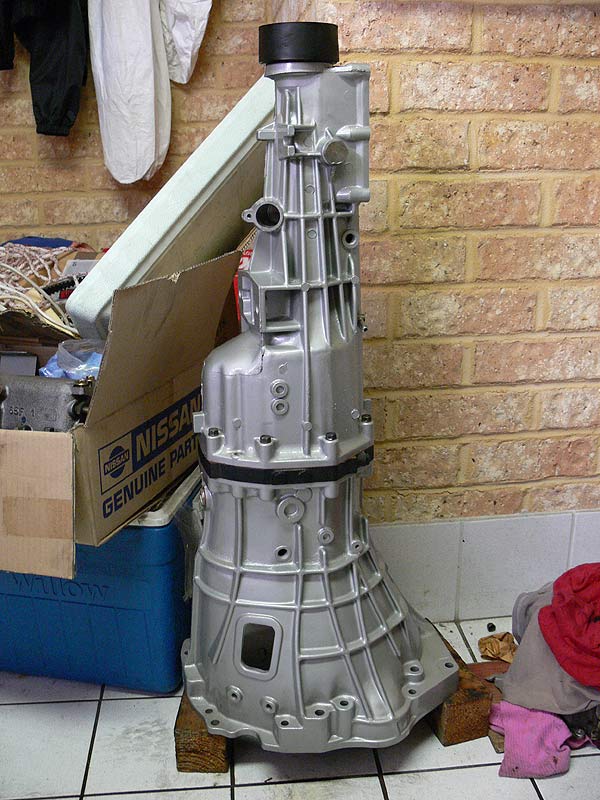
Alright, so a couple of weeks ago, I was lucky enough to start getting some help on moving Sillbeer closer to completion. Enter one Mr Greg Dally. He'll be doing a few days a week working on my car to get things moving along. I have so much work on now just to pay to get it over the line, that I have minimal time to actually work on the car so I'm glad to have his expert hand on the job...and to those who don't know how he works, he's about as anal (if not more) as I am.
So first on his agenda was to complete the gearbox. Now it's really just been a shell for quite sometime now, so with the internals of an S14 5-speed gearbox identified, Greg made up mine to as you see it here. Apparently there was a bit of polishing that took place on some components that will never get seen so that just goes to show his enthusiasm. It just looks mint and with the clear coat, should be relatively easy to keep clean too.
- S13 Gearbox Top View
- S13 Gearbox Closeup Middle
- S13 Gearbox Closeup Rear
- S13 Gearbox Closeup Selector
A little bit that I've done in between other things is to paint the taillight cluster units with a chrome paint. As I'm going to use the 'crystal' clear/red taillight lens, there needs to be a little more reflection from behind so a coating of chrome helps that out. Also to assist in a nice neat seal around the taillight, I cleaned all to old sealer from the taillight surround...using a bit of Rostoff and/or Prepsol and elbow grease, it came off easily enough.
- Taillight Cluster Unpainted
- Taillight Cluster Painted
- Taillight Surround Before and After
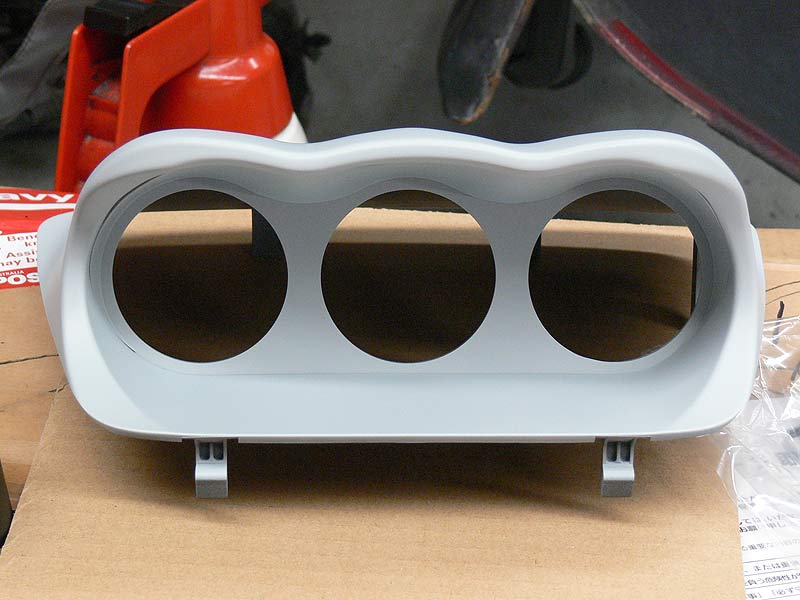
As the exterior and mechanicals are coming along now, it was time to start looking at what's happening with the interior. Now I have had a set of 4 Defi-Link gauges for some time, and have been tossing up on how to mount these. I had bought a set of Defi-Link Single Meter Visor's, but I didn't really like the thought of these things sticking out like dog's bollocks on the dashboard. So the only other option was a 3-gauge hood of some sort. Most of the stuff available for the S13 dash looks mighty naff, but those made for the WRX and EVO by Defi are so so nice...cue purchase to ET Performance and they had a Defi Triple Meter Hood in my lap inside a week. Now as this was made originally for a WRX (MY2000+) I will have to modify the dash and the hood appropriately to fit. This could take some time, but after an initial fitting - it'll look mint. Note that it comes in a primed plastic ready to be painted in your own chosen colour. Once fitted, the dash will get reskinned as close as possible to factory so it looks like the cluster was a factory option.
- Defi Triple Meter Hood Profile
- Hood Test Fit Front 1
- Hood Test Fit Front 2
- Hood Test Fit Top
- Hole in Dash
Please note that the dash used is stuffed anyway having had a set of gauges mounted on the passenger side. Once we have the basics sorted, we'll used a fresh dash to work with.
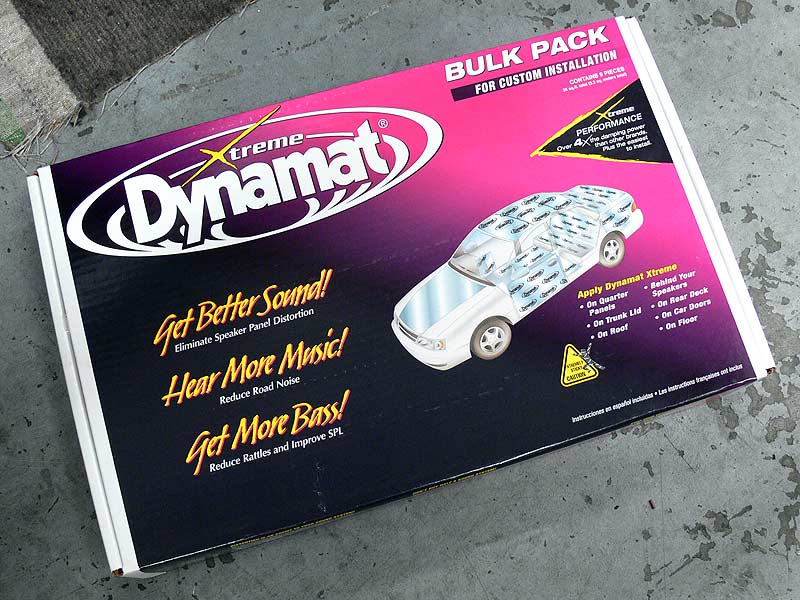
Now there's one thing that may or may not sit well with some people when building a car like this, and that's adding weight in the form of sound deadening. But as this really needs to be a comfortable (as well as quick) car to drive, it will be required...especially when taking into account the sound system planned (will be revealed in a future post). So as is done to all of Chip Foose's cars on Overhaulin', the interior will be fully decked out with Dynamat...improving on both sound and temperature in the cabin. This will be applied to all areas of the boot, the floor, roof and doors. Yes, it'll add weight, but at the same time make the car feel more solid (think thud rather than clink when closing the doors) and liveable especially when driving down south.
Next up for me is to find some components in the engine such as Power Steering pump, A/C compressor, alternator and starter motor and get them ready for fitting. The front and rear window seals should arrive from Nissan any day now and we've also ordered in a new brake master cylinder from a Z32 300ZX in the larger 1 1/16" size. An article on SportCompactCar's web site notes the particular's around using this master cylinder with Brembo's.
Also on the subject of interior, I need to start gathering the pieces that will get refinished (ie. plastic trim) and the bits that will be retrimmed to match the Honda Integra DC2 Type-R Recaro's that will be fitted. So much to do, so little time, but with Dally on the job things are looking great.
Cheers
Brendan
Monday, 4 December 2006 | | Categories: Engine, Driveline, Suspension, Wheels/Tyres
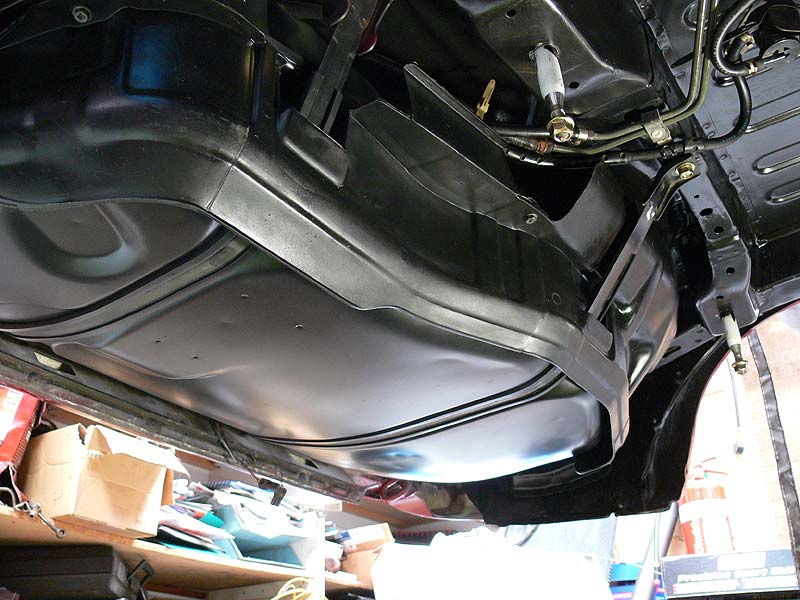
OK, so here's how it goes. The week before last I went ahead and painted the fuel tank using some of K&H;'s Chassis Black paint. Was touted as being chip resistant yada yada. So after prepping the tank with a quick wet sand using 400 grit paper, I sprayed it on...outside...in the sun. This turned out to be bad move. Number one problem was the dusted, number two was the tank getting hot making the paint finish a little strange and three the slight breeze present was blowing the spray away before it hit the tank. Needless to say I wasn't happy with the finish...plus it was way too shiny.
- Wetsanding the tank
- Finish using K&H; Chassis Black
So I let it dry for a week hoping the shine would subside a little but on Saturday, it still didn't look any good. So out it came for another coat of paint (which in the process of moving it, I scrapped it back to bare metal...so much for chip resistant). I think next time I'd use the VHT Epoxy Paint in Satin Black, but this time I used the VHT Caliper Paint in Satin Black, along with painting it inside for minimal dust flying around. All in all I gave it about 3 coats of this early in the day and the finish was much better and I'm glad I did it. While it was drying, I cleaned up the metal straps that hold the tank in place along with getting a hand from Clint (cceg) to clean the rubber strap covers (so the tank doesn't rub metal-to-metal on the straps). Along with the rubber straps, we cleaned the plastic tank surrounds as well which took a little bit of elbow grease to clean with some prepsol, but was worth it, giving it a final coat of tyre shine to bring it up to spec.
- S13 Fuel Tank Fitted (from front of car)
- S13 Fuel Tank Fitted (from rear of car)
- Fitting rubber nozzle surround
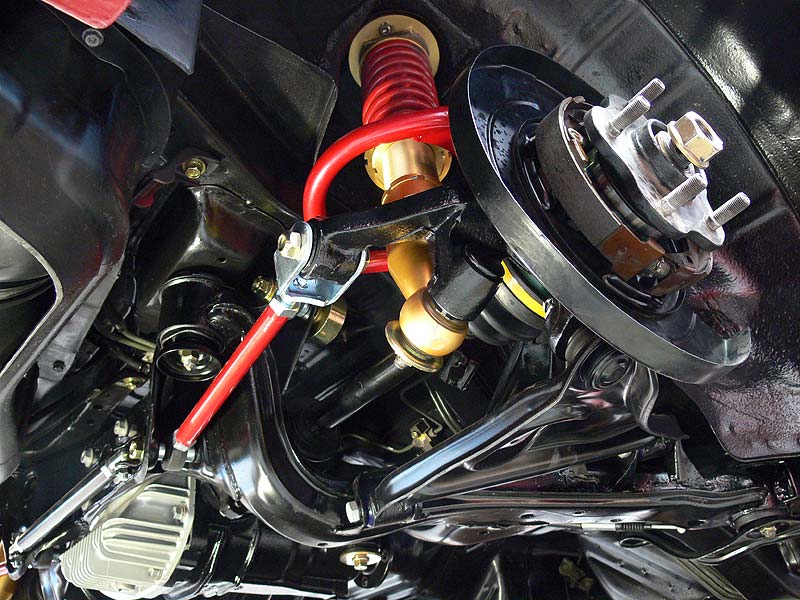
We were on quite a roll on Saturday, and Roy was staying back later than the usual close time so with Clint helping out, we bolted the subframe up and fitted the rear RG V-Stage coilovers as well. As you can see from the photos, it's looking mint with all the Kazama parts in place!
- S13 Rear Underbody 2
- S13 Rear Underbody 3
- S13 Rear Underbody 4
- S13 Rear Underbody 5
Now due to a bit of peer group pressure from Dally and Roy, I've gone ahead and purchased a full set of the Ikeya Formula Lower Control Arms (front and rear, otherwise known as roll-centre adjusters). The reasoning behind this is that I've done pretty much everything else, why not do this as well. The fronts I managed to pick up second hand for a good price (pictured), but the rears will be new and have ordered them through Aston at JShop. I've received the fronts already as they were already in Australia, but the rears will be coming from Japan, so your guess is as good as mine when they'll be arriving...hopefully prior to Christmas.
- Ikeya Formula Front Lower Control Arms for S13 Silvia/180SX
- Ikeya Formula Front LCA Bolts etc
And news just to hand, my rims are on their way downunder...but coming by ship it will be slow going. Should be here later this month or January. And for those who didn't read the previous post back in late May, here they are again:
WedsSport TC 105N

Front: 18x9.5+10 (8.0kg)
Rear: 18x10.5+12 (8.35kg)
I've also ordered in a new steering wheel. The one I had pegged will be fine for track duties, a Sparco #215 Competition Steering Wheel suede job, but I need a durable leather one for daily driving. The winner was a Nardi Rally 35 Deep Corn with about a 90mm dish, black leather and red stitching...perfect!
Cheers
Brendan
Sunday, 29 October 2006 | | Categories: Engine, Driveline, Suspension
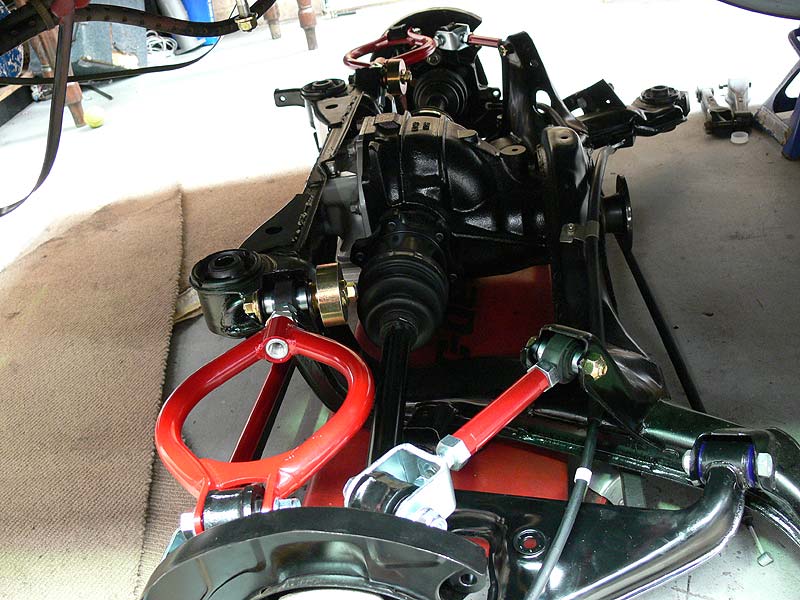
Finally got back into the workshop yesterday and got the rear end together after receiving the Kazama parts back a couple of weeks ago. Also made the aim of the day to get the electroplating kit together. Unfortunately the results weren't quite as expected (ie. not quite shiny enough), but the next batch I'll polish before doing the plating process. So first up I had to remove the old bushes from the rear lower control arms, so out came the oxy torch and with a bit of help from Shibb we had the old stuff out (very smoky). Now some of you may have noticed I got a set of the red Nolathane bushes a few weeks ago - after doing a quick test fit these didn't fit (will be writing an email to them about it), so luckily we had some others in the store to use. Oh, and I had to sand and repaint the rear LCA's in the process.
Once the nuts and bolts were plated, we moved onto the assembly of the rear subframe with the new Kazama bits, and with assistance from Roy and Jimmah, we had it back together in about 40 minutes.
- Just waking up
- Caswell Plating Kit
- Disassembled Rear Subframe
- Rear Lower Control Arm Painted (Top)
- Rear Lower Control Arm Painted (Bottom)
- Roy and Jimmah lending a hand
- Jimmah on the final run
- DONE! Well almost...
So the rear end was wheeled under the car as we ran out of time thus the crap picture, but all that's required now is the tightening of all the parts then we'll raise it up and go the front.
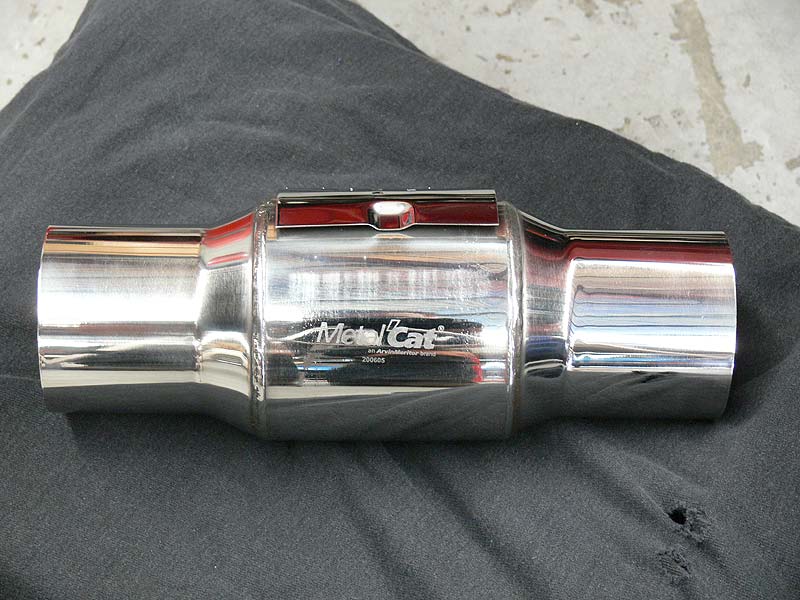
Also ordered through a GReddy Catch Can with 15mm connections (the squarish one) last week from a member on NissanSilvia.com (see next post for pics) and a new 3" MetalCat Catalytic Converter from shy180 (JustSR). Flanges need to be welded up, but we'll wait until the exhaust is up and attached before we do that to make sure we get the exhaust as high as possible.
- Box
- Logo
- Stange Numbers that mean something 1
- Stange Numbers that mean something 2
Hoping to get into the workshop mid week and complete the fitting up of the rear end and possibly move onto the front which I now have all the parts for woohoo! Time to hit the accelerator on the project methinks.
Cheers
Brendan
Saturday, 19 August 2006 | | Categories: Brakes, Driveline, Suspension
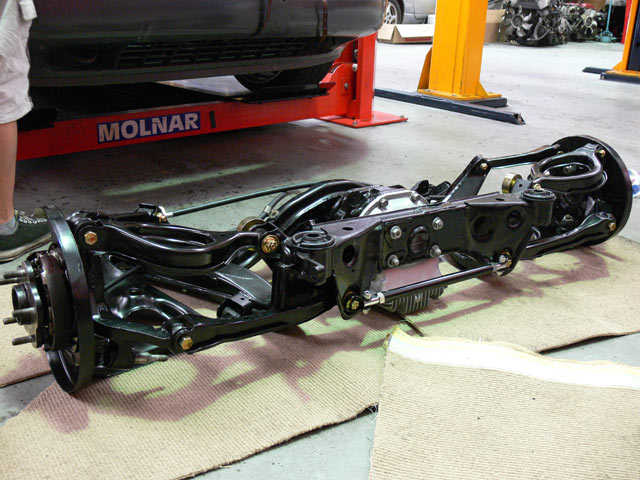
So it's been a while since my last post, but with more renovations going on and Autosalon now out of the road, I got back into the workshop for a full day to complete the rear end assembly. It all went together fairly smoothly, with Roy helping me out with one side of the hand brake assemblies (from an R33 GT-R) before I did the other under his watchful eye. Of course this was after we figured out that I had both the hubs and the hand brake pivot on the wrong sides (left on right and right on left)...der! Then came another minor hiccup...the rear lower control arms. Now after burning out the old crusty bushes with an oxy acetylene torch and repainting up nicely, I put some new bushes in one side only to find out they weren't going to fit! They were from an R32 GT-R and for some reason I had got them mixed up ages ago (about 12mths ago). I went and grabbed the originals, quickly gave it a clean up and coat of paint, and I'll redo the bushes when I replace all the arms with the Kazama ones I have on back-order. Here are some pics mid and after assembly, minus the half shafts which I missed out until someone mentioned I had better put them in then rather than after it was bolted up.
- Partly assembled
- Rear control arms
- Rear control arms
- Diff in place...sexy hey!
- R33 GT-R Handbrake Assembly
- R33 GT-R Handbrake Assembly
- Lower Tension Rod Brace
- Fully assembled (minus shafts)
The handbrake cables used were new Nissan R33 Skyline GTSt, please check new prices from Nissan before forking out for second hand ones as I've heard of some used ones going for same price as new. So once it was all together, we lifted it onto a trolley jack, wheeled it under the car, lined it up and bolted it in. Finally, I felt as though I had achieved something. Although now that it's bolted in, I know I'm going to have to take apart the outside arm assemblies anyway to replace all the arms - but at least it looks like I've done something. Pics of it bolted in:
- Rear Bolted Up 1
- Rear Bolted Up 1
- Rear Bolted Up 1
- DBA 4000 Rear Brake Rotor
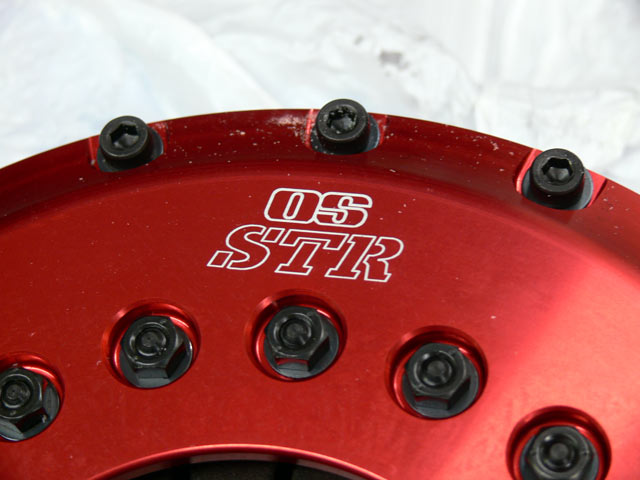
After a short wait, my new OS Giken STR (STR2C) Twin-plate Clutch arrived, and damn it's beautiful (as much as a clutch can be). Just a recap about the clutch for those that missed it previously:
The New OS Giken STR series can handle up to 600hp, yet retains drivability very close to standard with 30% lighter pedal effort than most multi-plate clutches. By using special new plate and diaphragm designs, OS Giken has achieved ample power handling with just 715kg clamping pressure. This makes the STR series perfect for everyday driving applications, along with most race and drift applications.
The clutches come complete with lightweight chrome-moly flywheel, ruby red-anodised billet aluminium clutch cover and the required bearing/carrier set or pull-push converter kit where required.
- STR2C Top
- STR2C Side
- STR2C Logo
- STR2C Thrust Bearing
A few other bits and pieces have come in too. The DBA4000 discs for the front brakes are now in, will take pics when I test fit them up. I purchased a Cusco OST Brace - for those who haven't heard of these, it mates up with a Cusco OS Rear Strut Tower Brace and adds two additional arms to tie the struts to the floor of the boot in a triangle configuration. These will need to be refinished as per my other braces (black wrinkle finish on the bar and semi-gloss on the plate). I've also purchased a kit that allows me to do my own Zinc electroplating of metal parts, saving me time in dropping them down to the platers (takes about 60mins to do parts in a bucket on site).
Not sure what's next, I know I have a lot of painting still to do (Sard fuel surge tank, intercooler, IC pipes), but also want to get the front engine support in and start on bolting the front suspension together.
Until next time.
Cheers
Brendan


