Category: Suspension
Monday, 10 July 2006 | | Categories: Driveline, Suspension
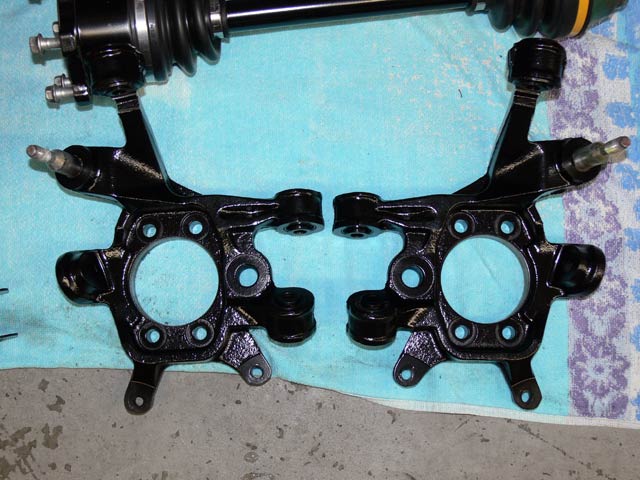
First of all, no I haven't been slacking off. I have been doing work on the car, but it's really restricted to Saturday's and sometimes a little of Sunday's...would make a good reason why it's taking so long to finish the car too.
Couple of weeks ago on Saturday (wife calls it Saturday morning creche), it was time to get the rear sub-assemblies off (otherwise known as Hub Carrier or Spindle I believe). This was a right pain in the a$$. After the half shafts being in them for over a decade, they were well and truly stuck fast. After plenty of Rost Off, belting with a hammer and one worse for wear half shaft, the shaft finally broke free of the sub-assembly. That was just one side...thankfully the drivers side came free with only 10 or so bashes with the hammer.
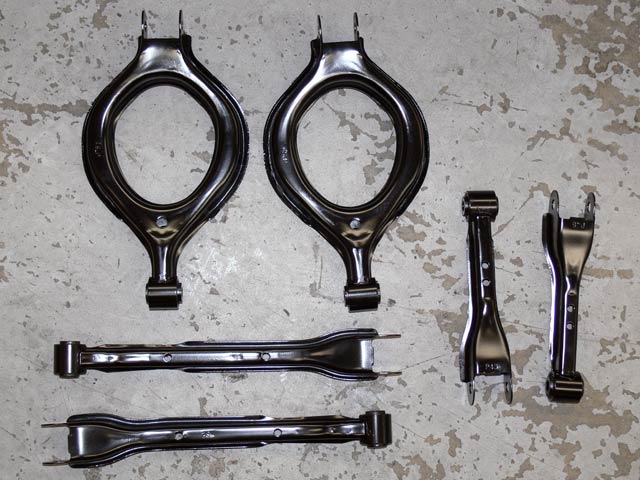
While I was at it, I removed the rear arms for cleanup and paint. Now although these won't be fitted to the final product, I thought I'd make sure they were at least worthy of being bolted up temporarily.
You may recall me doing the diff and half-shafts from an R33 GT-R a few weeks ago, well as planned, I found an S13 Rear Diff Cover which didn't have too many munted fins and prepped and painted it. I started out with just a coat of VHT Cast Aluminium paint, but thought why not a coat of clear to make it easier to clean (same theory as brakes - smooth surface, easier to clean). So on went 3 coats of clear and the results were great. So great I also hit the gearbox housing and the new Trust Sump with the same treatment.
- S13 Diff Housing 1
- S13 Diff Housing 2
- Nissan Differential Gasket
- Trust Sump - painted Cast Aluminium and Clear
Last week I finally took delivery of my new Nismo Power Brace, rear lower tension-rod brace and Do-Luck 'Style' Ladder Bar brace (goes under the gearbox and ties the chassis rails together). The Power Brace will stay its standard Nismo silver, but the other two braces were a mix of blue and polished alloy. These have now been painted Satin Black as per the rest of the under body parts.
- S13 Nismo Power Brace
- Do-Luck 'Style' Ladder Bar Brace (crap photo)
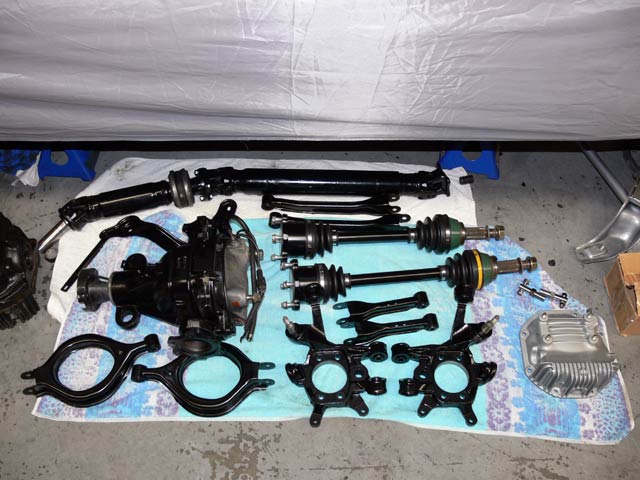
With all these bits painted and ready to go, it's almost time to bolt some of this stuff onto the car! Doh, just remembered I need to get all the bolts zinc coated first...
Cheers
Brendan
Tuesday, 30 May 2006 | | Categories: Exterior, Paint, Suspension
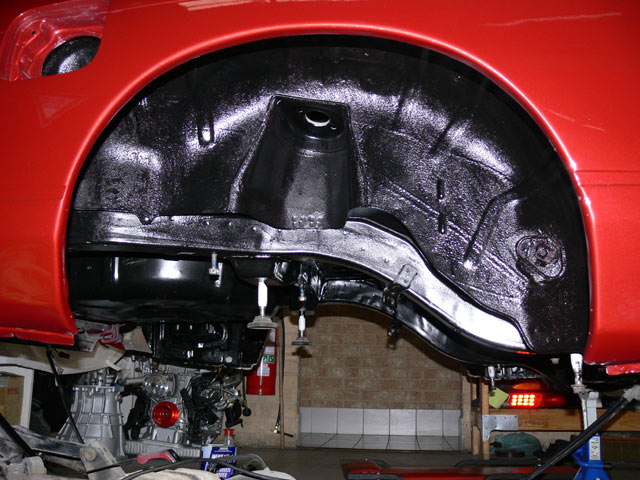
Actually, I felt more like Michaelangelo than Picasso doing the undercarriage painting - being on my back looking up (occasionally dropping paint in my eye/mouth/ear etc). This painting part was a little time consuming, and I still need to apply a second coat in bits (smoother areas) to get rid of the brush marks. The rougher parts under the car were a cinch though so all good there. Still not 100% finished though, as I need to remove the front bar, and paint the end of the chassis rail (see front wheel well pic below) and around under where the radiator is mounted. The paint I used I touched on in the previous post, and to give you an idea of coverage, I've done about 90% of the job with about 80% used of the paint (not much room for error).

- Front Wheel Well Painted
- Rear Wheel Well Painted
- Tunnel Painted (Before 1, Before 2)
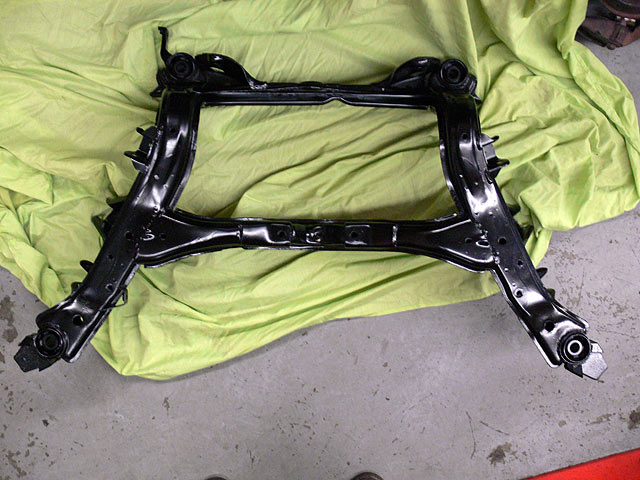
As well as the undercarriage, I've been busy getting all the subframes and associated bits ready to be bolted back together. The rear subframe I had painted up previously, but we had to melt out the subframe bushes which of course messed some of the paint job up so the hold rear subframe was painted again. This then had a set of Nismo Subframe Bushes pushed in. I decided to go with these rather than the aluminium bushes so I don't get as much noise/vibration coming up through the floor. The rear lower control arms have also had their original bushes melted out and they've been resprayed now too. Will be fitting a set of Nolathane bushes (in red of course) into these.
I'll be using an S15 powersteering rack which I cleaned up along with the brackets and heatshield. This will get a new set of rubber boots too. The S13 subassemblies (which the hubs bolt onto) have been cleaned up and painted, and we're hoping we can get a set of 350Z disc brake shields from the 'Track' edition to fit up for the factory look around the R33 GT-R Brembos I have going on.
- Front Subframe
- Front Subassemblies
- Rear Subframe
- Nismo Subframe Bushes 1
- Nismo Subframe Bushes 2
- Rear Lower Control Arms
- S15 Powersteering Rack (among other things)
- Powersteering Rack Heatshield
Next is to complete the undercarriage painting, then onto prep and paint of the brake calipers - which at this point in time will be done in Silver with Red Brembo logo and a coat of gloss clear. Then once all the Kazama suspension parts arrive, the rear end will be bolted together along with (for now) a GT-R diff and half-shafts.
In the meantime, I've gone ahead and ordered the Nismo Power Brace (a review of which is here), Do-Luck Style Ladder Brace (goes between chassis rail under the gearbox) and Rear Lower Tie-Rod Brace (you may have seen these link the rear lower tie-rods together on the rear subframe). Then to make sure I'll be getting enough fuel, I've ordered in a Sard Fuel Collector (Surge) Tank (preview picture). Now I could have gone a normal one, but then the fuel pump would need to be mounted in the boot causing lots of unwanted noise. The beauty of the sard item is that the fuel pump sits inside the surge tank - making it nice and legal, nice huh?! The tank is currently in Melbourne and assume it'll be here by weeks end. Phew.
Cheers
Brendan
Monday, 15 May 2006 | | Categories: Brakes, Exterior, Paint, Suspension
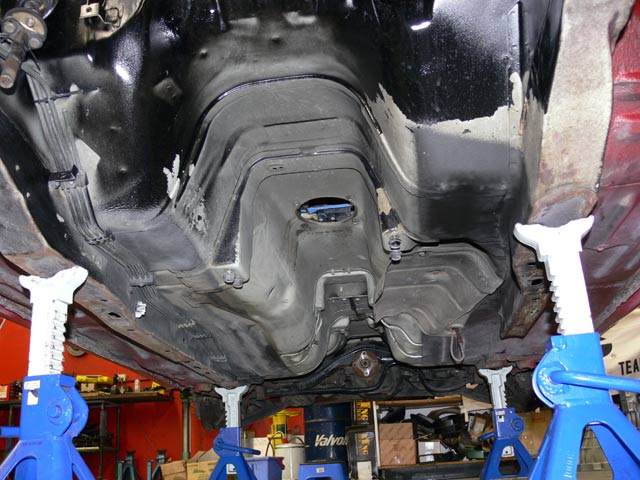
So this Saturday was the start of the final strip. Went out to Bayswater on Friday and picked up some PPC Chassiscoat and PPC Marine Clean. Then once I'd put the wheels back on the car, dropped it, rolled it outside and jacked the front and back up, I proceeded to use the Marine Clean (pretty good stuff) in concert with the Karcher high pressure hose to clean the undercarriage. The photo above is what it looked like after cleaning. It's not 100%, but after a quick wipe over this Saturday with some prepsol, I'll be giving it a nice coat of the PPC Chassiscoat. This paint is specially made for chassis and suspension components as it dries rock hard (a nice Satin Black) and is resistant to stone chips etc.
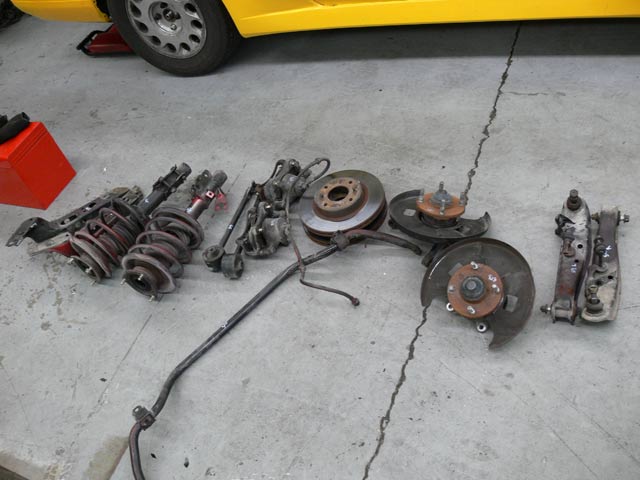
After the clean, a quick blow with the air compressor and it was back inside (after a quick rejig with car positions in the workshop and a mop of the floor - I like a clean working environment after all). Up on stands again, I made quick work of removing the struts, lower chassis rails and finally the front subframe. Dragged out of the road, it was then disassembled so I can clean and paint the subframe (with the Chassiscoat). What you see above is the leftovers that won't be going back on the car, instead replaced with new/used/uprated parts.
- Unpainted front subframe
- Engine bay without subframe
This Saturday it'll be onto removing the rear subframe, clean up the undercarriage a tad more before applying a coat of paint. In the meantime, I've been busy at home. Have cleaned the front subframe, an S15 power-steering rack, front hub knuckles and brake disc shrouds (which will be trimmed so the 330mm Brembo rotors can fit). Will try and spray paint these items before the weekend.
Cheers
Brendan
Saturday, 28 January 2006 | | Categories: Paint, Suspension
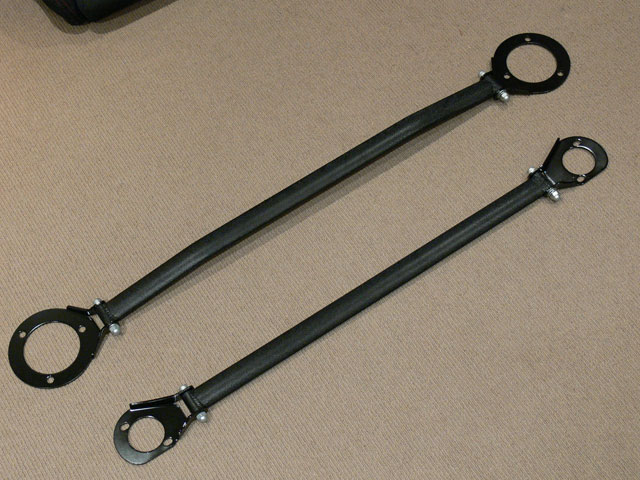
So I had these Cusco OS Type Strut Tower braces for the front and rear of the Silvia which just weren't going to match the rest of the car. With Blue painted end plates and polished allow bars, they're Cusco's standard fare. So, I figured I would refinish them to a more OEM look, which is where I'm going with the car - factory special. So to start out with I've sandblasted the end plates (along with a Cusco Brake Stopper - yet to be completed) and sanded back the bars nice and smooth. The plan was for the end plates in Satin Black and the cross bars to be in black wrinkle paint. Hanging all this from a rafter in my carport using old wire clothes hangers, I went about spraying them. The wrinkle paint is pretty special stuff...it goes on smooth, and after 20 minutes to 2 hours, it starts to wrinkle evenly. The more coats you put on, the more intense the wrinkles. In all I applied 4 coats to get the finish you see below. Check out the pics for the stages and end product.
Step-by-step, sorta:
- Original End Plates
- Sandblasted End Plates
- Painted End Plates
- Original Strut Bars
- Original Strut Bars (Detail)
- Sanded Strut Bars
- Completed Front and Rear Strut Tower Bars
- Completed Front Strut Tower Bars
- Completed Rear Strut Tower Bars
- Detail of Wrinkle Finish
In other news, the trayback went to pick up the car on Friday to bring back to the workshop only to final that Assure was closed (being between Australia Day and the weekend). So we should have it back early next week.
Cheers
Brendan
Wednesday, 14 December 2005 | | Categories: Suspension, Wheels/Tyres
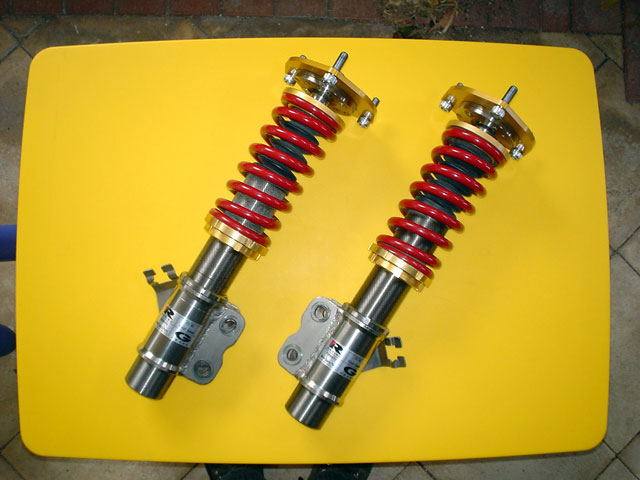
I've been chasing these coilovers ever since they were sold from C-Red's Pig v2.0 about 12mths ago. Due some very unfortunate circumstances that occurred with the owner of them, they came up for sale and I handed over the cash for them - thanks to kev_s13 on SilviaWA forums for holding them for me while I got the cash together.
The coilovers in question are Racing Gear's (RG) top of the line street/circuit damper commonly known as the RG JTC'N1 Damper V-Stage (quite mouthful, but impressive name nonetheless). With C-Red being the Australian distributor for RG, it was only appropriate that I go with a set, plus visually they will match the rest of the car - something the green Teins or purple HKS wouldn't. Here's a quick product blurb:
Racing Gear's ultimate Road/Race/Drift suspension system, the JTC'N1 V-Stage coilover allows a 5-step damping adjustment to go from the street to the circuit.
The adjustments can be set of steps 1 through to 3 for the majority of driving (ie. street), switching to steps 4 and 5 for circuit/drift work. Setting of the dampers is simple with use of a special tool to that comes with the system. For a solid street ride dial in 3, and for the full circuit ride - paired with R-Comp tyres, crank it up to 5. Coupled with the adjustable camber tops, and adjustment of dampers front and rear - the V-Stage is a must for those wanting to do everything.
These should suit well the combination street and grip driving I'll be doing in the car and look forward to driving a car that has had the chassis tuned with such equipment on board.
When I picked them up from Kev, they had the usual road grime and unfortunately a little overspray on them (I think from when the Pig was being built). With a fair bit of cleaning using some prepsol, they've come up a treat (but not quite out-of-the-box).
Some pics of these beautiful coilovers:
- RG JTC'N1 Damper V-Stage Front Coilovers
- RG JTC'N1 Damper V-Stage Front Camber Tops
- RG JTC'N1 Damper V-Stage Front Label
- RG JTC'N1 Damper V-Stage Rear Coilovers
- RG JTC'N1 Damper V-Stage Rear Tops
- RG JTC'N1 Damper V-Stage Rear Label
Car has been at the paint shop for a couple of weeks now so will be back before Xmas...I hope. Other things happening at the moment are a change of plans in boost control duties. The plan was to use the new Turbosmart eBoost 2 unit, but I've decided to trial the soon to be released Boost Control function in the new BikiROM (which is the ECU I'll be using too), this means keeping the Defi Boost gauge I had for sale. Have also had the gearbox housings and rocker cover acid dipped to clean and ready for paint. The gearbox will get a coat of VHT Aluminium paint finshed with a coat of VHT clear. This will help in keep it clean. The rocker cover will probably get a coating that Competition Coatings have - heading down to see Lyndon at Competition Coatings in Wandi next week to see what colours are available. This is to reduce the possibility of chipping as the coating is super strong (I'm assuming a ceramic coating of sorts).
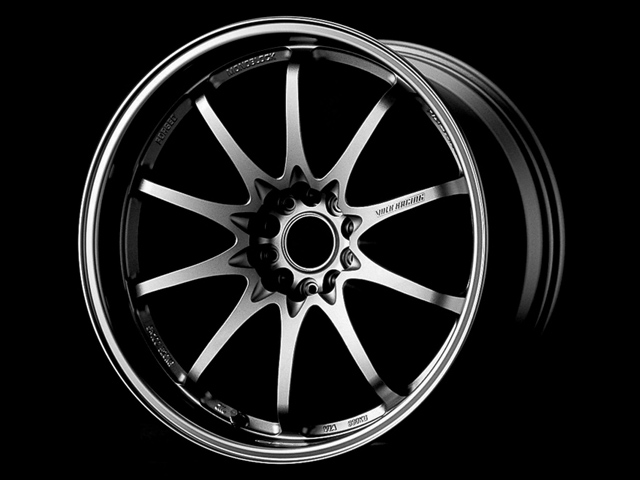
Another thread of discussion/work/decisions has revolved around rims. Originally thinking that 19's would be a good idea, after some discussion with others, the reality is that although looking great, 18's are a better choice for cost on rubber and competition use. So the specifications that are currently in play are:
Volk Racing CE28N
Front: 18x9.5+15
Rear: 18x10.5+18
In Titanium Silver
Tyres
Front: 245/35R18
Rear: 265/35R18
I'd really like a different colour, but its not released in a dark silver as per the mockup below:
To give you an idea of what a similar darker silver would look like, I came across these pics of a Yahoo Auction. These are 19x9+24 and 19x10+24 on a 350Z:
- Closeup
- CE28N on 350Z Front
- CE28N on 350Z Rear
The brakes do look tiny under these, and I'll be using similar sized Brembos (front and rear). But with 18's, they won't look so small (even though the fronts will use the 330mm rotors. I had thoughts of going a larger rotor, but I still want the option of being able to fit a set of R33 GT-R rims (with spacers) for track work.
Cheers
Brendan
Wednesday, 30 November 2005 | | Categories: Suspension
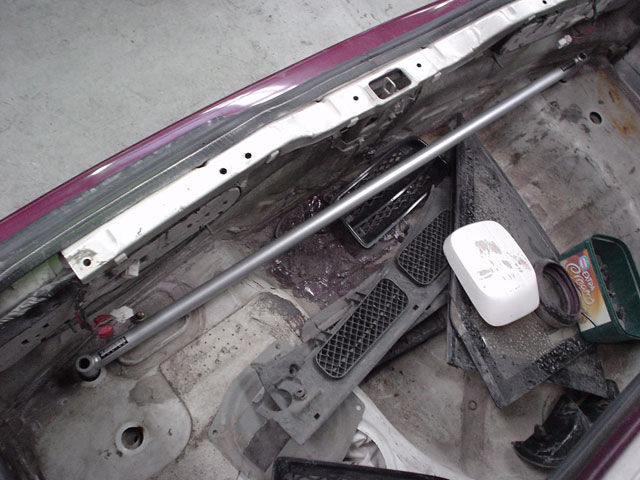
As mentioned previously, I also purchased from Zenith their S13 Boot Brace and C-Pillar Brace. Unfortunately, the C-Pillar brace I think is suited only to the 180SX, so if anyone is interested in it, please get in contact with me. The Zenith Boot Brace however is a goer. Those who've peered into the boot of an S15 will know that they have something like this as standard, basically tying the rear of the chassis rails together to further reduce chassis movement. The pic above shows it basically in situ when it's eventually installed. You can see from the pics that these are a high quality product.
Some pics of the braces:
- Zenith Boot Brace
- Zenith Boot Brace (End Weld)
- Zenith Boot Brace (End Mount)
- Zenith Boot Brace (In Situ)
- Zenith C-Pillar Brace
- Zenith C-Pillar Brace (pre-tensioner)
Also, C-Red have been appointed Western Australian contacts for Zenith Tuning products, so or those wanting to get hold of anything from their range, please can contact Jeff at C-Red during normal business hours.
Cheers
Brendan
Wednesday, 23 November 2005 | | Categories: Exterior, Paint, Suspension
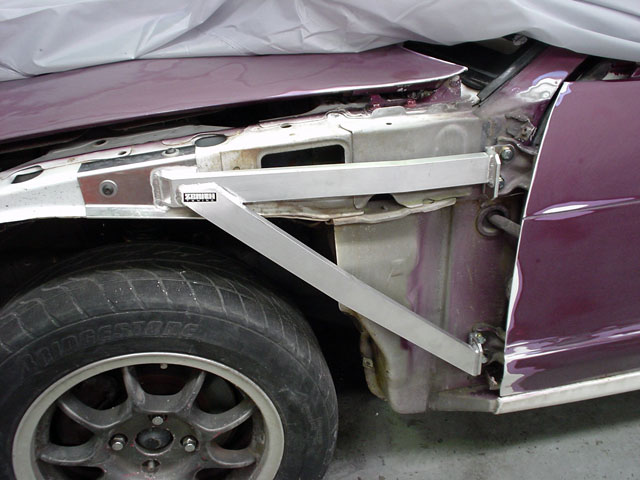
As part of the plans to stiffen the chassis, I came across a coming out of Adelaide called Zenith Tuning on the NissanSilvia.com web site. They're mainly focussing on bracing of all sorts and the first of many items I've picked up is the front 'Guard Bracing'. This has already been tried and tested in the heat of competition drift and is fitted to reduce chassis movement vertically at the front of the vehicle giving better suspension and braking response. The bracing is fitted from the front door hinges and fixed to the top of the inside guard structure, with a diagonal brace stretching from top of the guard to bottom door hinge as can be seen in the pics. The construction is of the brace is from aircraft grade aluminium making it extremely strong and extremely light.
The only downside is in the installation of the top bolts. This is where you need to get smart about getting a washer and bolt down a very narrow channel.
Some pics of the install:
- Zenith Guard Brace
- Zenith Guard Brace Door Mounts
- Zenith Guard Brace Top Mounts
- Access Hole 1
- Access Hole 2
Installation was relatively straight forward, encompassing fitting the door hinge mounts first with the extended bolts supplied. Drilling the holes in the top mounts - choosing a top and side whole for my setup (no rule of thumb here). Then last but by no means least, getting a washer and nut into a very tight space using a long spanner, some sticky goo from the interior door panels and many choice swear words.
In the end they really look the goods and can't wait to feel it the difference too. There is a caveat on fitting these with 'widebody' guards though. As most of these wide aftermarket guards come with vents behind the wheel arch, these braces will foul on them. There are two choices open to you at this point, either hack into the vent or as what I've done, have someone remove the vents altogether (Tom came to the rescue again on this).
Other bracing that I have so far are front and rear Cusco OS strut braces, Zenith Boot Brace and Zenith C-pillar brace (still yet to determine if it will fit as it's for a 180SX). Also got some Zenith aluminium pineapples for the rear subframe and a Zenith Steering Bush to give better steering response. All these bits should tie the chassis together quite nicely.
Update: As of a few hours ago, the guards have been refitted, and the front bar is being cut to suit the intercooler. A lot of preparation has already gone into the body, so the painter has been called to come down and check out the amount of work required. The choice of colour has been with me for some time, and I've chosen Mazda's 'Velocity Red'. It's a beautiful red with a slight orange tinge as well as a small fleck to boot:

Should know a bit more by the end of the week, but I'm pushing to get it in for paint prior to Christmas so I can do more work over the break.
Cheers
Brendan
Wednesday, 23 November 2005 | | Categories: Suspension
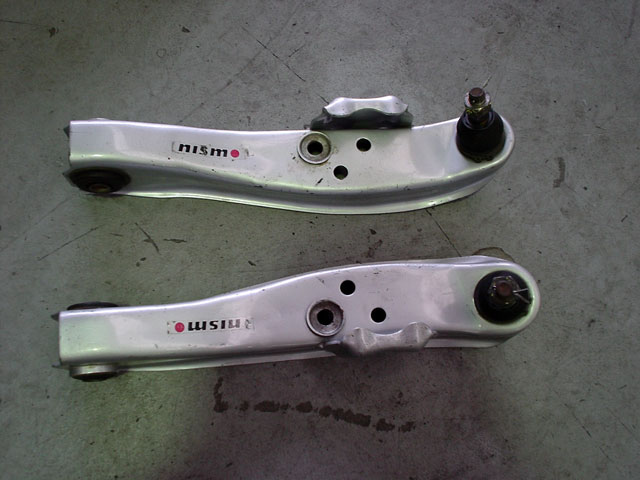
Sorry sorry sorry. It's been a hideously long time between posts I know, but getting back into the swing of things now. Unfortunately a few months back my mother-in-law passed, and we've just finished settling the estate including cleaning up the house and belongings and selling the family home. But that is all behind us now so on with the show. I was lucky enough (thanks to C-Red) to get my hands on some Nismo Lower Control Arms which will help in the strength stakes. I am however wanting the underside looking pretty stock, so I have painted them in black and will affix some small Nismo stickers onto them soon.
Some pics of the testing session:
- Nismo Lower Control Arms (Top View)
- Nismo Lower Control Arms (Bottom View)
- Nismo Lower Control Arms now in satin black
I have also resprayed the rear subframe in the satin black too, and most other parts will be done the same to reduce the attention from the constabulary.
Seeya
Brendan
Page 3 of 3 pages < 1 2 3


