Category: Engine
Friday, 6 February 2009 | | Categories: Engine, Paint, Random, Track
Damn, didn't realise it's been so long since my last post. Well, simple reason is I've been busy. Not with the car unfortunately, but work and life in general.
The car though has been used on a daily basis for to and from work duties, and the occasional weekend outing. Even some family transport duties thrown in for good measure, although only when there's four of us (I have three kids, but only two can fit in the back at one time).
Last October, we had the Powercruise come to Perth for the first time. Different to Motorvation, which is more a show and shine with a bit of cruising up and down the drag strip and around the car park, Powercruise is two days of watching the Power skids, and taking you car out onto a race circuit with 20-30 other cars. Racing per se isn't allowed, but it was fun nonetheless. The majority of the those in the event were V8's, many of which had 300+ horsepower, problem was though was having to wait for them to go around a corner. They mostly had no brakes, and suspension setup for drag racing or straight line work. Very frustrating when your car has power, brakes and handling. So I, and others with a similar setup, spent our time weaving around the traffic in a safe manner. At one point I took a died in the wool V8 lover for a drive, and he was amazed at the handling and braking on the car, and it wasn't too shabby when it came time to going in a straight line either. Will definitely be doing it again this year and hope the same guy I was following around in the Commodore ute is there again, we had great fun dicing around the track together.
Now, there has been problems since the car has been on the road with regard to response, which was mentioned back in September after the time out on the skid pan doing a motorkhana. Well, I took it into Sean at Allstar for him to take a look at it on the dyno and basic diagnosis was that either a lifter was sticking, or the heat at high revs was causing the valve to get pinched and stay open. After further conversations with Marc, Josh and Boney over at C-Red, it was decided that a head replacement could be the best solution...but why? Well the head that was used way back then was taken from the block that it sits on, it was ported already so seemed to be logical. It was then sent off to get a full service, but the problem we now have deduced is because it may have already been serviced a couple of times, too much meat had now been taken out of the heads and specifically the valve seats (note this is basically my understanding). As there's now less meat on the seat, the valve sits up in the head too far, and having used way undersized shims, the rockers are now also sitting at an angle they're not really meant to. This would explain why changing the adjustable cams gears during the tuning process didn't make too much of a difference.
What now you say, well during November and December I found and bought a head from Donny at Street Forced Performance in Melbourne. The head has already had porting work undertaken among other stuff. It's now been sitting at C-Red for a couple of months, but finding a time (and cash) to now get the change over done is the problem. I'm now working for myself, which means time off means money I'm not making...and I don't need to tell anyone what takes precedence at the moment.
So, that's where the cars at. There's a few paint problems starting to rear its head now the car has been on the road including some massive ones on the rear bumper where the old bog that was put on it before I started is cracking under the paint. Car still looks a million bucks, and for something that was taken off the road and rebuilt in such a way, it's had relatively minimal problems. Have another day at AHG on Sunday, so hopefully get some pics up from that too very soon.
Cheers
Brendan
Tuesday, 6 May 2008 | | Categories: Brakes, Engine, Exterior, Driveline, Suspension
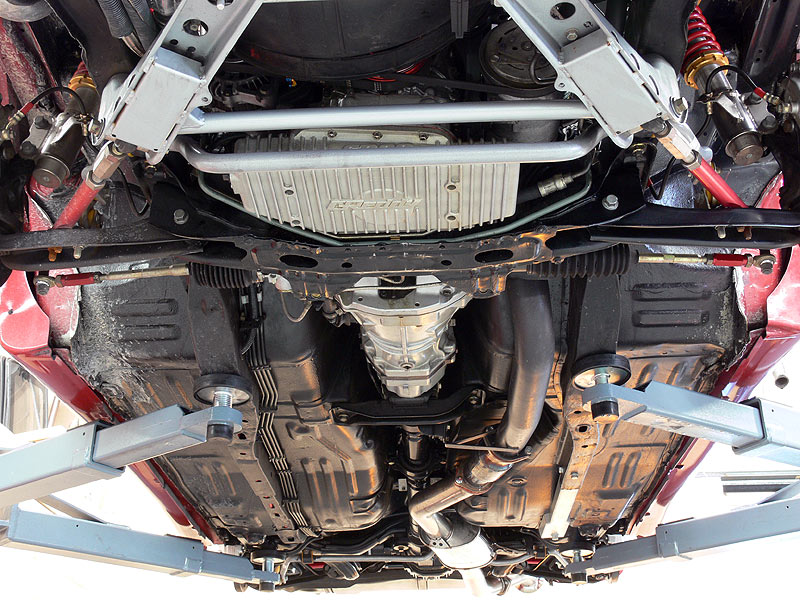
A number of weeks ago now, I did a photoshoot with Rick McDowell, a well known WA based photo journalist. The results of which were brilliant, but with a fair amount of work gone into the undercarriage, and an award to prove it, we needed to get some photos done of the underbelly along with additional engine and interior shots. This being something best done on a hoist of course, so last Saturday we were lucky enough to get some time on the hoist in the C-Red workshop (thanks to Marc, C-Red's Workshop Manager). I went in and first detailed the engine bay, which wasn't too bad really. But as I drive this on a daily basis, and that the road near work as had some work done on it recently (plus rain), I had quite a lot of dirt and mud built up under the guards. With the help of the trusty truck wash and a bit of elbow grease (and mess on the floor) the front and rear suspension on the passenger side came up a treat.
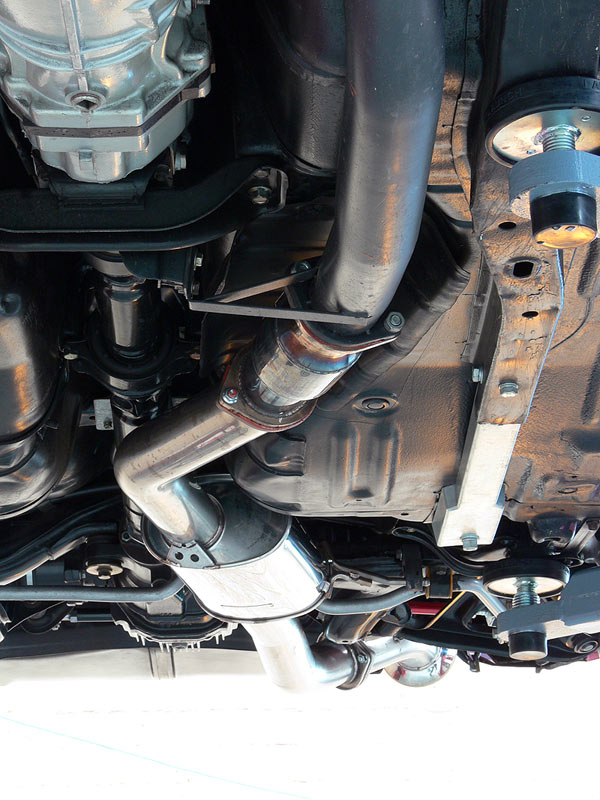
While Rick was snapping away, I thought I'd take the chance to update the undercarriage shots...being there's no longer the Ikeya Formula lower control arms in place, and the exhaust has been completed and changed since the last set I did 6mths ago or so. A couple of things to note though, first being the URAS Floor Reinforcement Kit which extends the chassis rail on the passenger side from the usual S13 cutoff point to the rear. Also, if you look on the drivers side, there's dirt there just to prove that it does indeed get driven. On a whole, I was surprised at how clean the undercarriage is considering the rain we've had lately. Having the fresh'ish paint surfaces certainly helped in cleaning it all up easily though.
Anyway, photos for all to enjoy:
- Rick taking his photos
- Under the engine bay
- Front Suspension
- Front Brakes and Coilovers
- Front Pipe and Gearbox
- Rear Subframe assembly
- Rear Suspension
- Air time
The photos that Rick have done so far were really ace, so looking forward to getting a gander at these new ones.
Cheers
Brendan
Tuesday, 6 May 2008 | | Categories: Engine
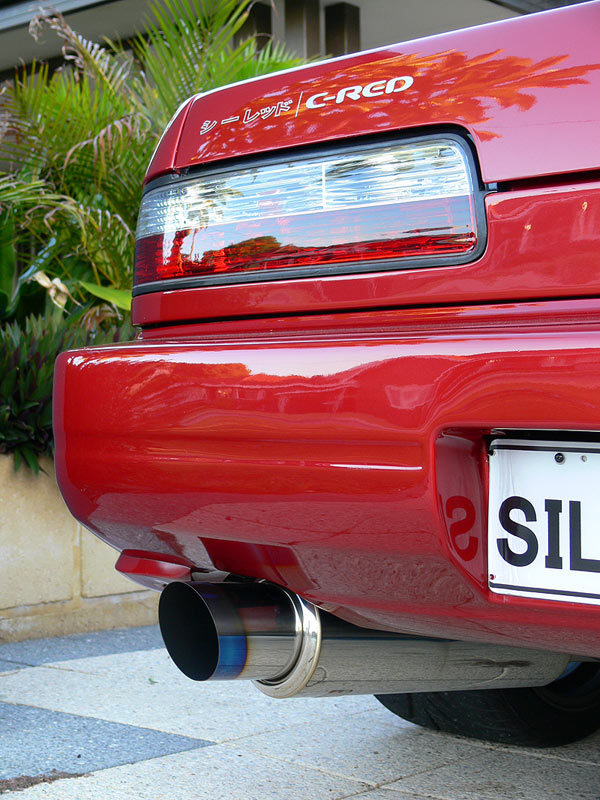
A few weeks back, I had the chance to fit up a new exhaust while doing some other work on Sillbeer and with C-Red being an agent for Tanabe, it seemed a no brainer to go for the Tanabe 'Medalion g-FORDAN blue' cat-back exhaust. Now you might be wondering why I would change, fair enough question. The answer has two parts...the first is that the exhaust that was fitted (XSPower Dual N1) was rather loud at certain cruising rev ranges which made it a little annoying. The second part being that it hung down rather low and was a constant worry on whether or not I would hit it on some driveways. This was more due to the design of dual pipes coming through under the rear subframe. So when the chance came, I took it.
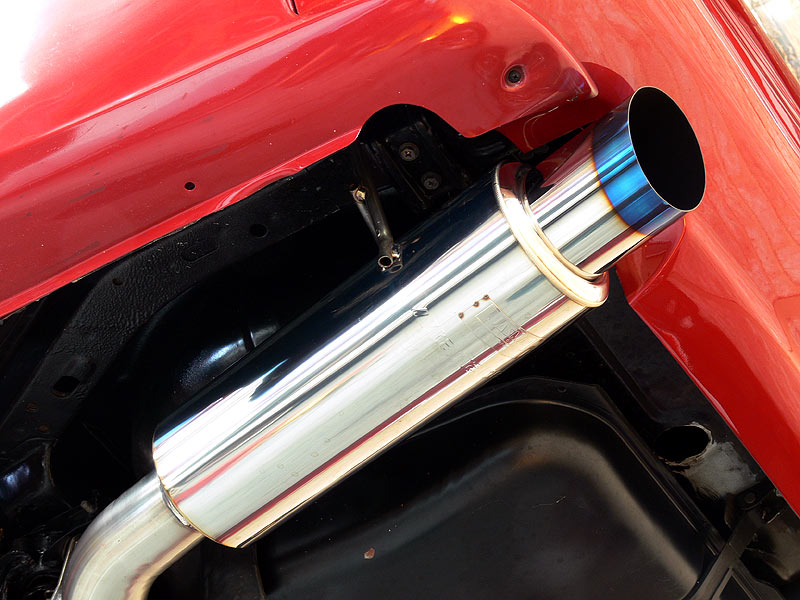
Now I wish I had the obligatory 'box opening' pics for this event, as the experience was incredible. This exhaust is a perfect example of pure Japanese aftermarket quality parts. The packaging was tight, there were all sorts of protection and the product was just beautiful. Fitting the exhaust was a dream, after we put back all the standard rubber mounts we removed to get the china made XSPower exhaust to fit. Within 10mins, it was fitted up and ready to go...it took longer to open the box. As you can see from the pics, this exhaust has a 'titanium look' blue tip. It's a little wanky, but I like it. The welds are a thing of beauty too and all the supplied nuts, bolts and gaskets were all top quality pieces.
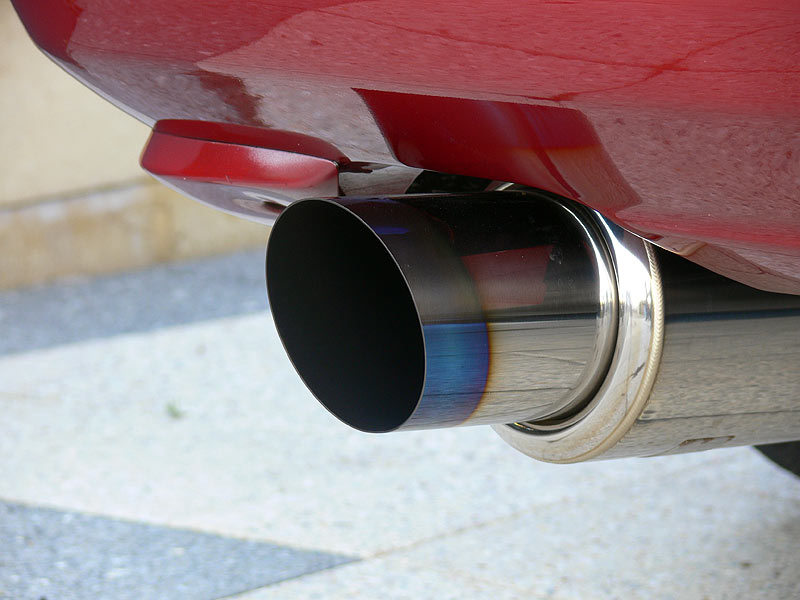
So, it was down with the hoist and a turn of the key. Now coming from the Dual N1 to this exhaust was quite a change sound wise. The Dual N1 was reasonably loud, especially at WOT, but this Tanabe exhaust is very quiet at idle and normal off boost driving. Being a JASMA exhaust, this was to be expected, but the surpise came when I gave the car a quick squirt through the tunnel. OMG, it's like a banshee being let free. Just beautiful. I had the same experience with another JASMA certified exhaust on my 32 V-spec - being a Nismo Weldina item, quiet on running around, then opened it's lungs right up at WOT.
The experience in the cabin now is much more to my liking (I am getting on in years). It's now a huge difference, with no droning at cruising speeds, it means I can hear more of the sound system.
Here's a few more pics of this lovely Tanabe 'Medalion g-FORDAN blue' cat-back exhaust:
- Full Rear View
- Full cat back exhaust 1
- Full cat back exhaust 2
- Centre Muffler 1
- Centre Muffler 2
- Rear 'Titanium look' Exhaust tip 1
- Rear 'Titanium look' Exhaust tip 2
- Exhaust tip side profile
- JASMA Plaque on Rear can
- Metalcat Catalytic Converter
- Cat converter and HKS front pipe
Thanks to Josh at C-Red for assisting in fitting the exhaust too. If anyone is looking to purchase one of these exhausts, I have no problem recommending them.
Cheers
Brendan
Friday, 4 April 2008 | | Categories: Engine
Phew, that was a hell of a break. Didn't think it had been that long. Well in the time between the last post and now the car has been my regular daily driver to and from work. So far the car has performed pretty well other than the niggles from those unknown camshafts that were installed in the initial build. I've also had a couple of weeks holiday visiting sunny Melbourne for the Australian F1 Grand Prix followed by a week on Hamilton Island - just the wife and I (our 3 kids stayed with their Nina).
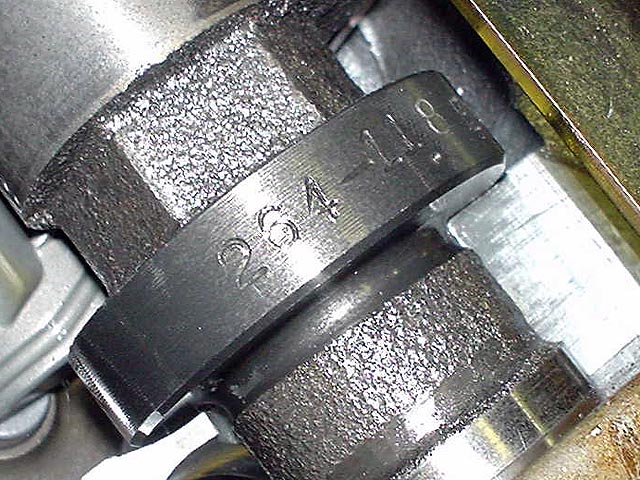
While away, the car stayed at C-Red and had the camshafts changed over for some brand spanking new GReddy Performance Camshaft Pro items. The specs on these are as follows:
- IN 264deg/11.5mm (120deg)
- EX 264deg/11.5mm (114deg)
I had a chance to drive it around for a few days while I waited for the appointment at the tuners and although the idle was hunting, it was a lot smoother than with the previous camshafts that were in there. Airconditioning wasn't a problem anymore either in the traffic, whereas before if I had it on in peak hour, the engine would constantly stall (it was something that we couldn't get rid of).
So I dropped the car off for a couple of days at Allstar Garage in the capable hands of Sean. The last time it was in, the changing of the camshaft timing using the sprockets was a complete waste of time, this time though, with a bit cleaning up of the base tune we finally had a decent improvement. See the dyno sheet below for the results. The thin lines are the previous camshafts and the thick lines are with the new GReddy's in play.
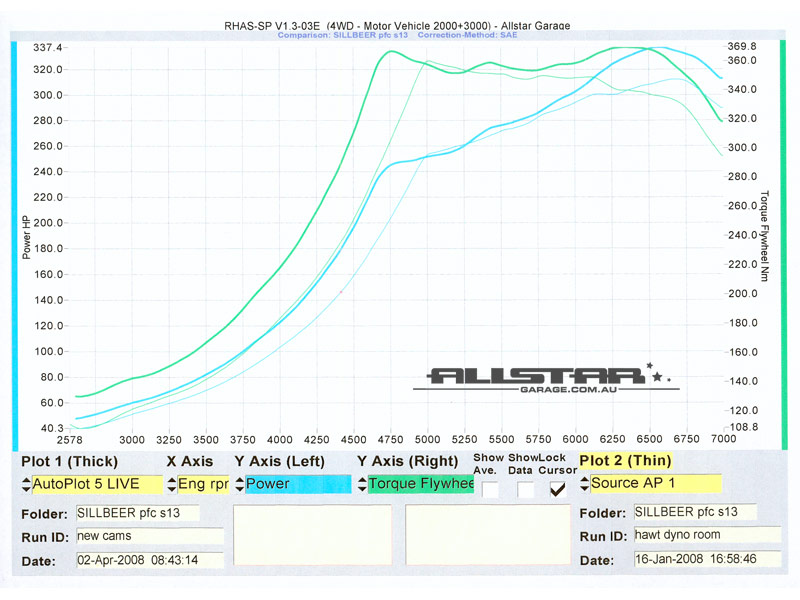
So to sum it up. Run on Allstar Garage's Dynapack Hub Dyno. With the boost set to a maximum of 1.45bar (21psi) using the GReddy Profec-B SpecII, power (the blue lines) is up from about 312hp (233kw) to 337.4hp (251kw), an improvement of over 20hp (15kw). The torque (green line) has moved forward another 400rpm or so showing that we've got full boost by 4750rpm. Peak torque is 369.8Nm (272.8ft lb-f) at 6300rpm, but it hits about 365Nm at 4750rpm and stays about 355Nm from there until redline.
As for what the bum dyno says, well it's all good there too. Once on boost, the power seems endless, and now I can change gears and be right on top of things again. I think there could be more response gained from going slightly smaller camshafts, but for the time being, we'll see how we go with this.
I'll be endeavouring to get down to the strip soon to see what she'll do. But remember I'll be a drag virgin so don't set your hopes too high. I also need to get to a weigh bridge and see what it all weighs too. Also on the cards is a trip up to Barbagallo Raceway with No Limits Motorsport and the odd fang out at AHG in motorkhana and circuit time attack. If fundage allows, I'm also looking at competing in a tarmac rally called the Alphera Dutton Rally when it comes to Perth in July.
A couple of items are still sitting in the wings that need to be done. Firstly will be fitting the boost gauge...although I haven't missed having one, it'll round out the cabin nicely, the Meter Hood will need to be purchased first though. When I fit that, I also need to fix the fuel gauge as that's way out of wack. Oh, and the vents in the rear parcel shelf need to be affixed to the new shelf material because each time I take a sharp turn they go flying from side to side.
I also had a visit from a well known magazine photographer on the Australian import/four cylinder scene back in late February, so look forward to seeing my car staring back at you on the newstands in the within the next couple of months. Will try and get permission to post pics for those people overseas too.
Drive safe, and talk next time.
Cheers
Brendan
Thursday, 17 January 2008 | | Categories: Engine
Well the car spent some time on the Allstar Dyno yesterday with Sean at the helm. The aim of this tune was to try and bring the response back down the rev range as it was way up top. This was to be achieved by adjusting the cam timing using the adjustable camshaft sprockets that have been fitted.
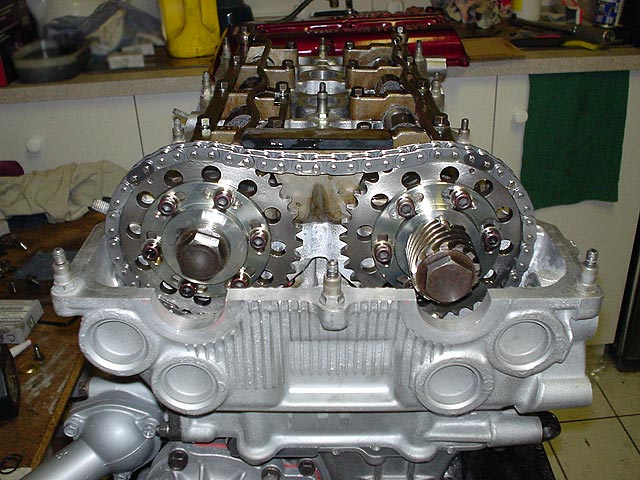
Now this is a time consuming job, as each time you want to change the timing, you need to crack open the rocker cover make the change and screw it back down. It would have been easy if we knew the characteristics of the camshafts themselves, but all we had were the basic specs - 264deg duration with 11.8mm lift on both intake and exhaust.
Unfortunately, no matter what was done, we couldn't get any better response out of the engine. We could however put more lag in...but yeah, you probably guess that isn't what we're after. Boost comes on strong at 5300rpm, where I've seen some dyno graphs seeing boost rise from 2500rpm with full boost by 3600rpm. It is however making between 310-320rwhp, but only for about 2000rpm :( So currently in the throes if researching my camshaft options for maximum response. If anyone knows that HKS recommend as the best match for the HKS GT-RS turbo, I'd appreciate it if you could let me know what they say.
Now, onto Motorvation!
Cheers
Brendan
Friday, 14 December 2007 | | Categories: Engine, General
Well then, where do I start.
After getting the car registered, and bits and pieces back on it was time for the shakedown. Basically driving around, checking for squeaks, leaks, rattles and hums. There were a few rattles in the doors that have been pinpointed and fixed, along with one on the bonnet (hood) hinge which will require another hinge. We had a problem with the air-conditioning though, where the seals were naff, and after it was gassed up the first time, it all leaked out. The seals were replaced, re-gassed and now it's all good. I went without A/C for a week or so in what was one of Perth's hottest week in the month of November ever. Ugh!
As for leaks, which are all part of the fun, there was one of the factory oil pressure sender, now fixed, and another from the oil seal around the crank pulley. Now this is not to do with shoddy work, but a symptom of the GFB crank pulley being made of aluminium. The oil seal had worn a groove in the soft ally, so the pulley was removed, machined down and sleeved with a harder metal. The team at C-Red have now fixed that all up and all is good.
The car has settled down nicely on the suspension, and considering the fairly hard spring rate of 8kg/mm front and 6kg/mm rears for the Racing Gear JTC'N1 Stage-V coilovers, it's reasonably subtle. I thing it could be made a little softer for street work though but I'm yet to mess about with the damper settings. I also think the rear coilovers are clicking a little bit on some of the larger bumps in the road, but this is yet to be determined.
One of the items I'm not quite enjoying though is the exhaust. At about 60km/hr in fourth, it has a very loud drone that just goes right through the car, and unless you have the stereo cranked, you can hardly hear the sub-doofer. So I'm looking to eventually change over to a nice Tanabe Medalion g-FORDAN blue exhaust which C-Red have in stock.
Now the engine was run-in over a period of about 3-4weeks, clocking up about 1300kms. It was then time to put her on the dyno for her first, but by no means the last, tune. Tuning is being taken care of by Sean and his team at Allstar Garage and the first session was yesterday. After running her up, she made a very laggy 312hp (233kw) at 1.4bar to rear hubs (Dyno Pack hub dyno). After a conversation with Sean, it requires some experimentation with the camshaft timing to bring the power back down to the low/mid-range with as its making boost at about 4800rpm and full boost at about 5800rpm. Once you're into the power though, it's solid and just gets going.
Now how do I feel about all this? Well, I'm not disappointed that's for sure. I mean the car has been completely apart and is now together again in a state that Nissan would not have dreamed of. It's been three years in the making, and a few weeks of trial and error, refining and troubleshooting is to be expected.
Oh, and the Defi gauges are now hooked up, but just not on the dash yet. And I chose to go with a GReddy Profec B-spec II electronic boost controller rather than the PowerFC Boost Control kit. Reasoning behind this is that it has a high/low boost setting that can be easily changed, and you don't need to be a rocket scientist to work get through the menu system and understand how the PowerFC handles boost settings.
Until next week, have a good one.
Cheers
Brendan
Wednesday, 14 November 2007 | | Categories: Engine, General
This week is a good week.
Yesterday (Tuesday) I was given the go ahead to pickup the car. It has had a run-in tune put into it by Sean at Allstar Garage on Monday...and in 39C (102F) heat I should add. Now, this was a special day for me as you would imagine, it was the day I could finally take my car home. Having started this journey on the 28th August 2004, that would make it 3 years, 2 months and 16 days to get it this far. To say I was nervous about driving it home was an understatement, but after driving it a couple of kms, I settled down and really appreciated what I and many others had created. The engine ran sweet (if not lumpy at idle due to the cam profiles), the suspension was tight, steering tracked true and the interior felt like new (as it should). That bodywork certainly lets you know it's there too, every time you look in the side mirrors..boom, take that.
I went and picked up the kids from school, they were all giggly about getting into the car too...I cranked up the tunes for them and they just loved it. Once home, I gave the car it's first ever wash. It has collected quite a bit of dust and crap since Autosalon as the cover hasn't been put on as much, and once clean the paint really did pop out so much more.
This morning was the first test in peak hour traffic, and did it serve it up...one of the worst days I've seen in a long time just getting onto the Freeway. Was it hard to drive? Well kind of, remembering it has a twin-plate clutch that hasn't really been run in yet, and a driver just getting used to a twin-plate again, I reckon it was pretty good. Give me another 2 weeks, and it would be a problem at all, just need to keep the revs up higher than I would in the Sigma.
I'll take a stack of pics soon and post up another gallery for those chomping at the bit to see how it's progressing.
Now is the journey over? Not by a long shot. Unfortunately when we switch ECU's over, the pin setup is slightly different between the ADM and JDM computers, which means the air conditioning isn't connected (although it has been gassed ready to go). But the weather is cooling down towards the end of the week, with a 30C today, and 28C tomorrow and Friday. We'll sort the aircon on Saturday along with the sump guard which I took delivery on Monday for. I will also run the sensor looms for the Defi Gauges and look towards getting those running...at least temporarily on the dash board. Then of course there's the run-in, which will be 1000kms of easy driving. The tune on Monday garnered a respectable 160rwhp on 6psi (0.4Bar) at 5000rpm (which is the current rev limit set in place for the run-in), so there's plenty left in it. Not sure what we'll boost her up to, but I'm saying the in region of about 22psi (1.5Bar), mmmmmm boost.
So keep an eye out for those photos.
WOOT!
Cheers
Brendan
Thursday, 8 November 2007 | | Categories: Engine, General
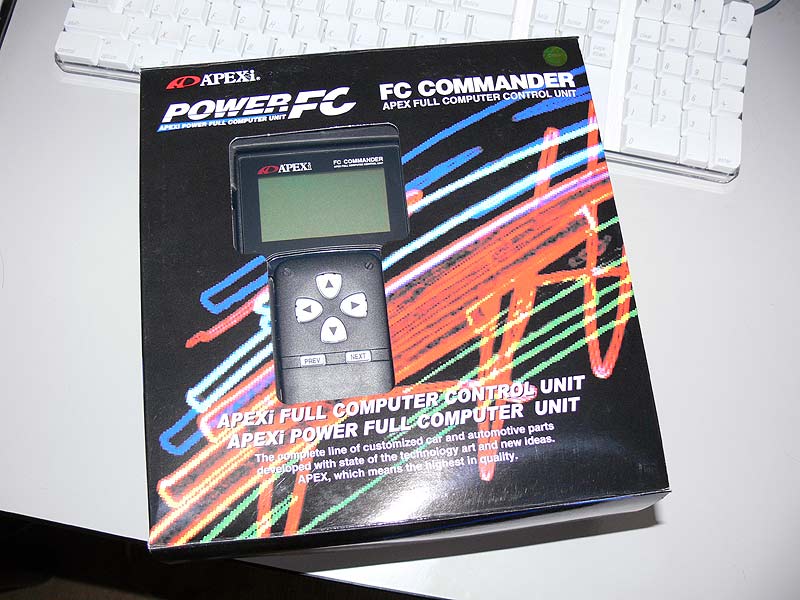
Yeah, crap title I know. Anyway, delivery of the Power FC (Full Computer) was on time and on Tuesday we dropped it into the kick panel, changed a few parameters around for the injectors and AFM and voila...sutartu! It's an S15 version as I originally planned on running a modded stock S15 ECU. We'll do a little bit of tuning to make sure the fuel is ok for light driving around, then have a proper tune coming up early next week. After that I can start running the engine in before leaning on it.
- Main ECU Unit (for direct replacement of the stock ECU)
- Power FC Commander (Hand Controller)
- Main plug interface
- Label on the side with serial number
- Accessories interface for Commander and Boost Control Unit
Speaking of boost control, I'll either be using the Power FC Boost Control kit, or a C-Red is now an official Trust/Greddy supplier, a GReddy Profec-B Boost Controller.
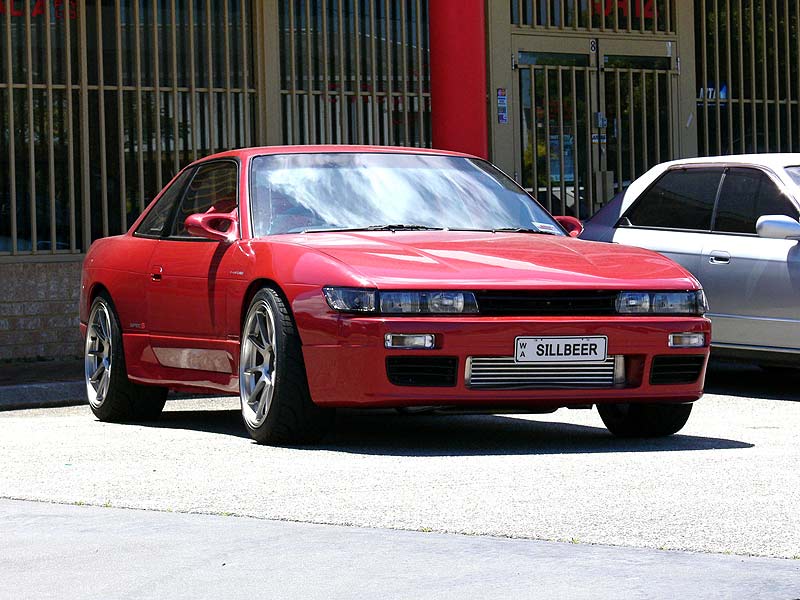
Now for the good bits. Yep the car is registered, and the plates are now on. Ride height has been adjust so that it has plenty of clearance on the coilovers, but may need to look at a different exhaust down the track a little to get even more clearance...this is a daily remember. The car is getting it's air con regassed today, (this morning) and I'll take it down to Exley's Tyre Service (where I got my tyres from) to get a base alignment done. There's way too much camber front and rear on the passenger (left) side of the car and too much toe at the front. Now I apologise for not giving it a wash before taking the pics, but time was short when they were taken yesterday.
- Front quarter view
- Front wheel showing the Brembos
- Side view showing new ride height
- Rear quarter showing plenty of tyre clearance
- Rear quarter view 2
- Left profile - OMG it's phat, too much camber
- Right profile view
The rear height might be dropped by another 10mm or so, but we'll see how it goes for now...that'll be all part of the fun of getting it closer to perfection. Still to come now is fitting of some additional chassis bracing I've yet had time to put on (URAS Chassis Rail Extention and Tunnel Brace), then I need to work out how to add the Defi gauges which are waiting in the wings.
Shakedown will follow while we work out the inevitable bugs. Stay tuned.
Cheers
Brendan
Friday, 12 October 2007 | | Categories: Engine, General
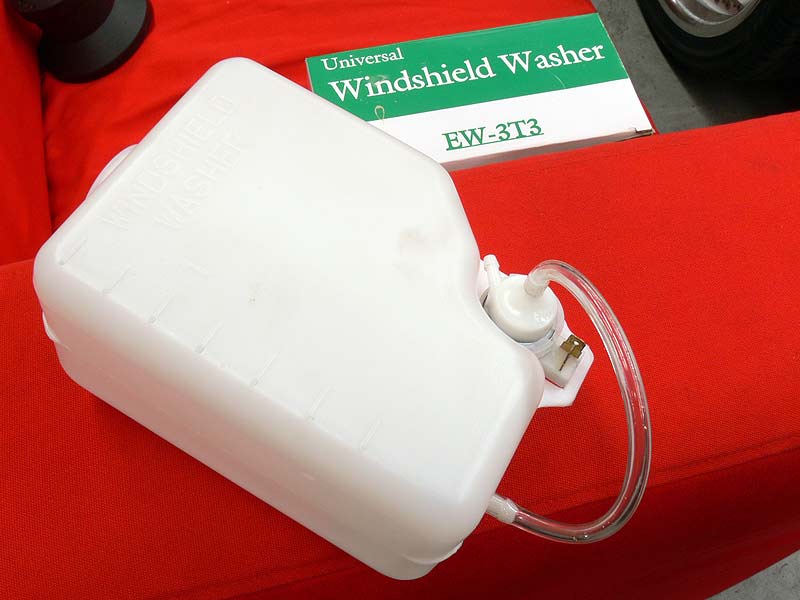
One of my pet hates when it comes to driving is a dirty windscreen, and of course to be registered, the car needs windscreen washers (squirters) working, so I needed to get them into working condition. Now, in an effort to clean the engine bay up a bit, the fuse box was moved to a position right next to the guard. This position however covered up the hole where the original washer bottles filling pipe comes up...so another solution was required. As the battery is now in the boot, it left a bit of space where it was, next to the intercooler pipe.
A quick trip down to Supercheap Auto found a universal washer bottle at a perfect size. We looked at a bunch of different locations, including down underneath the guard, but all solutions still has the problem of being able to fill the small capacity bottle, thus the location in the engine bay itself. After making up a bracket from stainless flat strap and giving it a coat of paint it all bolted in pretty effortlessly. I pulled the original washer plug and hose through, filled the bottle and connected the hose and electrics. To my surprise, the electrical plugs were a match and after dropping the battery onto charge, the squirters were all working mint. Photos off the stuff below:
- 'L' Bracket 1
- 'L' Bracket 2
- Bracket installed with additional bottle attachment
- Bottle installed and filled
Now that that was done, it was time to start thinking about putting the suspension back to stock for registration. The adjustable arms may or may not be re-installed. I'll take some pics of the position of the rear wheels for reference, but with the stock rear lower control arms, the rear wheels sit almost perfectly...and I'm rethinking my decision on whether I really 'need' the fully adjustable Ikeya Formula lower control arms. We'll get to that decision later once it's back on the road.
Cheers
Brendan
Wednesday, 3 October 2007 | | Categories: Engine, Interior, Suspension, Wheels/Tyres
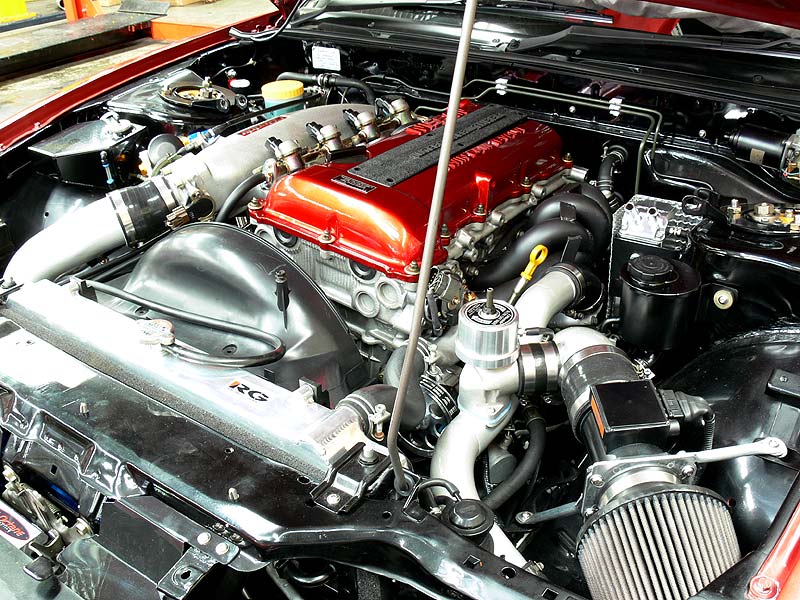
Wow, time flies...full stop. But yes, I have still been working on the car. We're currently going through some changes under the bonnet that are taking longer than expected which is causing a knock-on affect in having the car on the road. While this has been happening though, I have been continuing to do things on the car in preparation for its eventual trip over the pits. But first up, I never took photos of the engine bay while at the show which was a complete oversight on my part, so here are a few photos now:
- Engine Bay from front
- Engine Bay from driver's side
- Engine Bay from Passenger side
- Exhaust manifold detail
- GReddy Remote Oil Filter
- GReddy Oil Cooler
You may have noticed in those pics a nice shiny GReddy oil catch can (breather) sitting on the passenger side strut tower. Well this was fitted by me, using a custom mounting bracket and heat shielding that I fabricated (which I was very happy with). Final result looks reasonable clean.
- GReddy Oil Catch Can from front
- GReddy Oil Catch Can from rear
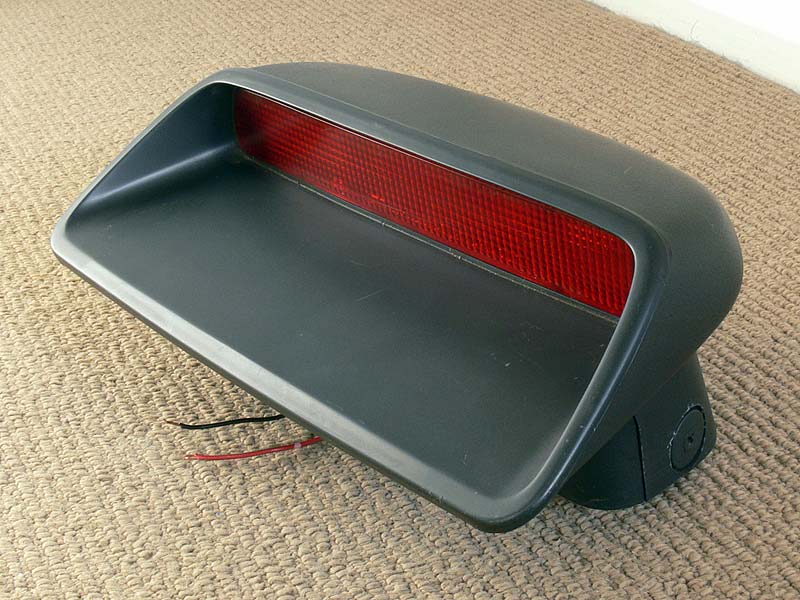
As part of the registration process, there are a number of items that needed to be addressed. The first is the rear high-mount brake light. Now I was originally going to get a Hella light from the local light store (Alanco), but remember that the S13 Silvia came out with one of the factory. As fate would have it, when I had a look on eBay, someone in the east was selling one...and after a frantic last 10sec bidding war, I came away the new owner of a genuine Nissan S13 Silvia High-mount Brake Light.
- S13 Silvia Brake Light (Front)
- S13 Silvia Brake Light (Back)
- S13 Silvia Brake Light (Side)
- S13 Silvia Brake Light (Bottom)
- S13 Silvia Brake Light (Lamp)
Now the sorta trick bit was figuring out how to mount the little bastard (note: it's not that little). After removing the rear parcel shelf (and the sub woofer), I found mounting holes on the metal shelf. Unfortunately the same couldn't be said for the wooden parcel shelf, which I went ahead and guestimated where the holes should be cut after doing a bit of measuring. Next up was figuring out how to get power to it, this is where I could kiss the Nissan engineers as they left the plug sitting on the loom that runs across the rear window. I cut the retaining tape and hey presto, all it plugged straight in. After bolting on the mounting bracket and a few backwards and forwards with the wooden parcel shelf, it was installed.
- S13 Silvia Brake Light Mounting Bracket
- S13 Silvia Brake Light Plug (Wire/Loom)
- S13 Silvia Brake Light Parcel shelf modifications
- S13 Silvia Brake Light Fitted (from inside)
- S13 Silvia Brake Light Working
While on the parcel shelf, I installed the child restraint belt brackets. Now I installed the bolt holes a few months ago, so this was a very simple job. Using the Klippan Child Restraints from Repco (I think), it was just a matter of removing the pre-cut piece in the wooden parcel shelf, a hole made in the material and bolt them in. All done in about 5 minutes, but crucial for registration and taking my 1yr boy for a spin.
- Klippan Child Restraint
- Child Restraint (fitted)
- Child Restraint (fitted)
As the car is getting registered, it will no doubt be subjected to their height test which usually equates to the car needing to be 100mm off the deck at any point under the car. After fitting up the exhaust a few weeks ago, a quick check under the car revealed it had a lot of height required to clear. At only 55mm off the deck, I needed at least another 55mm to get me in the safe zone. The procedure to do so was reasonably easy though with just a matter of taking off the bottom coilover mount and winding both sides out until it all cleared. This was done for the front too, but this consequently cancelled out some of the clearance done on the rear. I'm in two minds yet as to whether I will just put stock shocks/springs on to get the registration process over and done with. Here's a before and after shot anyway:
- Wheel height before
- Wheel height after
- Exhaust clearance after
Another reason for all these delay's is the fact that I'm also spending more time with the family, which means less time on the car...and without doubt, family comes first. I promise not to leave it so long next time (like you've never heard that before from a blogger).
Cheers
Brendan


