Category: Paint
Thursday, 29 December 2005 | | Categories: Exterior, Paint
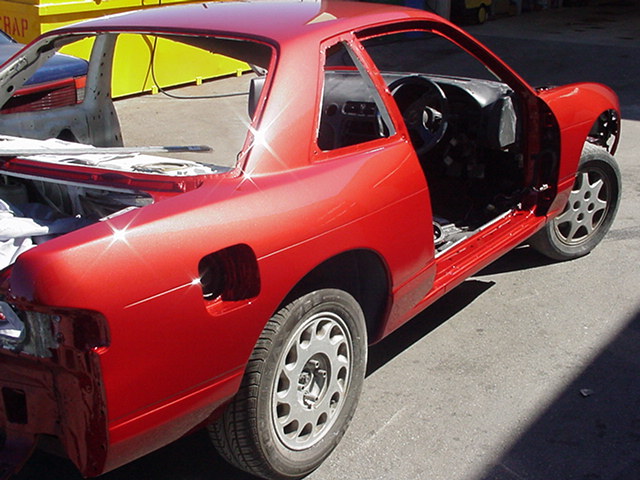
Well what can I say, it looks f%^∈ tops!!! This is straight off the gun so still some finishing touches to do but it looks real good. I'll shutup now so you can look at the pics.
Wow:
- Front view drivers side
- Front view drivers side 2
- Front view passenger side
- Front view passenger side 2
- Rear view/Side
- Rear view 2
- Roof Front
- Roof Rear
- Side'ish View
Cheers
Brendan
Tuesday, 27 December 2005 | | Categories: Exterior, Paint
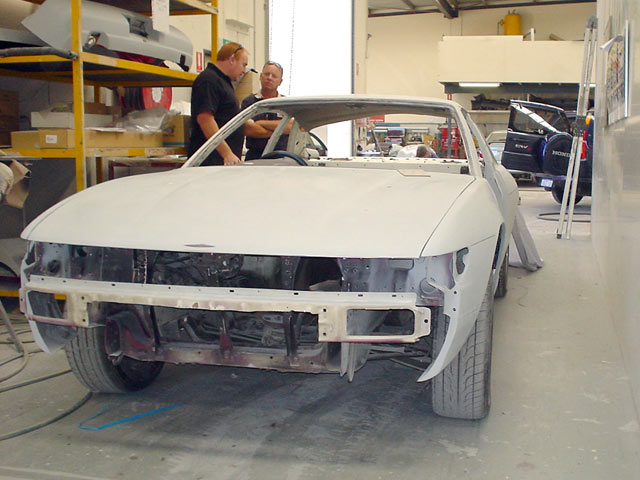
So by the time you read this, I'm hoping the car now has a coat of red on her. Last Wednesday I went out to Assure in Canningvale to look at the body. It was in primer, and after talking to one of the staff, was due to get paint the next day (Thursday). Not 100% sure when I'm likely to see the body again, but would assume it'll be within the next week or so. Now being all in a single colour, albeit a drab grey, the wide body isn't so noticable unless looking right down the side. The front guards almost look stock too, even though they're 30mm wide than stock.
Here's what she looked like:
- Front view drivers side
- Front view passengers side
- Rear view/Side
- Roof
Can't wait to see her now that I know she should be looking much closer to finished. Once back in the workshop, the glass will be replaced and then comes the long haul to put it all back together again..
Cheers
Brendan
Tuesday, 20 December 2005 | | Categories: Driveline, Paint
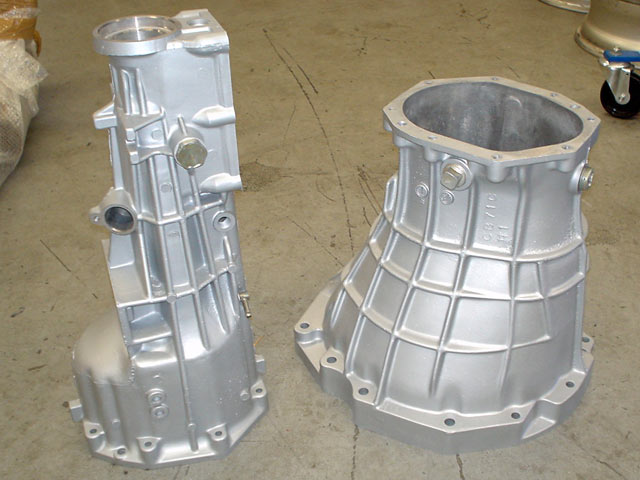
This post won't win the award for the most exciting, but it's progress nonetheless. A couple of weeks ago I decided to start prepping a gearbox ready to be bolted up to the engine. Not wanting to have an ugly oily mess I thought it best to clean one up and paint it. Josh from C-Red said the easiest way to sort it would be to clean up just the housings, then build up a gearbox (thereby also checking components for wear etc).
So I set up degreasing, then acid dipping. Unfortunately the acid dipping didn't quite have the affect I wanted (ie. cleaning up to new condition) as can be seen in the first photo below. The next best thing was to jump on the sandblasting box and give the housings a good once over. The results are clearly seen in the second photo below. Finally once both were pressure washed and air blown dry from sand etc, a couple of coats of VHT engine paint in aluminium colour was applied.
Here's the results of my efforts:
- Gearbox housings after acid wash
- Bell housing sandblasted
- Finally painted
I know you don't see the gearbox, but being the slightly anal bastard I am, I know it's there - so it best be clean and look like new. Dally would be proud.
Cheers
Brendan
Saturday, 17 December 2005 | | Categories: Paint
Quick update, car is now in primer and will be painted next week (woohoo!). Will be in at C-Red next Wednesday so might pop into the panel shop while on errands to check out the progress and take some happy snaps.
Also done a quick update to the 'Plan' based on product changes etc.
Cheers
Brendan
Thursday, 1 December 2005 | | Categories: Exterior, Paint
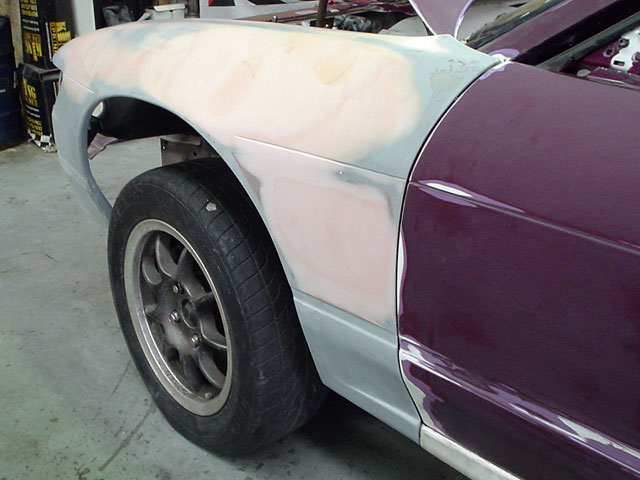
A few posts back I mentioned the problem with fitting the Zenith Guard bracing with the vented Wide Body guards from M Sports. Basically they wouldn't fit due to the diagonal support fouling on the vent. So thanks to Tom, I've now had the vents removed and I reckon this is going to look more and more stock than ever - just really freakin' wide! Also had Tom cut the front bar around the intercooler and as you can see from the shots, he's done a really really good job.
And some news I've been waiting for for a long time, the car has been shipped off to get paint, and I'm hoping it'll be back before Xmas so I can do some work on it over the Xmas break.
Some pics of the modified guards:
- M Sports Front Guard sans vent (Left)
- M Sports Front Guard sans vent (Left)
- M Sports Front Guard sans vent (Right)
- S13 Front Intrusion Bar cut for FMIC (Front-mount Intercooler) fitment
- S13 Nissan Aero Bar cut for FMIC
Should be a few more updates soon as I start to get things like coilovers etc sorted.
Cheers
Brendan
Thursday, 24 November 2005 | | Categories: Exterior, Paint, Suspension
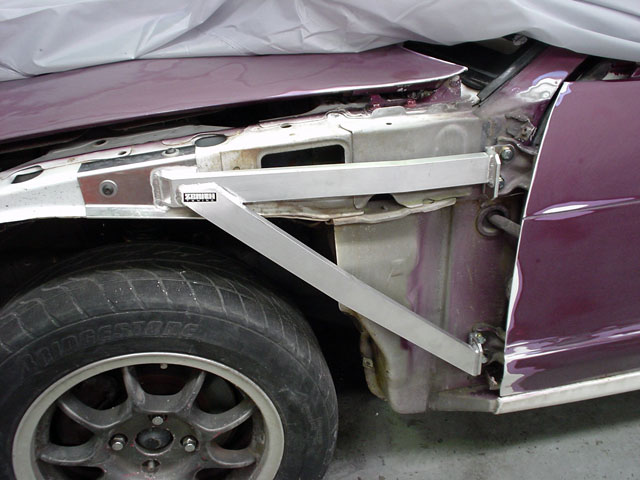
As part of the plans to stiffen the chassis, I came across a coming out of Adelaide called Zenith Tuning on the NissanSilvia.com web site. They're mainly focussing on bracing of all sorts and the first of many items I've picked up is the front 'Guard Bracing'. This has already been tried and tested in the heat of competition drift and is fitted to reduce chassis movement vertically at the front of the vehicle giving better suspension and braking response. The bracing is fitted from the front door hinges and fixed to the top of the inside guard structure, with a diagonal brace stretching from top of the guard to bottom door hinge as can be seen in the pics. The construction is of the brace is from aircraft grade aluminium making it extremely strong and extremely light.
The only downside is in the installation of the top bolts. This is where you need to get smart about getting a washer and bolt down a very narrow channel.
Some pics of the install:
- Zenith Guard Brace
- Zenith Guard Brace Door Mounts
- Zenith Guard Brace Top Mounts
- Access Hole 1
- Access Hole 2
Installation was relatively straight forward, encompassing fitting the door hinge mounts first with the extended bolts supplied. Drilling the holes in the top mounts - choosing a top and side whole for my setup (no rule of thumb here). Then last but by no means least, getting a washer and nut into a very tight space using a long spanner, some sticky goo from the interior door panels and many choice swear words.
In the end they really look the goods and can't wait to feel it the difference too. There is a caveat on fitting these with 'widebody' guards though. As most of these wide aftermarket guards come with vents behind the wheel arch, these braces will foul on them. There are two choices open to you at this point, either hack into the vent or as what I've done, have someone remove the vents altogether (Tom came to the rescue again on this).
Other bracing that I have so far are front and rear Cusco OS strut braces, Zenith Boot Brace and Zenith C-pillar brace (still yet to determine if it will fit as it's for a 180SX). Also got some Zenith aluminium pineapples for the rear subframe and a Zenith Steering Bush to give better steering response. All these bits should tie the chassis together quite nicely.
Update: As of a few hours ago, the guards have been refitted, and the front bar is being cut to suit the intercooler. A lot of preparation has already gone into the body, so the painter has been called to come down and check out the amount of work required. The choice of colour has been with me for some time, and I've chosen Mazda's 'Velocity Red'. It's a beautiful red with a slight orange tinge as well as a small fleck to boot:

Should know a bit more by the end of the week, but I'm pushing to get it in for paint prior to Christmas so I can do more work over the break.
Cheers
Brendan
Friday, 15 July 2005 | | Categories: Exterior, Paint
Apologies for the delay in posting, but the last few weeks have been hectic to say the least. Especially last week with preparations for the Perth edition of Cabin Autosalon, there were plenty of people putting in late orders for stickers which resulted in me not getting to bed most nights before 1am in the morning. The show however was a great success, myself personally involved in the SilviaWA and C-Red stands. Well done to SilviaWA for taking out "Ultimate Club Theme" for the third year in a row.
Anyhow, there's been a minor set backs with regard to Project Sillbeer over the last couple of weeks. This comes down to paint colour. We managed to track down someone who had a good matched colour formula to the Yamaha R1 'Lava Red' as Yamaha don't actually release a paint code as such for it. The main setup on this is cost - being a 3 stage candy application, a full professional paint job is going to cost between $6-7K - not to mention the problems with retouching such a paint job. So, Lava Red is off the list. Now the indecision sets in again as I try and decide on another paint colour. Here are my current choices in no particular order:
- Mazda's "Velocity Red"
- Peugeot "Diablo Red" (No decent pictures available)
- Citroen "Rouge Lucifer"
- BMW "Steel Grey Metallic"
- My Old R32 GT-R V-spec (Paint Code 'BLO')
At the moment, I'm really not 100% sure. I went to have a look at the Citroen the other day and it was dark so couldn't really see the paint colour too well (they had it out the back, not under lights), and I have a feeling they've done some colour correction on the online image. There aren't too many red Silvia's going around (especially wide-body) so red is more than likely the way I'll go, it's just a matter of which one. Feel free to drop a comment on your thoughts.
In the meantime, I've just been advised that my front bar is ready for pickup (modified Nissan 'Nismo' Aero bar), and according to Tomas, that's the last bit he's waiting for before we get the body back.
Cheers
Brendan
![]()

