Wednesday, 15 February 2006 | | Categories: Engine
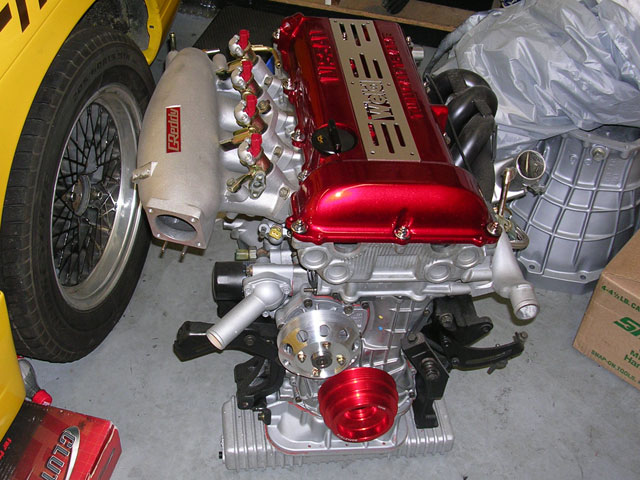
I know you're all probably waiting to here about the painting of the car, but due to some unforseen problems, it's heading back for another round of paint. These things happen, it's just frustrating for the punter due to additional time delays - but then again, I've waited this long, may as well get it done good! In the meantime I've had the rocker cover done. Was originally looking to do this in a red crackle/wrinkle paint (similar finish to strut braces) but decided after considering the occasional beating (ie. dropped tool etc) it can get, that a more sturdy finish would be required. Step up to the plate Lyndon from Competition Coatings (0500 8999 88). We've passed the rocker cover over to him, and he's applied what I believe to be a ceramic coating of sorts that is virtually indestructable. It's done in a Candy Red colour, which comes out to something similar to stock, but a lot deeper (with a believe a slight fleck when in the sun). I've seen another rocker cover that Lyndon had around that was done in the same coating, and even with huge mallet/hammer hits, it's the metal that has cracked first, not the coating.
It's so beautiful:
- Front Right View
- Front Left View
- Top View
Thanks to Roy for the pics, and for polishing up the the cover nuts and washers. You'll also notice the temporary Weld coilpack cover, not sure if I'll stick with this or use something a little more stock looking (TBD).
So it's a very pretty piece of the work, the engine so far is looking fantastic - clean, simple with only a hint of bling in those rocker cover washers. Will let Roy off this time on those.
Cheers
Brendan
Saturday, 28 January 2006 | | Categories: Paint, Suspension
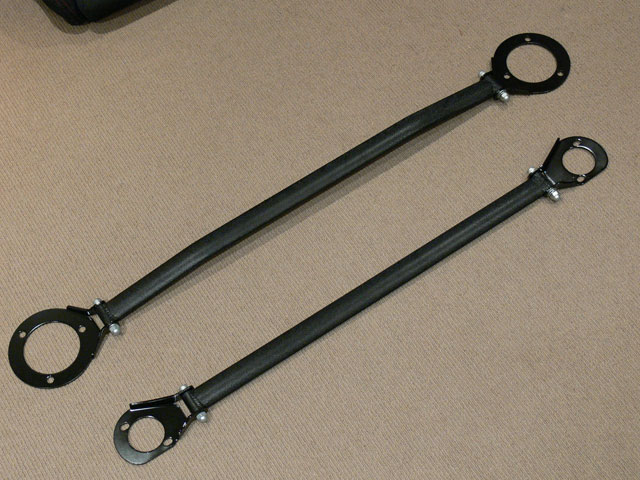
So I had these Cusco OS Type Strut Tower braces for the front and rear of the Silvia which just weren't going to match the rest of the car. With Blue painted end plates and polished allow bars, they're Cusco's standard fare. So, I figured I would refinish them to a more OEM look, which is where I'm going with the car - factory special. So to start out with I've sandblasted the end plates (along with a Cusco Brake Stopper - yet to be completed) and sanded back the bars nice and smooth. The plan was for the end plates in Satin Black and the cross bars to be in black wrinkle paint. Hanging all this from a rafter in my carport using old wire clothes hangers, I went about spraying them. The wrinkle paint is pretty special stuff...it goes on smooth, and after 20 minutes to 2 hours, it starts to wrinkle evenly. The more coats you put on, the more intense the wrinkles. In all I applied 4 coats to get the finish you see below. Check out the pics for the stages and end product.
Step-by-step, sorta:
- Original End Plates
- Sandblasted End Plates
- Painted End Plates
- Original Strut Bars
- Original Strut Bars (Detail)
- Sanded Strut Bars
- Completed Front and Rear Strut Tower Bars
- Completed Front Strut Tower Bars
- Completed Rear Strut Tower Bars
- Detail of Wrinkle Finish
In other news, the trayback went to pick up the car on Friday to bring back to the workshop only to final that Assure was closed (being between Australia Day and the weekend). So we should have it back early next week.
Cheers
Brendan
Monday, 23 January 2006 | | Categories: General
Well, the good news is my car is ready for pickup from the paint shop, the not so good news is there's no room in the C-Red workshop currently for the car to fit. Oh well, at least it's ready which a step in the right direction. Have also started prepping and painting my Cusco strut bars and will update on that soonish.
Cheers
Brendan
Wednesday, 11 January 2006 | | Categories: Interior
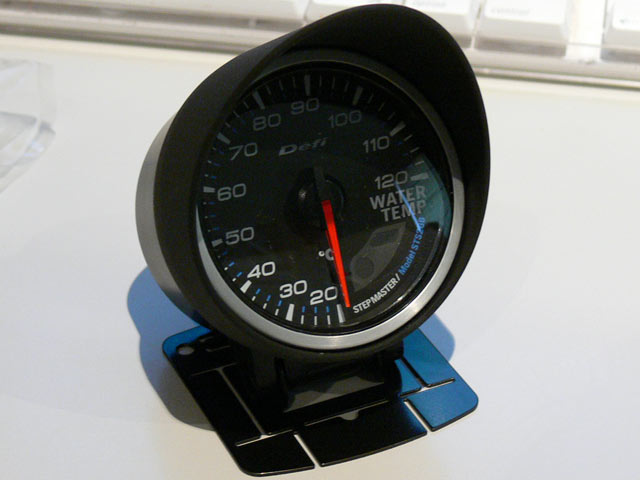
Sorry about the naff title, but I'm running out of ideas. Anyway, quick update here, this one on the Defi-Link Single Meter Visor (a.k.a. gauge hood). I've decided to mount my three centre gauges on the dash board and didn't want reflections on the windscreen while driving at night to thus the reason of the hoods. I have three of the hoods for the oil pressure, oil temperature and water temperature gauges. The boost gauge will sit in a single gauge pod on the A-pillar, hopefull nice and low and relatively out of harms way. Would like to thank the great service from Aston at J-Shop for getting these in for me.
Wow:
- Defi-Link Single Meter Visor from front
- Defi-Link Single Meter Visor side profile
- Defi-Link Single Meter Visor in box
At this point I still haven't heard anything on where the paint is at, but can only hope it comes back to the workshop by end of this week.
Cheers
Brendan
Wednesday, 28 December 2005 | | Categories: Exterior, Paint
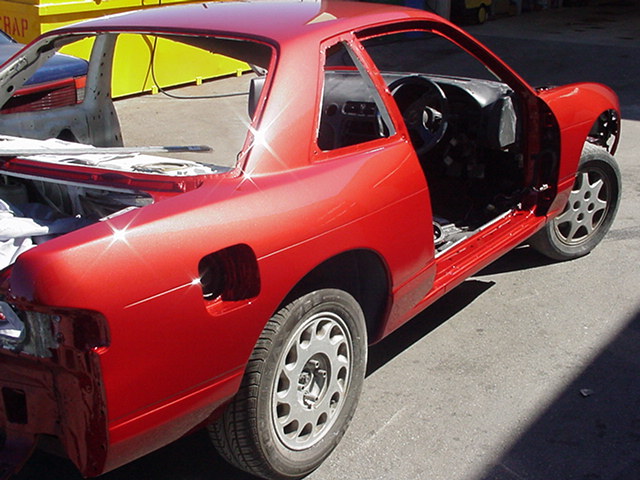
Well what can I say, it looks f%^∈ tops!!! This is straight off the gun so still some finishing touches to do but it looks real good. I'll shutup now so you can look at the pics.
Wow:
- Front view drivers side
- Front view drivers side 2
- Front view passenger side
- Front view passenger side 2
- Rear view/Side
- Rear view 2
- Roof Front
- Roof Rear
- Side'ish View
Cheers
Brendan
Tuesday, 27 December 2005 | | Categories: Exterior, Paint
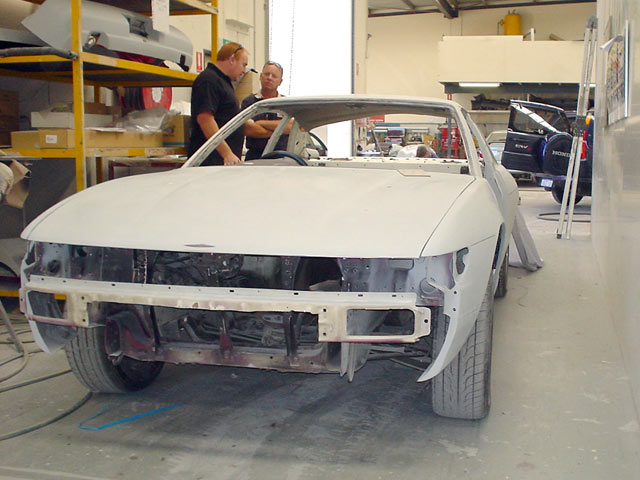
So by the time you read this, I'm hoping the car now has a coat of red on her. Last Wednesday I went out to Assure in Canningvale to look at the body. It was in primer, and after talking to one of the staff, was due to get paint the next day (Thursday). Not 100% sure when I'm likely to see the body again, but would assume it'll be within the next week or so. Now being all in a single colour, albeit a drab grey, the wide body isn't so noticable unless looking right down the side. The front guards almost look stock too, even though they're 30mm wide than stock.
Here's what she looked like:
- Front view drivers side
- Front view passengers side
- Rear view/Side
- Roof
Can't wait to see her now that I know she should be looking much closer to finished. Once back in the workshop, the glass will be replaced and then comes the long haul to put it all back together again..
Cheers
Brendan
Monday, 19 December 2005 | | Categories: Driveline, Paint
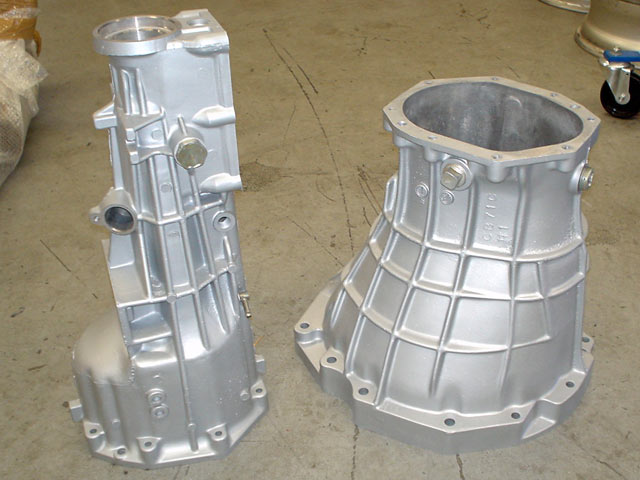
This post won't win the award for the most exciting, but it's progress nonetheless. A couple of weeks ago I decided to start prepping a gearbox ready to be bolted up to the engine. Not wanting to have an ugly oily mess I thought it best to clean one up and paint it. Josh from C-Red said the easiest way to sort it would be to clean up just the housings, then build up a gearbox (thereby also checking components for wear etc).
So I set up degreasing, then acid dipping. Unfortunately the acid dipping didn't quite have the affect I wanted (ie. cleaning up to new condition) as can be seen in the first photo below. The next best thing was to jump on the sandblasting box and give the housings a good once over. The results are clearly seen in the second photo below. Finally once both were pressure washed and air blown dry from sand etc, a couple of coats of VHT engine paint in aluminium colour was applied.
Here's the results of my efforts:
- Gearbox housings after acid wash
- Bell housing sandblasted
- Finally painted
I know you don't see the gearbox, but being the slightly anal bastard I am, I know it's there - so it best be clean and look like new. Dally would be proud.
Cheers
Brendan
Friday, 16 December 2005 | | Categories: Paint
Quick update, car is now in primer and will be painted next week (woohoo!). Will be in at C-Red next Wednesday so might pop into the panel shop while on errands to check out the progress and take some happy snaps.
Also done a quick update to the 'Plan' based on product changes etc.
Cheers
Brendan
Wednesday, 14 December 2005 | | Categories: Suspension, Wheels/Tyres
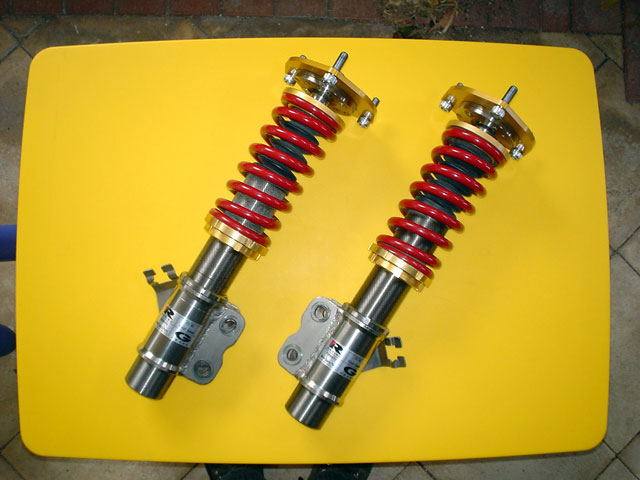
I've been chasing these coilovers ever since they were sold from C-Red's Pig v2.0 about 12mths ago. Due some very unfortunate circumstances that occurred with the owner of them, they came up for sale and I handed over the cash for them - thanks to kev_s13 on SilviaWA forums for holding them for me while I got the cash together.
The coilovers in question are Racing Gear's (RG) top of the line street/circuit damper commonly known as the RG JTC'N1 Damper V-Stage (quite mouthful, but impressive name nonetheless). With C-Red being the Australian distributor for RG, it was only appropriate that I go with a set, plus visually they will match the rest of the car - something the green Teins or purple HKS wouldn't. Here's a quick product blurb:
Racing Gear's ultimate Road/Race/Drift suspension system, the JTC'N1 V-Stage coilover allows a 5-step damping adjustment to go from the street to the circuit.
The adjustments can be set of steps 1 through to 3 for the majority of driving (ie. street), switching to steps 4 and 5 for circuit/drift work. Setting of the dampers is simple with use of a special tool to that comes with the system. For a solid street ride dial in 3, and for the full circuit ride - paired with R-Comp tyres, crank it up to 5. Coupled with the adjustable camber tops, and adjustment of dampers front and rear - the V-Stage is a must for those wanting to do everything.
These should suit well the combination street and grip driving I'll be doing in the car and look forward to driving a car that has had the chassis tuned with such equipment on board.
When I picked them up from Kev, they had the usual road grime and unfortunately a little overspray on them (I think from when the Pig was being built). With a fair bit of cleaning using some prepsol, they've come up a treat (but not quite out-of-the-box).
Some pics of these beautiful coilovers:
- RG JTC'N1 Damper V-Stage Front Coilovers
- RG JTC'N1 Damper V-Stage Front Camber Tops
- RG JTC'N1 Damper V-Stage Front Label
- RG JTC'N1 Damper V-Stage Rear Coilovers
- RG JTC'N1 Damper V-Stage Rear Tops
- RG JTC'N1 Damper V-Stage Rear Label
Car has been at the paint shop for a couple of weeks now so will be back before Xmas...I hope. Other things happening at the moment are a change of plans in boost control duties. The plan was to use the new Turbosmart eBoost 2 unit, but I've decided to trial the soon to be released Boost Control function in the new BikiROM (which is the ECU I'll be using too), this means keeping the Defi Boost gauge I had for sale. Have also had the gearbox housings and rocker cover acid dipped to clean and ready for paint. The gearbox will get a coat of VHT Aluminium paint finshed with a coat of VHT clear. This will help in keep it clean. The rocker cover will probably get a coating that Competition Coatings have - heading down to see Lyndon at Competition Coatings in Wandi next week to see what colours are available. This is to reduce the possibility of chipping as the coating is super strong (I'm assuming a ceramic coating of sorts).
Another thread of discussion/work/decisions has revolved around rims. Originally thinking that 19's would be a good idea, after some discussion with others, the reality is that although looking great, 18's are a better choice for cost on rubber and competition use. So the specifications that are currently in play are:
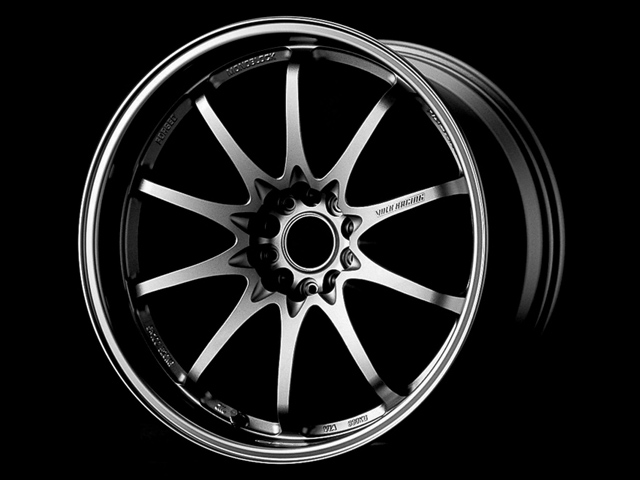
Volk Racing CE28N
Front: 18x9.5+15
Rear: 18x10.5+18
In Titanium Silver
Tyres
Front: 245/35R18
Rear: 265/35R18
I'd really like a different colour, but its not released in a dark silver as per the mockup below:
To give you an idea of what a similar darker silver would look like, I came across these pics of a Yahoo Auction. These are 19x9+24 and 19x10+24 on a 350Z:
- Closeup
- CE28N on 350Z Front
- CE28N on 350Z Rear
The brakes do look tiny under these, and I'll be using similar sized Brembos (front and rear). But with 18's, they won't look so small (even though the fronts will use the 330mm rotors. I had thoughts of going a larger rotor, but I still want the option of being able to fit a set of R33 GT-R rims (with spacers) for track work.
Cheers
Brendan
Wednesday, 30 November 2005 | | Categories: Exterior, Paint
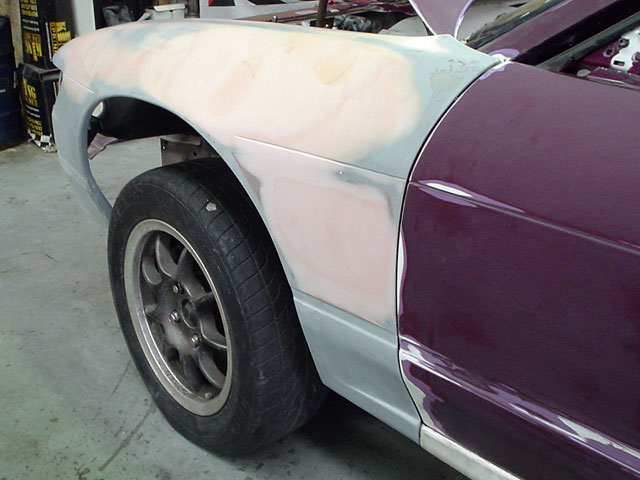
A few posts back I mentioned the problem with fitting the Zenith Guard bracing with the vented Wide Body guards from M Sports. Basically they wouldn't fit due to the diagonal support fouling on the vent. So thanks to Tom, I've now had the vents removed and I reckon this is going to look more and more stock than ever - just really freakin' wide! Also had Tom cut the front bar around the intercooler and as you can see from the shots, he's done a really really good job.
And some news I've been waiting for for a long time, the car has been shipped off to get paint, and I'm hoping it'll be back before Xmas so I can do some work on it over the Xmas break.
Some pics of the modified guards:
- M Sports Front Guard sans vent (Left)
- M Sports Front Guard sans vent (Left)
- M Sports Front Guard sans vent (Right)
- S13 Front Intrusion Bar cut for FMIC (Front-mount Intercooler) fitment
- S13 Nissan Aero Bar cut for FMIC
Should be a few more updates soon as I start to get things like coilovers etc sorted.
Cheers
Brendan
![]()
