Category: Wheels/Tyres
Sunday, 4 May 2014 | | Categories: Micra, Wheels/Tyres
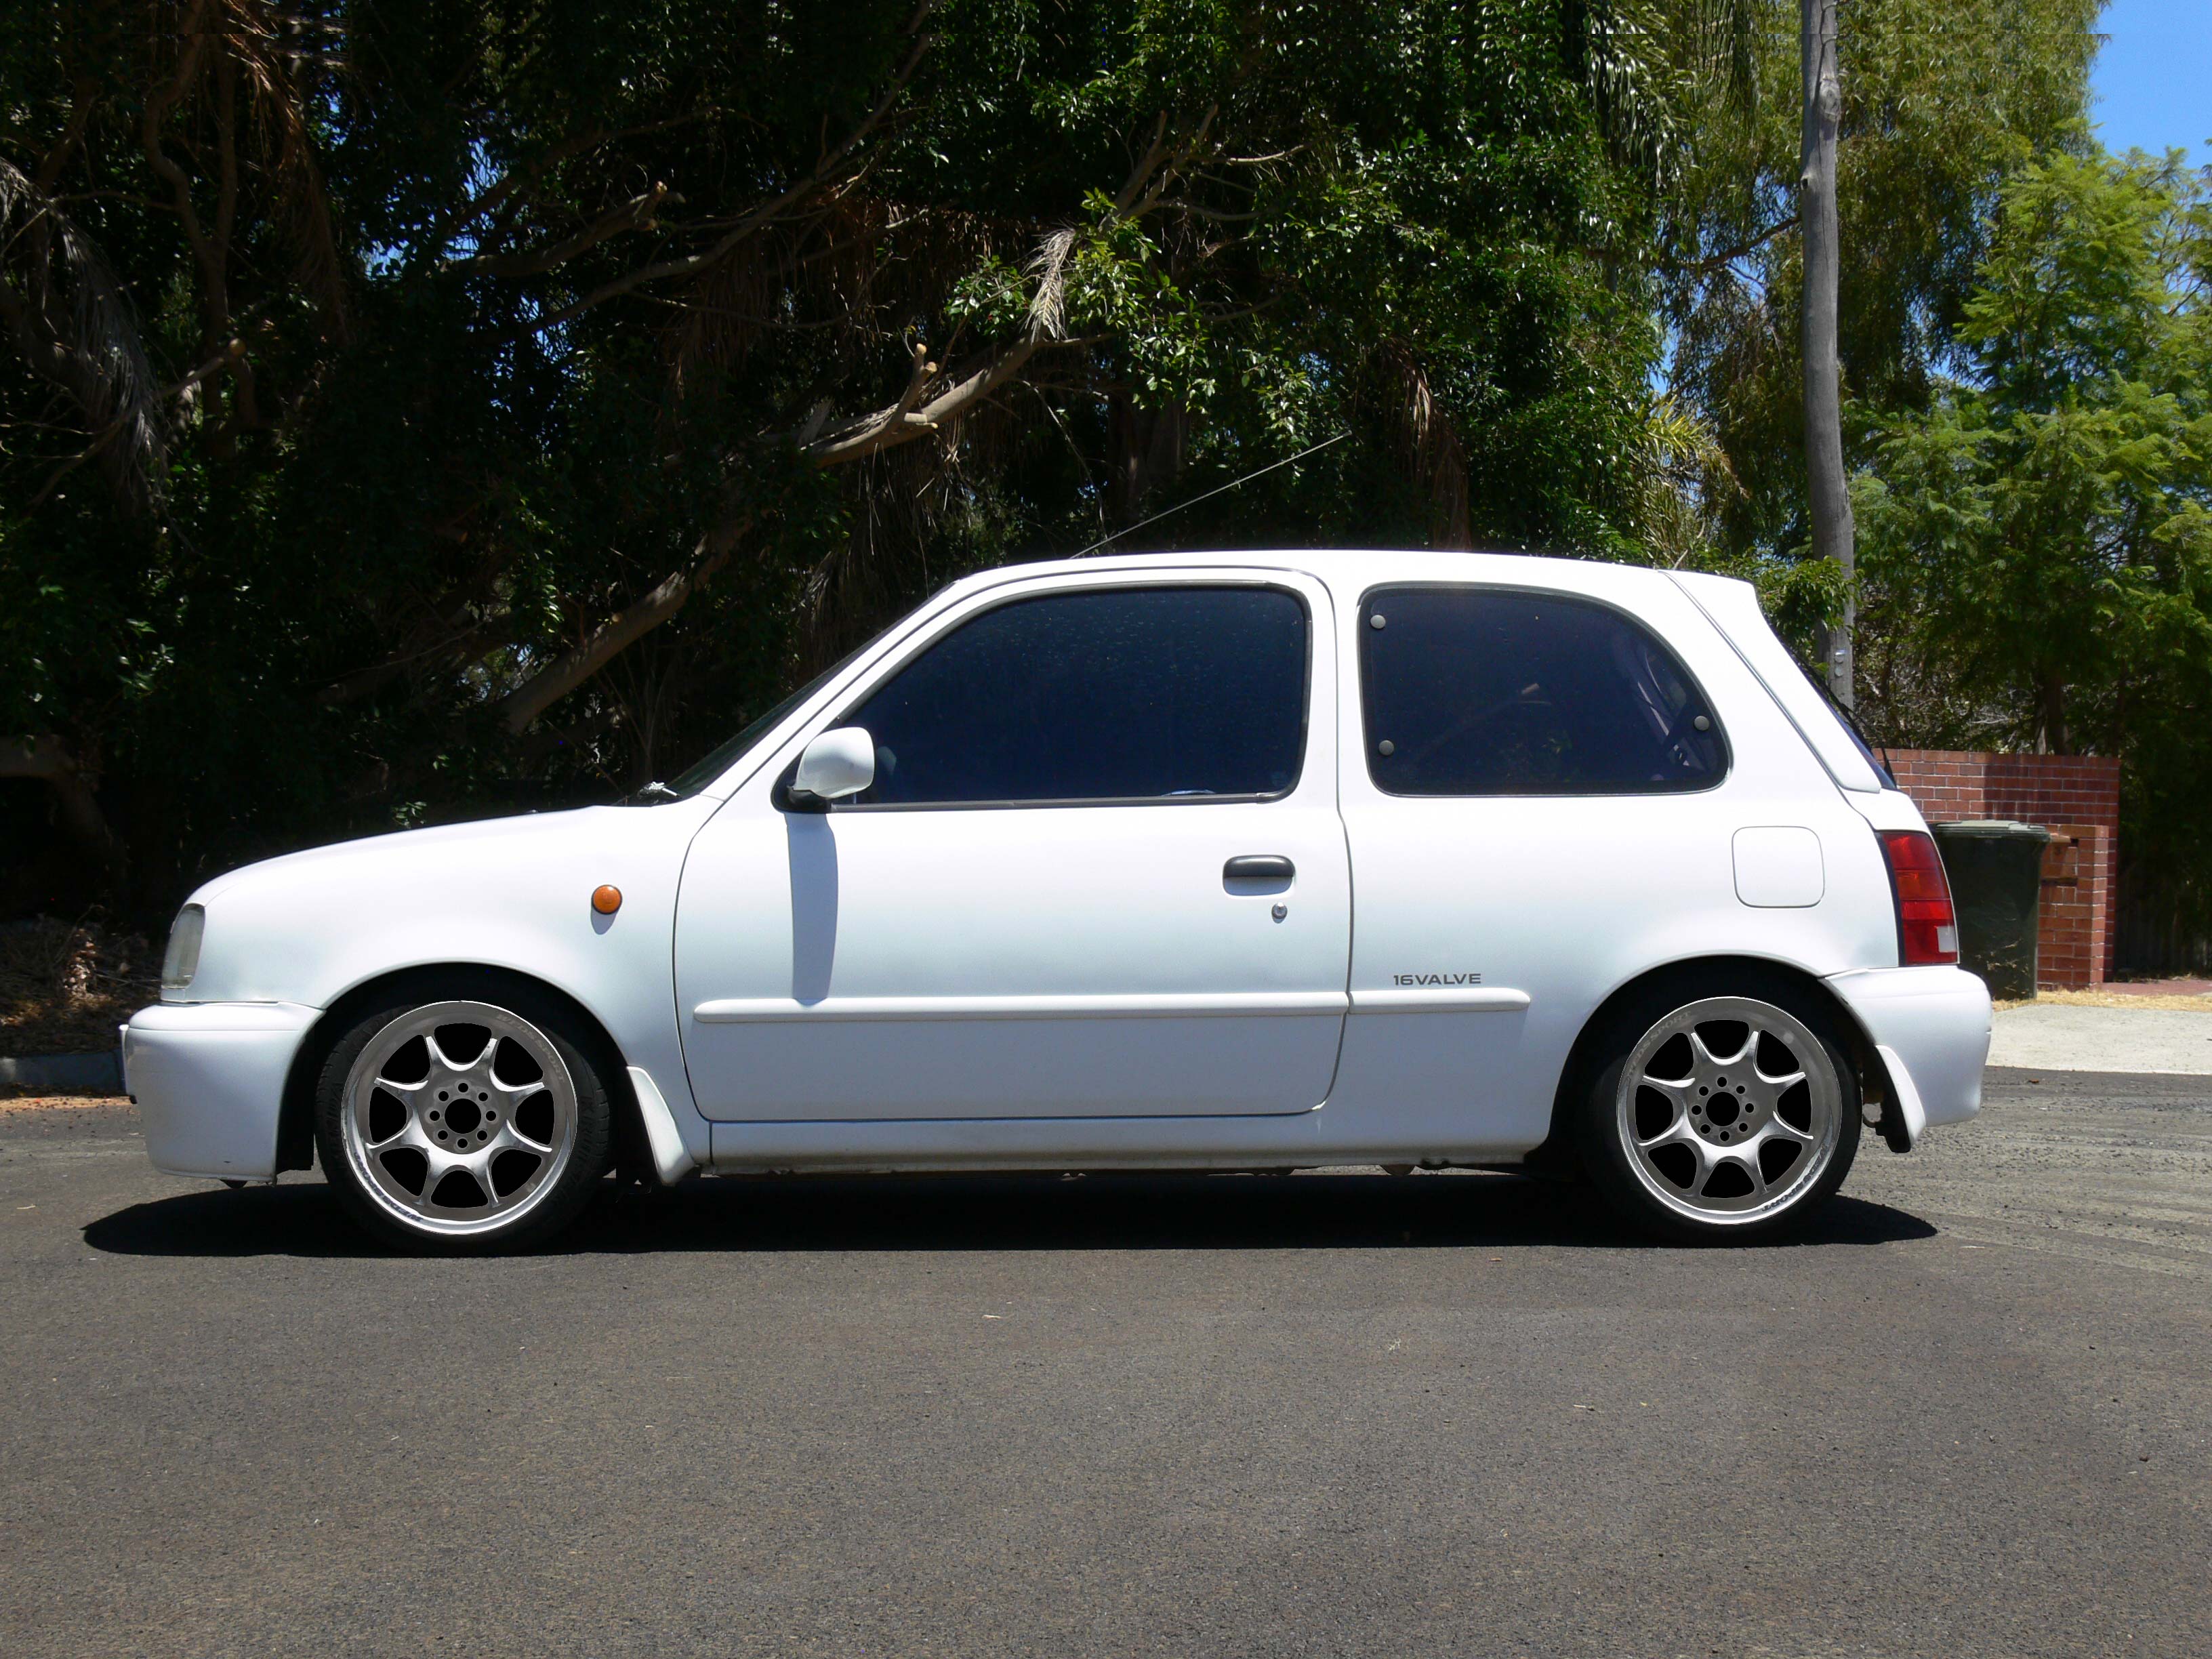
So I recently picked up some rims from Japan (via Import Monster) for our family 1995 Nissan K11 Micra. They're classic lightweight Weds Sports TC-05 in 15x6+30, they should fit very nicely under the guards of the Micra, once they've been wrapped in some Nankang NS-II tyres in 185/45R15. The condition of them isn't too good, so I'll be getting them blasted and powder coated. Of course choosing the right colour is always a hard task, so I photoshopped up a set of different colours for my wife to look over as she is the primary driver of it. She's chosen to go with either a Dark Silver/Gun Metal Grey, followed by Silver. My son and I think the gold and red looks pretty good, but he will need to wait until he takes ownership before he changes th he colour - and then he can probably just do a Plasti-dip change.
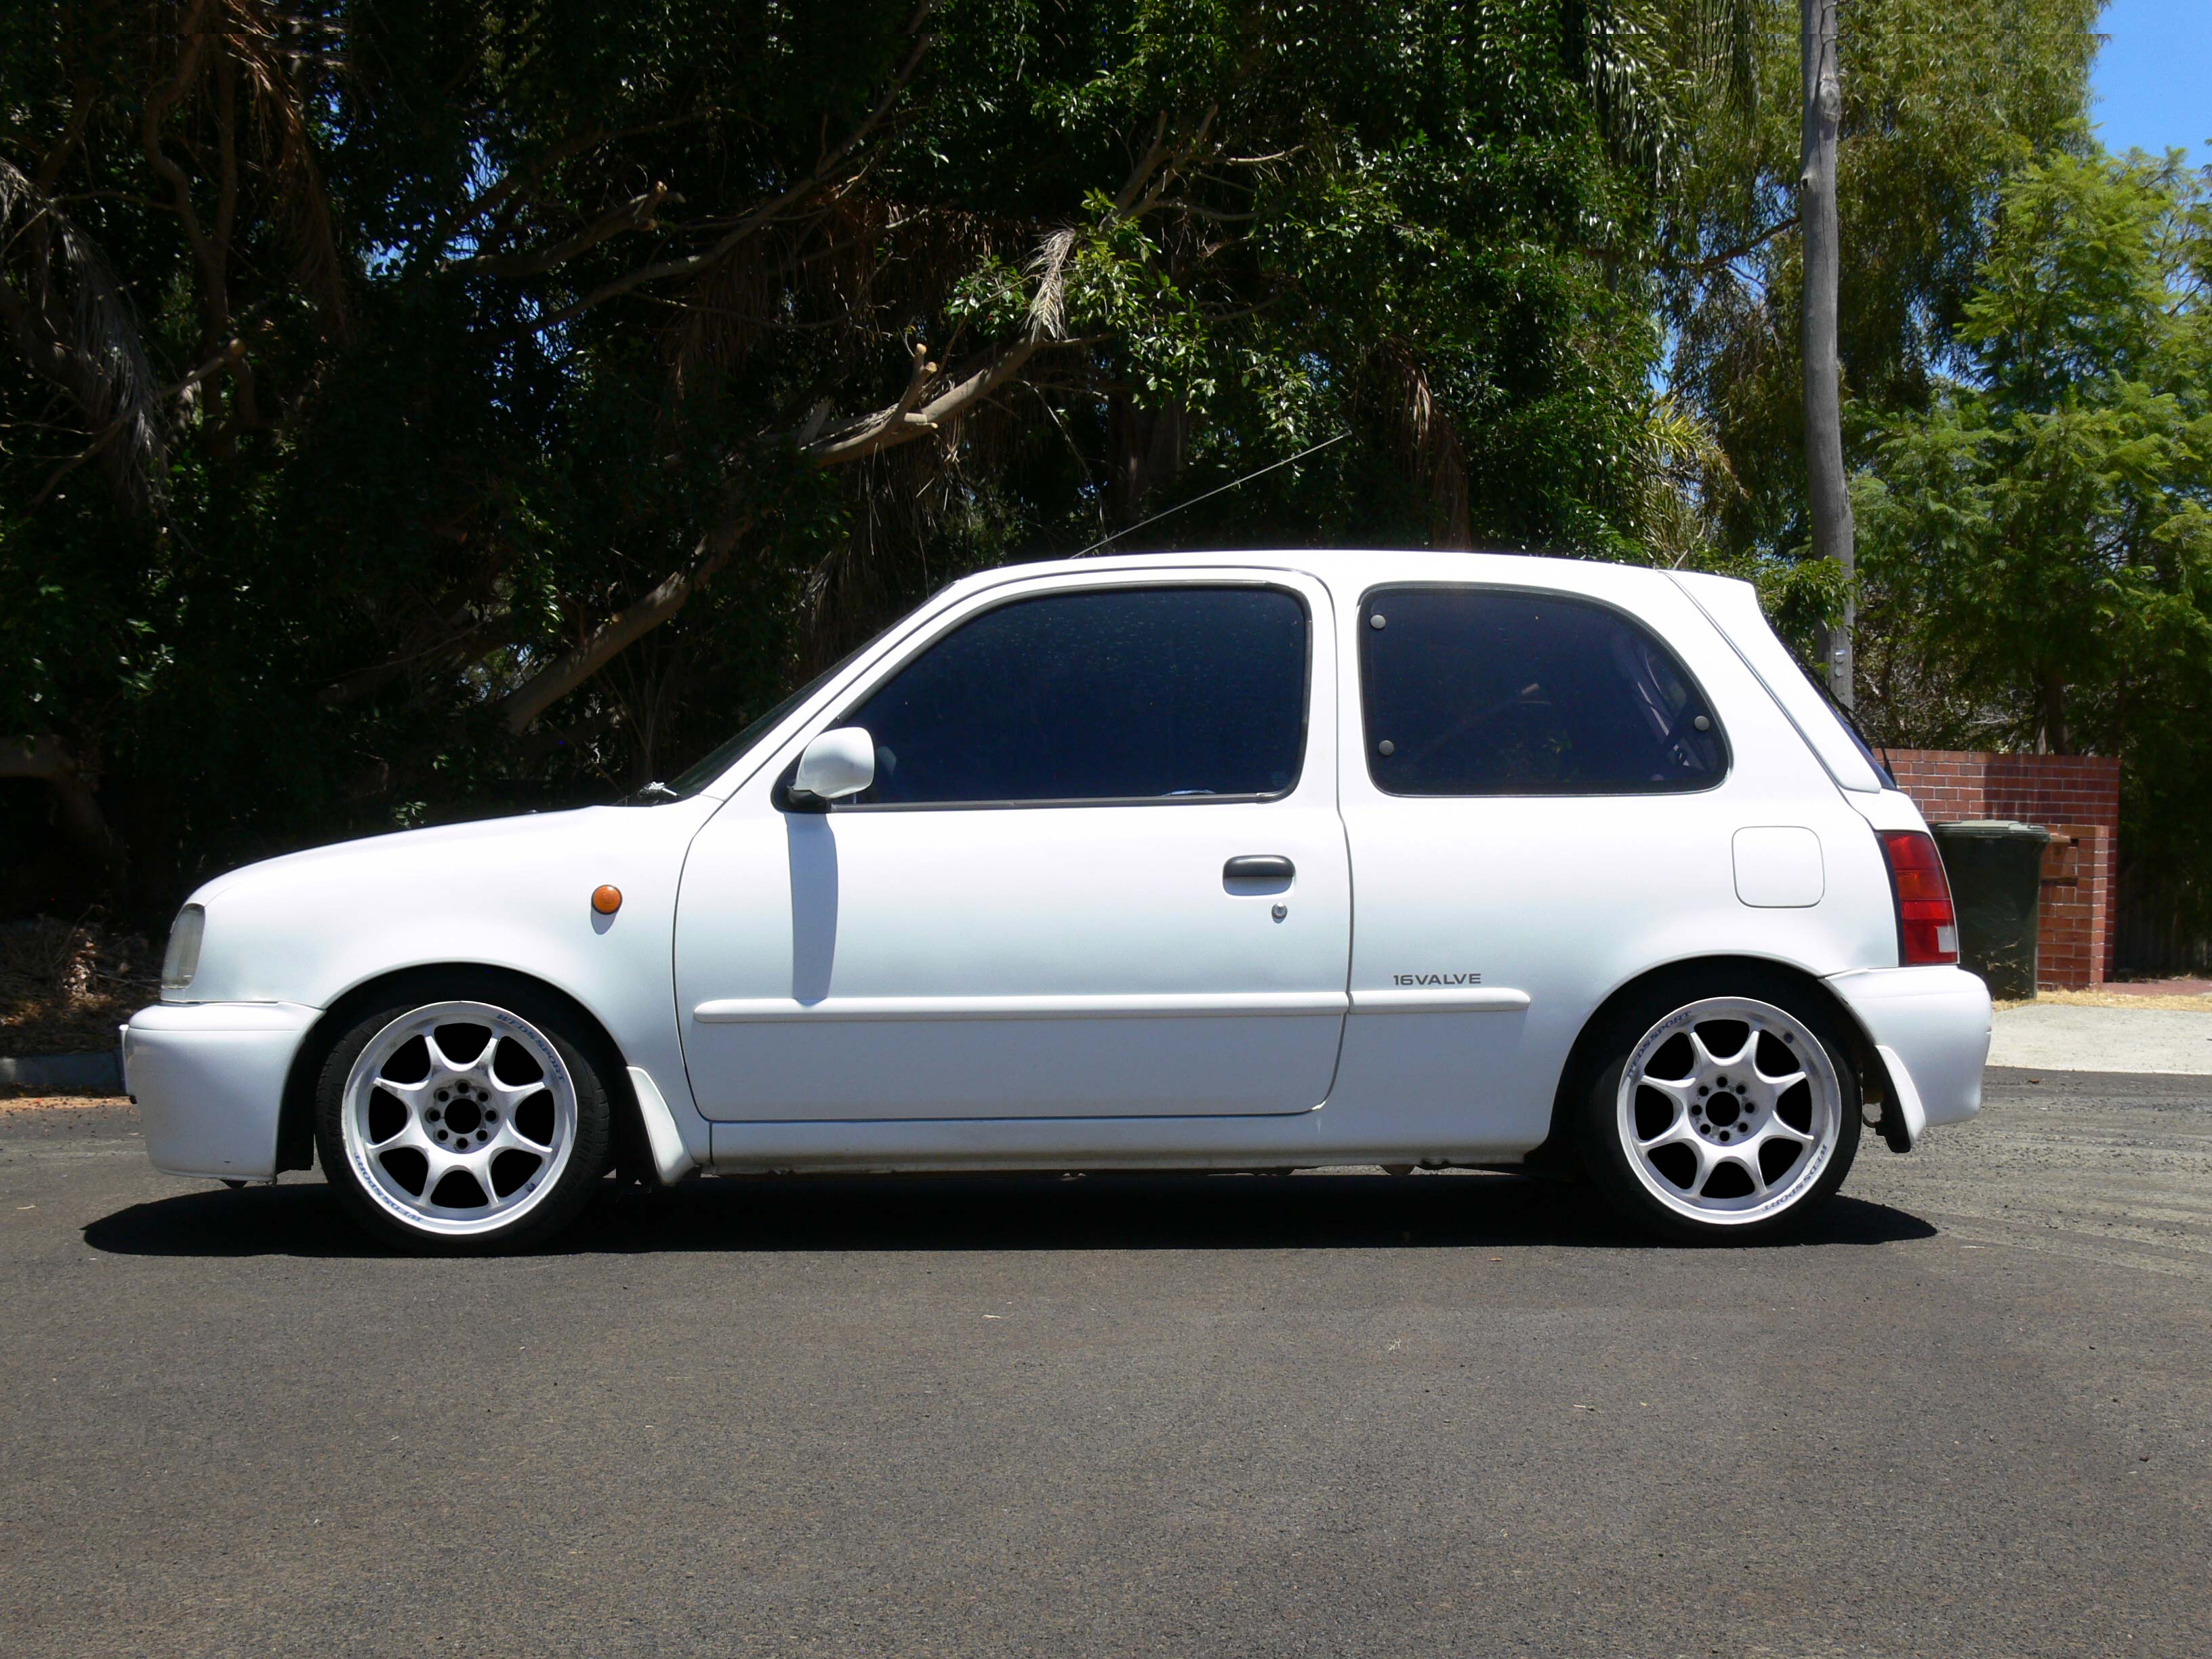
Above: K11 Micra with White (original colour) 15x6+30 Weds Sport TC-05 (Photoshopped)
Above: K11 Micra with Silverish (photoshop trial colour) 15x6+30 Weds Sport TC-05 (Photoshopped)

Above: K11 Micra with Gun Metal Grey (photoshop trial colour) 15x6+30 Weds Sport TC-05 (Photoshopped)
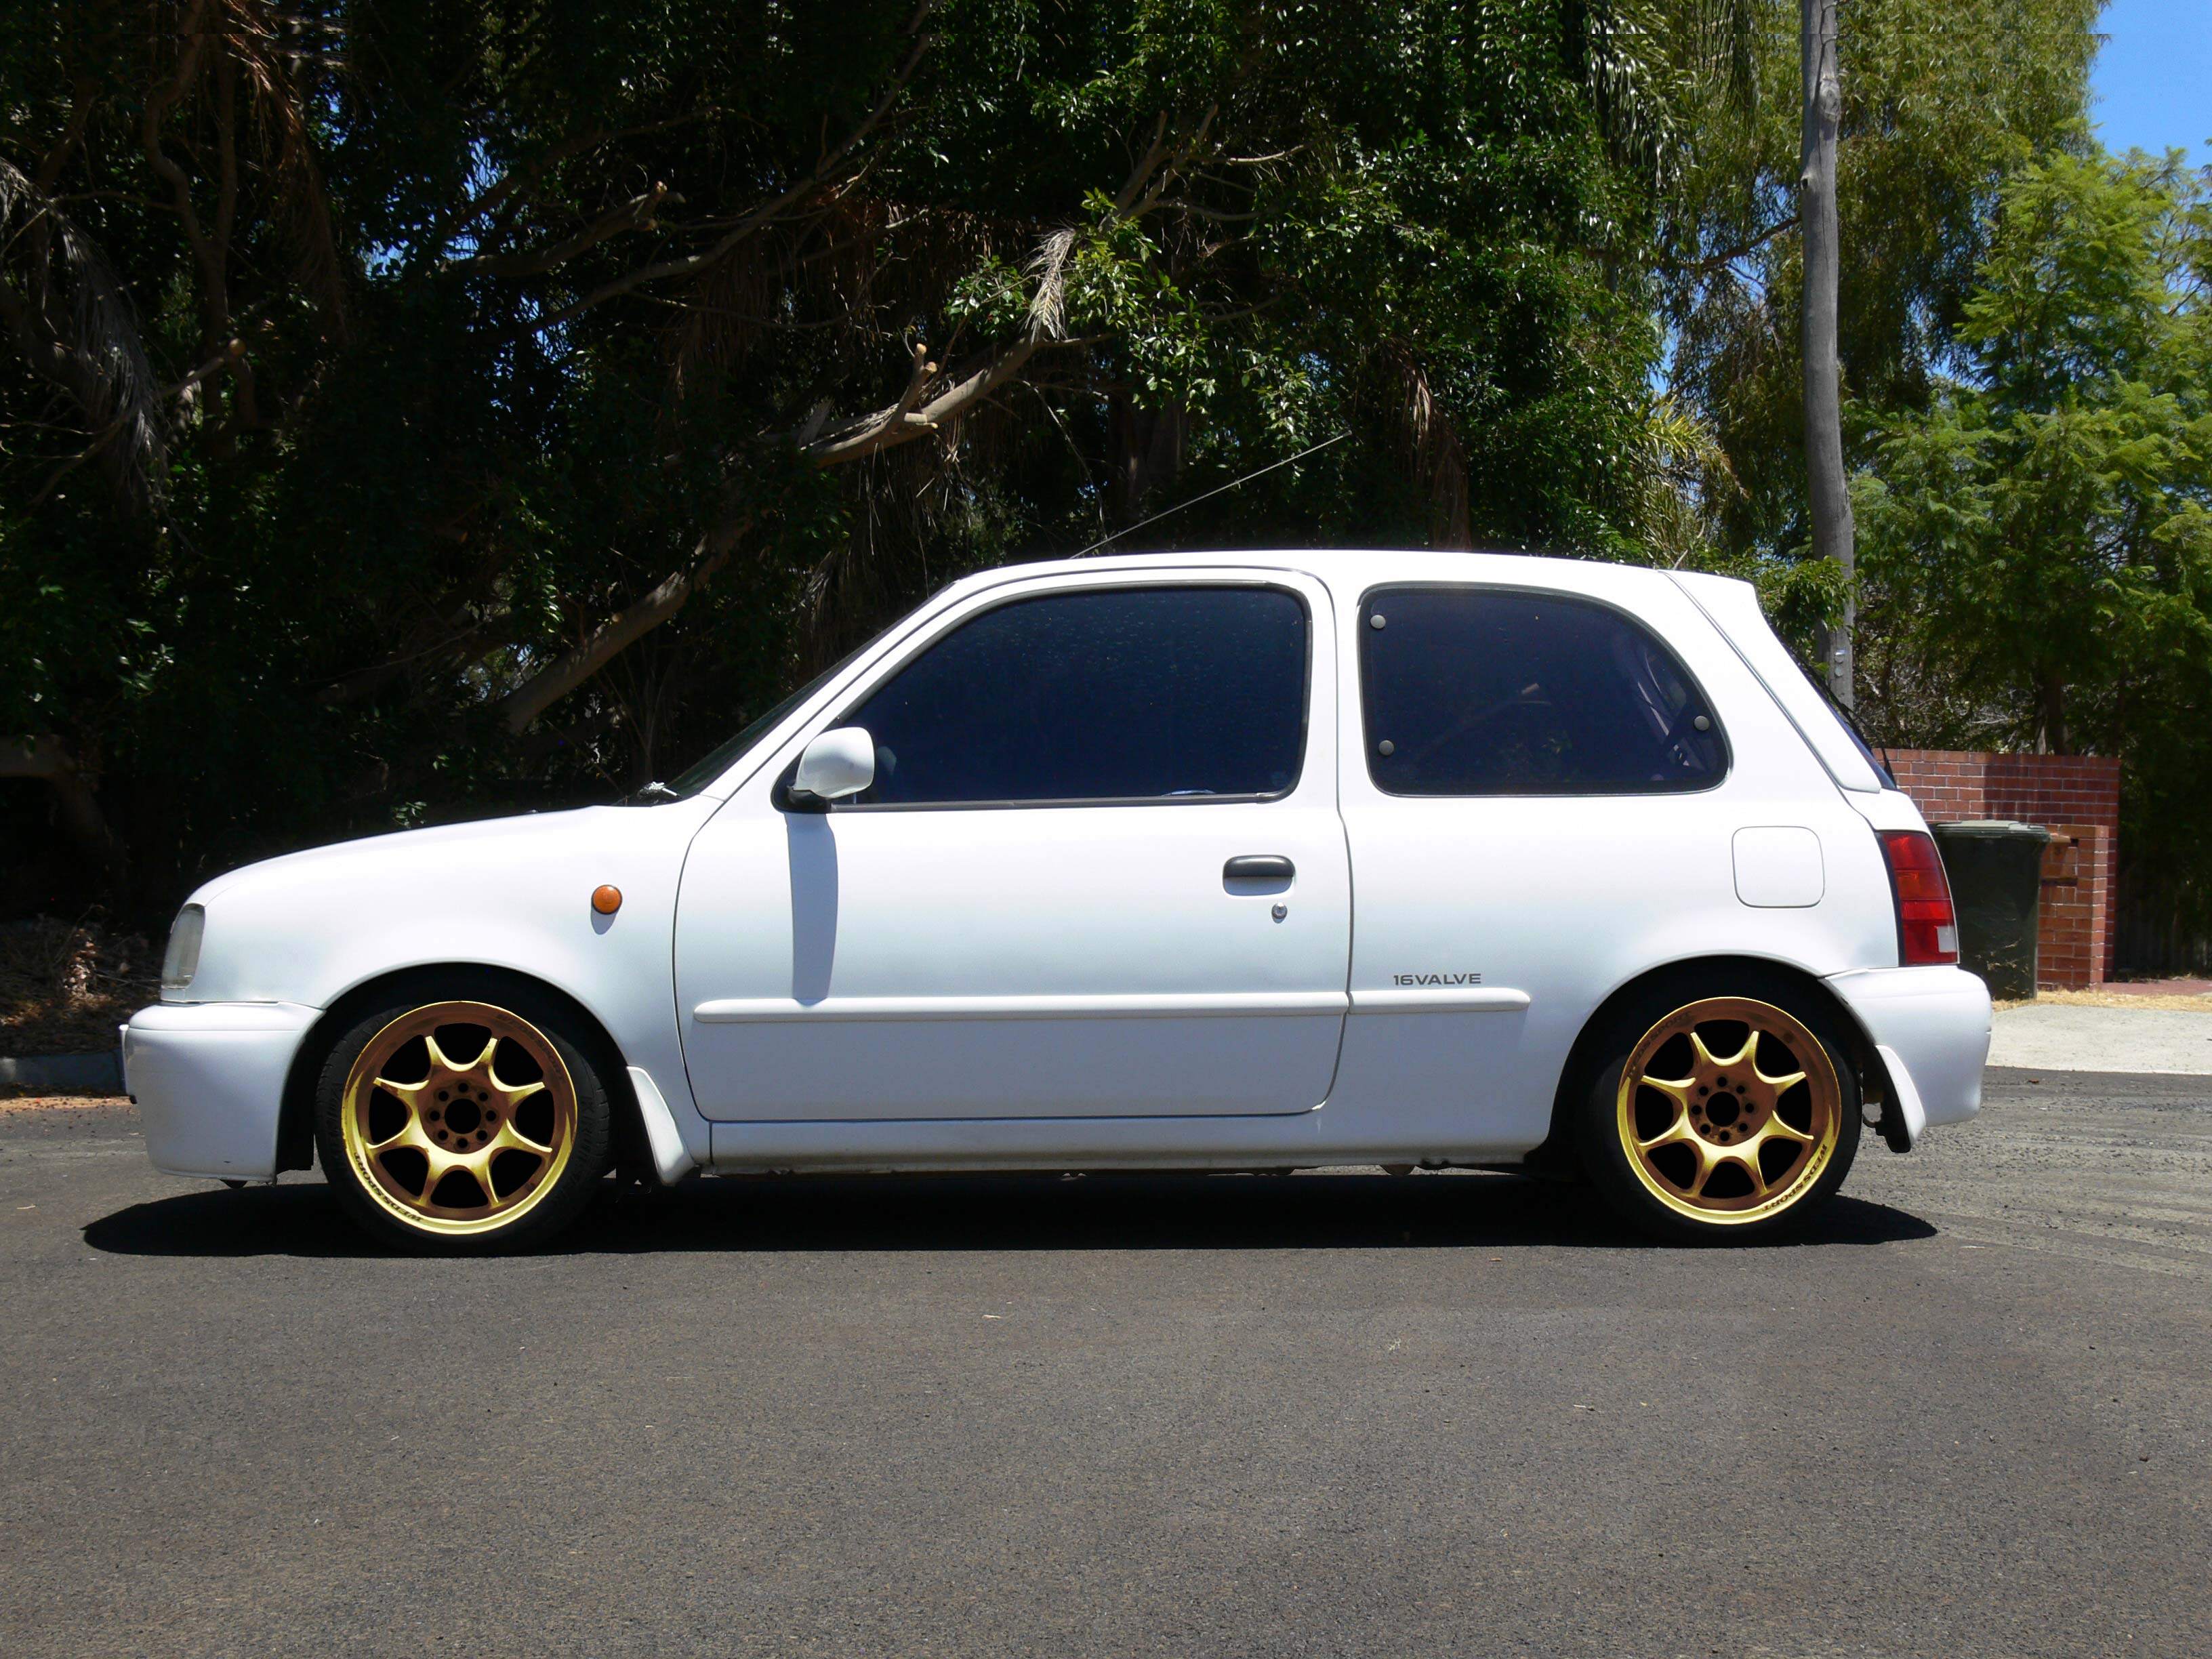
Above: K11 Micra with Gold (photoshop trial colour) 15x6+30 Weds Sport TC-05 (Photoshopped)

Above: K11 Micra with Red (photoshop trial colour) 15x6+30 Weds Sport TC-05 (Photoshopped)

Above: K11 Micra with Black (photoshop trial colour) 15x6+30 Weds Sport TC-05 (Photoshopped)
Still need to work on getting the original Weds Sport decal artwork drawn up so I can replace them once the wheels have been powdercoated.
Tuesday, 23 November 2010 | | Categories: Wheels/Tyres

Driving back home on the Freeway after a day at the Great Escape in Hilarys (think water slides and rides etc), I hit something hard and heavy about the size of a small novel. I just didn't have time to miss it and my front left tyre collected it on the inside, followed by a heck of a thump on the underside of the car. I thought to myself that can't be good, and low and behold a few 100 metres up the freeway the steering started to get heavy on the inside. CRAP! So I limped off the freeway and onto a side street. The tyre was going flat fast. I managed to limp it to a garage where I got about 10psi into it and limped it the further 2kms back home. The above shot is the after math.
I got under there and found that the block of whatever debris it was had hit right on the inside edge of the tyre and split the sidewall, which is understandable given the size of whatever it was and travelling at 100kph at the time. This was a pain as the tyres still had a good 30-40% tread left and I knew finding someone with a used one of the same size was going to be difficult. Buying a single new one was out of the question too as it would really upset the handling as the tyre had been upgraded to a new model since I first got them not to mention having tread differences. So I bit the bullet and bought two new tyres in the same size. The originals were Federal 595RS, the new ones are Federal 595RS-R, which is basically the semi-street/circuit tyre and a good tyre given the cost and flexibility of use. Sizing was the same at 235/40R18 and Shane at Bridgestone Tyre Centre in Bentley had them fitted onto the rims the same day I dropped them off.
Now that they're on, they feel much smoother and quieter than the originals, whether this is due to being new and a different compound, or because they don't have a few small flat spots on them I don't know. Either way I happy to have some new rubber up front with an impending session on the skid pan running motorkhana early in December. I now have 1 spare front tyre which I will keep just in case.
Cheers
Brendan
Friday, 27 February 2009 | | Categories: Old School, Wheels/Tyres
 SSS with XXR/Sportmax 513 15x8+0 wheels")
It was about the middle of last year that I mentioned to Dad about the possibility of putting some new wheels on his classic 1974 Datsun 180B (610) SSS 2-door coupe. Dad's owned this car for many years and has slowly got the body work into the shape you see it here. But I always thought the rims didn't quite stack up to the quality of the body, so after some 'chops were done showing what a set of Konig Rewinds looked like it was a goer.
 SSS with XXR/Sportmax 513 15x8+0 wheels")
Now about 6mths later, I was surfing the OzDat forums and found another 180B 4-door that had a set of Sportmax 002 in the same sizing and thought that's what Dad should get. A little risky considering his age, but he was willing to trust my judgement and we made the purchase through Zi at JDMyard. Opting instead for the XXR/Sportmax 513 model in 15x8+0 offset (see previous blog post for details shots of the wheels) for that more traditional Watanabe/Panasport style. Now Dad likes a little bling (see the rocker cover in the engine bay), so it was decided to go with the Silver/Polished lip combo. Now don't they look the ducks nuts!
 SSS with XXR/Sportmax 513 15x8+0 wheels")
Fitted with Kuhmo Ecsta KU31's in 195/50R15 for that perfect amount of stretch, the car is really starting to get that nostalgic JDM look. Now while I was taking some pics, I snapped some of the engine bay and interior - the condition is great considering Dad still uses it for his daily communiting.
- Side profile - very very nice
- Down low at 3/4 front
- Head on to see offset (needs more camber)
- Close up on front wheel
- Down low at 3/4 rear
- Profile from rear
- Interior
- Engine Bay 1
- Engine Bay 2
- Engine Bay 3
- Engine Bay 4
- Engine Bay 5
Next up we'll be taking her to see a suspension specialist to see what we can do about the handling. It's been 7-8 years since it was last looked at and she's a little 'boaty' at the moment. Plans will be to have it lowered more at the front, and a little at the rear (even things up), and fit some new bushes and adjustable parts to get it all tied away nicely.
Thanks Dad for giving me the trust with your baby.
Cheers
Brendan
Friday, 27 February 2009 | | Categories: Old School, Wheels/Tyres
")
Alright, check out these beautiful rims above. They're going to be fitted to my Dad's classic 1974 Datsun 180B (610) SSS 2-door coupe. The rims are XXR/Sportmax 513's in 15x8 +0 offset finished in Silver with the polished lip. They're based on a mix of the Watanabe RS-8 and Panasport Formula One designs, and this particular spec has 3.5 inches (89mm) of polished dishy goodness! They also feature both 4/114.3 and 4/100 PCDs so they'd fit on some of the Mazda/Toyota/Honda vehicles too.
Some detail photos:
- Front of rim
- Dish Profile
- Dish Profile
- Hub Detail
- Wheel cross section
- Back of wheel
- Model/Offset detail
These were purchased from Zi at JDMyard (http://www.jdmyard.com/) and were delivered promptly. Thanks for the great service Zi. He still has a few of these and other models left in stock, so if you're in Australia and wanted to push the limits and go hella flush, then check out their website or head over to their eBay Shop.
Fitting onto these rims, we've gone for some Kuhmo Ecsta KU31's in 195/50R15 for that small amount of stretch. See next post of these beauties fitted up to Dad's car.
Cheers
Brendan
Thursday, 25 October 2007 | | Categories: Suspension, Wheels/Tyres

Good news first up. After some troubleshooting with the engine, the blokes at C-Red found the problem with the engine. It was found that with the standard shims in place, valves were not able to close completely as the head had basically been over serviced. After ordering a set of undersized test shims in from Precision Shims Australia, the valves were all reshimmed and all is working again. A big thanks goes to Precision Shims Australia...I sent them an email from the workshop on a Saturday morning, I got a call back in 15 minutes from Chris who advised that they were available and could be sent Monday, for delivery by Tuesday. I paid and all said and done...top human.
- Precision Shims storage box
- Shims - from 2.00mm to 3.00mm in 0.05mm increments
In the meantime, as can be seen by the top photo, I have been busy in preparation for compliancing. To ease that process all the adjustable arms have been removed, and a stock set re-fitted. I had this set already cleaned and painted, so it all looks new. Here's the photos of all the adjustable arms laid out on the floor:
- Front adjustable Kazama and Ikeya arms
- Rear adjustable Kazama and Ikeya arms
And here's a couple of pics of the front setup as it is now with the stock arms fitted:
- Front stock arms (from rear)
- Front stock arms (from front)
You can see a small Nismo logo on the front lower control arms, there are original Nismo LCA's, but I've repainted black and applied the logo myself. Also in view is the end of the Whiteline front sway bar.
An interesting result of putting the stock arms back on is the way the rear wheels now fit in the guards. With the Ikeya Formula arms, I couldn't get a good compromise to good fitment, and before the changeover, I had a set of 20mm spacers fitted. Below are a couple of photos with all the stock arms in place (but still lowered on coilovers), and although there's still to have an alignment done, they're sitting pretty.


At this stage, I'm seriously thinking of leaving the stock lower control arms on and not refitting the Ikeya Formula front and rear lower control arms. I think if it was a full race car, that was super super low and full total control over alignment was required, they would be great...but for my purposes, I think they could be overkill. Decision yet to be made. I will however be using all the other Kazama arms including upper camber arms, tension rods and toe rods on the rear, castor arms and tie rod ends on the front.
Now all this time I've been driving the trusty (and rusty) Mitsubishi Sigma (Galant) Turbo around as my daily driver. It's actually a Japanese import, now an Aussie delivered car, and is basically a Starion four door complete with four-wheel vented disc brakes, rear independent suspension and 4G63B engine (Sirius). It's done over 315,000kms and is showing it. The latest item being the driveshaft - with the front universal joint being completely shagged and causing one hell of a vibration. So we had the driveshaft sent off for reconditioning. So what did I drive in the meantime:

I was fortunate enough to borrow Jeff Ash's from C-Red's little Nissan Micra Super S. This little thing although not powerful, was very zippy. Jeff's in his usual mode has changed a few items though, including new front and rear lights, Lenso rims and Tanabe coilovers. This thing, although a little rough, was a great segway from the usual Sigma drive. Think go cart and you're not far off, although I think the beautiful Personal steering wheel and 8-ball gear stick knob had a good deal to do with the driving experience. I also created a little logo based on the March Cup branding use for the K12 March one-make racing series in Japan, and a little Porsche Carrera RS treatment. Some stripes down the lower side including logo may go on in the future.
- Micra from the rear
- Micra from the side
- March Cup logo
Anyway, we're racing to get the car on the road for the next SilviaWA club meet on 7 November. I can't guarantee it, but we're giving it a good go. Because it's a little odd for the club president to be driving around in a Sigma!
Cheers
Brendan
PS> Shameless plug for Woody who's selling Angry13, one of the nicest Nissan S13 Silvia's in Australia.
Tuesday, 2 October 2007 | | Categories: Engine, Interior, Suspension, Wheels/Tyres

Wow, time flies...full stop. But yes, I have still been working on the car. We're currently going through some changes under the bonnet that are taking longer than expected which is causing a knock-on affect in having the car on the road. While this has been happening though, I have been continuing to do things on the car in preparation for its eventual trip over the pits. But first up, I never took photos of the engine bay while at the show which was a complete oversight on my part, so here are a few photos now:
- Engine Bay from front
- Engine Bay from driver's side
- Engine Bay from Passenger side
- Exhaust manifold detail
- GReddy Remote Oil Filter
- GReddy Oil Cooler
You may have noticed in those pics a nice shiny GReddy oil catch can (breather) sitting on the passenger side strut tower. Well this was fitted by me, using a custom mounting bracket and heat shielding that I fabricated (which I was very happy with). Final result looks reasonable clean.
- GReddy Oil Catch Can from front
- GReddy Oil Catch Can from rear

As part of the registration process, there are a number of items that needed to be addressed. The first is the rear high-mount brake light. Now I was originally going to get a Hella light from the local light store (Alanco), but remember that the S13 Silvia came out with one of the factory. As fate would have it, when I had a look on eBay, someone in the east was selling one...and after a frantic last 10sec bidding war, I came away the new owner of a genuine Nissan S13 Silvia High-mount Brake Light.
- S13 Silvia Brake Light (Front)
- S13 Silvia Brake Light (Back)
- S13 Silvia Brake Light (Side)
- S13 Silvia Brake Light (Bottom)
- S13 Silvia Brake Light (Lamp)
Now the sorta trick bit was figuring out how to mount the little bastard (note: it's not that little). After removing the rear parcel shelf (and the sub woofer), I found mounting holes on the metal shelf. Unfortunately the same couldn't be said for the wooden parcel shelf, which I went ahead and guestimated where the holes should be cut after doing a bit of measuring. Next up was figuring out how to get power to it, this is where I could kiss the Nissan engineers as they left the plug sitting on the loom that runs across the rear window. I cut the retaining tape and hey presto, all it plugged straight in. After bolting on the mounting bracket and a few backwards and forwards with the wooden parcel shelf, it was installed.
- S13 Silvia Brake Light Mounting Bracket
- S13 Silvia Brake Light Plug (Wire/Loom)
- S13 Silvia Brake Light Parcel shelf modifications
- S13 Silvia Brake Light Fitted (from inside)
- S13 Silvia Brake Light Working
While on the parcel shelf, I installed the child restraint belt brackets. Now I installed the bolt holes a few months ago, so this was a very simple job. Using the Klippan Child Restraints from Repco (I think), it was just a matter of removing the pre-cut piece in the wooden parcel shelf, a hole made in the material and bolt them in. All done in about 5 minutes, but crucial for registration and taking my 1yr boy for a spin.
- Klippan Child Restraint
- Child Restraint (fitted)
- Child Restraint (fitted)
As the car is getting registered, it will no doubt be subjected to their height test which usually equates to the car needing to be 100mm off the deck at any point under the car. After fitting up the exhaust a few weeks ago, a quick check under the car revealed it had a lot of height required to clear. At only 55mm off the deck, I needed at least another 55mm to get me in the safe zone. The procedure to do so was reasonably easy though with just a matter of taking off the bottom coilover mount and winding both sides out until it all cleared. This was done for the front too, but this consequently cancelled out some of the clearance done on the rear. I'm in two minds yet as to whether I will just put stock shocks/springs on to get the registration process over and done with. Here's a before and after shot anyway:
- Wheel height before
- Wheel height after
- Exhaust clearance after
Another reason for all these delay's is the fact that I'm also spending more time with the family, which means less time on the car...and without doubt, family comes first. I promise not to leave it so long next time (like you've never heard that before from a blogger).
Cheers
Brendan
Monday, 28 May 2007 | | Categories: Audio, Interior, Wheels/Tyres

Wow, two posts in less than a week...I'm trying to make amends. And so as part of the interior install, between doing the Dynamat and putting the carpets in, the wiring for the impending stereo needed to be installed. So last Friday was the day. First up I went for a quick a trip down to JB Hifi in Cannington to get myself some quality interconnects that run the signal from the deck through to the boot where the amplifiers will be installed. After doing a quick bit of research on what to use, it was down to Stinger and Aepro (?). As luck would have it, JB's had the Stinger Helix in stock...these being their higher end product, and in a nice red to boot. Therefore if they do get seen, at least they won't stand out like dog's bollocks. Back at the workshop the fun begins.
After a quick run down from Marc Palmer (all-round nice guy and electronics whizz, also C-Red Workshop Manager) on where I should be running the cables, I set to work running them out. First up were the Stinger interconnects (RCA's) which have been run down the passenger side of the tunnel, across the back of the rear footwell and up and over the wheel arch into the boot (basically following one of the stock wiring loom paths).
- Stinger interconnects along rear passenger footwell
- Stinger interconnects over wheel arch
Next was a 7-wire multi-core cable which we've run for future needs if they should arise. This was run along the same path as the stock loom on the drivers' side of the car, followed by the speaker cables which run down each side of the car and up and over the wheel arches.
- Speaker wiring in Passenger footwell
- Speaker wiring along Passenger sill
- Speaker wiring along Drivers' sill
- Speaker & multi-core wiring over drivers' rear wheel arch
Also on Friday I received my next box of Dynamat (3rd so far) and before leaving the post office, I had it weighed. It came in at a smidge of 10kg. Not bad really considering that could be the difference between my planned stereo setup, and one with twice as much weight. And of course the amount of deadening in the car really has made a huge difference already.
Saturday I managed to get the rear seat area and wheel arches covered so next up will be the boot. I reckon we're getting pretty close to getting the interior back it. So far I'm undecided on whether to get the rear seats and door trim panels retrimmed before Autosalon. The interior I picked up has the option CA-version velour material with a grey and slightly red stripe patten. It's nice, but the grey doesn't quite match the same grey as the GT-R seats, but I may forego that...but as mentioned, undecided.
For the stereo, I'm looking to go something fairly basic, but still punchy starting out with an Alpine SWX-1042D Type-X 10" Subwoofer. The front splits will be the Alpine DLC-177R DDLinear 6.5" Component 2-Way Speaker System (6.5" mid-bass and tweeter) as after listening to the Type-X splits, these has a more appropriate sound for my liking. The head unit will again be Alpine - and having just spied the new Alpine iDA-X001 Digital Media Receiver on their website, I think that's the winner (oh, it's basically an interface to an iPod and Tuner with no CD player...more info). Now rather than installing some huge amps which weight a lot, I thought I claw some weight savings back from the Dynamat by going for the diminutive Alpine PDX Digital Amplifiers. In this case I'll be going an Alpine PDX-1.1000 Mono Power Amp for the subwoofer and Alpine PDX-2.150 2/1 Channel Power Amp to run the splits. All-in-all a very nicely rounded system methinks. Now I just need to find a place that will give me a decent price for it all.
Oh, and something I didn't mention last week and that's about tyres. I originally had a set of Federal SS595 tyres installed on the rims, but with my plan to do a bit of track work, and the desire to have something that is both street and track pliable in a 50:50 split, I've just had some new tyres put on. These are again Federals, but not the SS595RS Ultra High Performance tyre - this should give me what I'm after. Oh, and an unashamed plug goes to Shane at Exley's Motorsports Tyres down in Willeton for supply and fitting these up.
Until the next episode.
Cheers
Brendan
Monday, 26 March 2007 | | Categories: Engine, Exterior, Wheels/Tyres

Progress is happening, but to coin the old phrase, the devil is in the detail is an understatement. And with two of the most anal people I know (Greg and I) working on the project, everything must be done to the best of our abilities (his are higher in this regard than mine). This last week or so has been spent getting the A/C condenser cleaned (and fins straightened), more rummaging through wrecks getting much needed pipe work and bits and pieces. The radiator, an S14 Racing Gear jobby (re-branded Koyo), is now in place along with the S14 shroud. There was a plan to fit up thermo fans, but we've changed tack now and gone back to the clutch fan and shroud. I went and got some foam and rubber stripping for Greg to use in the radiator mounting and the job is beautiful. You'll see the foam in and around all the gaps in the pics above and below.
- Air conditioning Condenser Installed
- Grex (Trust/GReddy) Oil Filter Sandwich plate for Oil Cooler and Remote Filter mount

On Saturday, I decided it was time for Sillbeer to get some Vitamin D, so with the help of Josh and Woody, we pushed it out into the sun and OMG...isn't it just jaw droppingly beautiful. It's the first time I've seen it from the rear as it's usually parked up in front of a wall. You really see how wide those guards are and the width of the tyres isn't really as big as first thought. Our current thinking is that some spacers will be required to get the rims out to the lip, but that will come after she's up and running. The view from the front is just awesome, looking more like it's about to pounce with those massive guards looking more like a danish strong man's shoulders...grrrrr (sorry lame). The colour really is shown a lot better in the sun, with a slight orange shown in the highlights that compliment the wheels. And speaking of wheels, they just shine. So enough of my rabbling, enjoy the pics:
Sillbeer in the Sun:
- Front View 1
- Front View 2
- Front View 3
- Rear View 1
- Rear View 2
- Rear View 3
- Side View 1
- Side View 2
- Front Wheel
- Rear Wheel 1
- Rear Wheel 2
- Engine Bay
- Colour close up
Breathtaking hey?
Anyway, this week it's onto fitting up the Hybrid Intercooler and GReddy Type-R BOV. Because of the size of the BOV, this is where our main problems will lie. It will be plumbed back, as I don't really want huge noise, it will be loud enough just coming back through the air filter. The intercooler couplings etc have now all be replaced from the standard blue silicon to some Samco Black silicon pieces. A big thanks goes to Steve at Hyperflow (the Australia distributors for Samco hoses) in Sydney for sending these over so quickly. Much appreciated.
Speak to you all later.
Brendan
Tuesday, 23 January 2007 | | Categories: Brakes, Exterior, Wheels/Tyres

So Saturday morning I was very excited know that today was the day I'd get to see my car finally with some proper shoes on. Firstly though, I made a quick dash down to Jap Parts Plus to pick up a drivers side window glass, regulator and motor as my door was just empty (thanks to Raj at JPP). Then swung back through to Exley's Tyre Service in High Road, Willeton to grab the wheels which had been fitted with the tyres (thanks Shane). Quite a few people commented on how fine they look while I was there...and after squeezing them into the Sigma, it was off to the workshop for some rubber love.

Before I could fit up the wheels though, I needed to complete the fitting of the calipers. One was already assembled, so after pushing the pads out a bit to clear the the massive DBA rotors, the front 4-spot Brembo calipers were bolted on. They look bloody fantastic.

So with a quick adjustment to the rear camber to bring reduce a lot of the negative camber that was in it, the rims went on. One that really strikes you is the solidness that you get when fitting large rims and tyres to a car of this stature. I mean when you stretch tyres on big rims too much, IMHO it looks too 'try hard'. These look like they were meant to be there...a little GT-R'ish from the rear too. You'll notice I have quickly chucked in the rear taillight to see how it looks. I was a little unsure before fitting it up that it would look cheap, nasty and common seen as quite a few people have them now, but I love it...looks factory.

- WedsSport TC105N Fitted - Rear Quarter view
- WedsSport TC105N Fitted - Side view
- WedsSport TC105N Fitted - Rear Wheel closeup
- Sillbeer wrapped up tight...night night
So, now that that little climax is over, it theoretically can roll...although I should connect up the steering rack so it can be coaxed into a particular direction now. Really need to get stuck into the engine bay, engine and gearbox now...and for those that haven't read previous posts, the engine is built, the gearbox needs doing.
Cheers
Brendan
Monday, 15 January 2007 | | Categories: Brakes, Suspension, Wheels/Tyres

The call came about 11.00am last Friday morning from Jeff Ash at C-Red to say my wheels had arrived at the workshop. Although I felt like jumping in the car and racing out there to see them, I held off and waited until Saturday morning.
And was the wait worth it...abso-freakin-lutely! For those who haven't seen previous posts, they're from Japanese manufacturer Weds Co Ltd, and are part of the WedsSport range called the TC105N (released in 2006). These rims are just gorgeous and will suit the build down to a tee. They're very race oriented, with minimal obvious dish, and a spoke the goes from the outer lip into the centre hub which is very important for me aesthetically. The colour, which is best described as Titanium Silver (TS colour code according to Weds). The sizes are as mentioned before:
Front - 18 x 9.5 +10 @ 8.0kg
Rear - 18 x 10.5 +12 @ 8.35kg
They're seriously light and very well made. Here's a selection of pics to help you get a feel for how nice these are:
- WedsSport TC105N
- WedsSport TC105N
- WedsSport TC105N (Detail 1)
- WedsSport TC105N (Detail 2)
- WedsSport TC105N (Detail 3)
Tyres have been ordered in the form of Federal 595SS in 245/40R18 for the front and 265/35R18 for the rears. May even have by weeks end.
The offsets were always going to be hard to guess, especially with such a wide car (as it is now), but we nailed it I reckon. Not that we had much choice we ordered them as big as was available. When it came time to fit them up, I was a little disappointed with the amount they say in the guards, but on closer inspection, it was more that I had not adjusted the camber arms or lower control arms as yet. Here's a couple of shots before and after the adjustment:
- Rear Wheel fitted Before Adjustment
- Rear Wheel fitted After Adjustment
The front is on and sitting out from the guards just a smidge, but again nothing has been adjusted yet and we have about 2-3mm clearance on the coilover at the moment.
- Front Wheel fitted no adjustment
And check this out, it shows how much width I really have front and rear...it just looks so brawny it's nuts! It even has glimpses of GT-R in the rear now.

While in on Saturday, by myself mind you, I managed to get the rear Brembo's fitted up. The pins and retainer clips required a bit of scrubbing with a metal brush to remove some of the baked on brake dust, along with a quick polish. The rear's now fill the rims very nicely. Will get on the fronts this week.

- Rear (R33 GT-R) Brembo Caliper
- Rear (R33 GT-R) Brembo Caliper - Top View
- Rear (R33 GT-R) Brembo Caliper - Fitted
It's been an exciting time getting the rims because it really shows we're getting close now. Just finishing off a couple of private jobs at the moment so I can purchase a few things for the interior (Dynamat, headunit and retrim) so that I have a nice comfy and relatively quiet and cool driving environment.
Until next time.
Cheers
Brendan


